C:\Users\사용자\AppData\Roaming\Subversion\auth\svn.simple 제거

반응형

[ SVN 계정/그룹 생성 및 권한 제어 ]

1. /conf/authz 파일에 아래와 같이 유저계정/그룹 추가

[users] 
userId = userPw
userId2 = userPw2
admUser = admPw1

[groups]
user = userId, userId2
adm = admUser

2. 디렉토리 별 유저계정/그룹 권한 제어

[/]
@adm = rw
* = r

[/branches/hidden]
@user = 
userId* =


[ SASL 패키지를 사용하여 암호화된 SVN 계정 생성하기 ]

1. SASL 패키지 사용 가능 여부 확인

> svnserve --version

커맨드 실행 후 제일 하단에 아래와 같은 문구가 있다면 사용 가능

Cyrus SASL authentication is available. 


2. /conf/svnserve.conf 수정

[general]
anon-access = none (true : 누구나 읽기 가능, none : 불가)
auth-access = write (인증된 사용자만 쓰기)
assword-db = passwd (사용자 계정 정보가 저장되는 파일, SASL 사용시 불필요)
authz-db = authz (사용자 계정 권한 정보가 저장되는 파일)
realm = [Repository Group Name] (저장소 별 유니크 한 값, 공백 X)

[SASL]
use-sasl = true (SASL 사용)
# min-encryption = 0# max-encryption = 256 

3. SASL 패키지 설치

> yum install sasl


4. SASL 명령어

1) 계정 생성

> saslpasswd2 [ID]@[realm]

> Password : 비밀번호입력

> Again (for verification): 비밀번호재입력


2) 계정 목록 확인

> sasldblistusers2

[ID]@[realm] : userPassword


3) 계정 삭제

> saslpasswd2 -d -u [realm] [ID]

-d 옵션은 계정 삭제


참고 :

m.blog.naver.com/matoker/30180899572


반응형

1. 이클립스를 종료

2. C:\Users\Administrator(본인계정)\AppData\Roaming\Subversion\auth  파일 삭제 

3. $이클립스설치경로\configuration\org.eclipse.core.runtime\keyring  파일 삭제 

4. 이클립스를 재실행 후 신규계정으로 다시 로그인


출처: https://madnix.tistory.com/entry/Eclipse-Subversion에서-SVN-로그인-정보-초기화하는-방법-Window

반응형

[SVN branch와 trunk merge 하는 방법]

1. branch 프로젝트 우클릭


2. TEAM > merge 클릭


3. Merge two different trees 선택


4. from 에 trunk repository 정보, to에 branch repository 정보 입력

* from 이 trunk, to 가 branch 라는 점을 유의

* trunk / branch 모두 commit이 되어있어야 한다.


5. Head revision을 기준으로 merge 진행


반응형

add 취소

git reset HEAD [file]

commit 취소

git reset HEAD^

commit message 변경

git commit --amend

https://gmlwjd9405.github.io/2018/05/25/git-add-cancle.html


반응형

1. git history 를 제거할 project(local repository) 최상위 경로로 이동


2. 기존 git 설정 모두 제거

rm -rf .git

3. git 새로 설정 및 commit

git init

4. .git/ 경로로 이동 후 아래와 같이 config 파일에 git 사용자 정보 추가

[core]
  repositoryformatversion = 0
  filemode = false  
  bare = false  
  logallrefupdates = true
  symlinks = false
  ignorecase = true
[remote "origin"]
  url = https://github.com/develo-pyo/boot-jpa.git
  fetch = +refs/heads/*:refs/remotes/origin/*
[branch "master"]
  remote = origin
  merge = refs/heads/master
[user]
  email = jungpyo9@gmail.com
  name = develo-pyo

5. 모든 파일을 새로 add 및 commit

git add .
git commit -m "first commit"

6. git repository 연결 및 강제 push

git remote add origin {git remote url}
git push -u --force origin master


반응형

1. git 저장소 만들기

1) git으로 관리할 (github에 올릴) 소스가 위치한 workspace 로 이동 

2) git init

※ git init 시 .git 폴더 생성되며 환경설정 (config) 파일 등이 생성됨


1-1. git 사용자 계정 정보 설정하기

> git config user.name "develo-pyo"

> git config user.email "jungpyo9@gmail.com"

.git/config 파일 직접 수정해도 된다 (참고)


2. 인덱스에 추가하기

- 추가한 파일 인덱스에 추가 : git add hellogit.java

- 제거한 파일 인덱스에 추가 : git rm hellogit.java


3. 인덱스 커밋하기

- 인덱스 커밋 : git commit -m "commit comment"


4. 원격서버 추가하기

새로운 원격서버 추가 : git remote add origin "https://github.com/develo-pyo/~.git"

이때 git repository 주소는

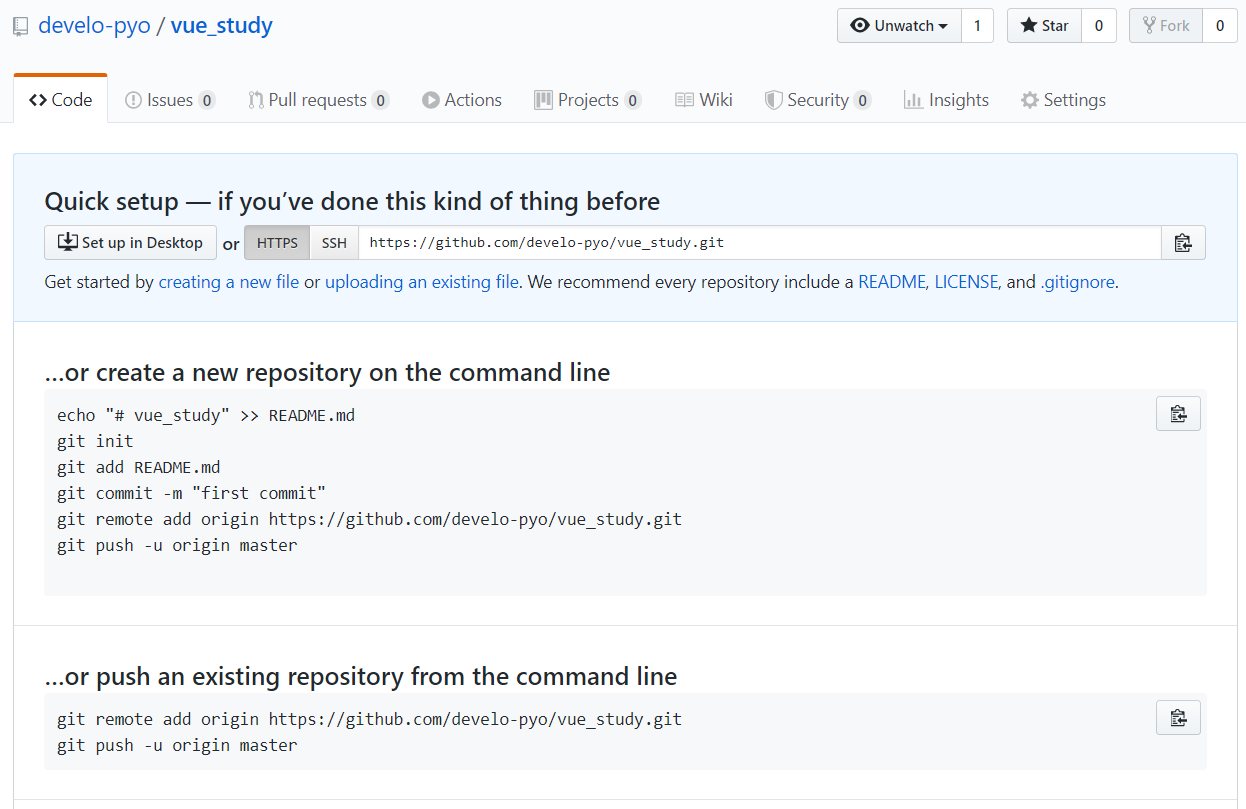
git hub 접속 > git repository new > 프로젝트명(경로) 작성시 나타나는 아래 화면에서 확인할 수 있다.


5. 원격서버에 푸시하기

- 마스터에 푸시 : git push origin master


참고 : https://rogerdudler.github.io/git-guide/index.ko.html


반응형


https://m.blog.naver.com/CommentList.nhn?blogId=sim4858&logNo=220924984480


반응형

github repository를 생성한 후, 매일 공부한 내용 중 일부를 커밋하고 있다.

1년 뒤 초록색으로 가득한 contribution chart를 기대하며 1일 1커밋을 실천하였으나, 

커밋을 아무리 해도 차트 셀의 색이 바뀌질 않았다.


github 사이트 내에서 레파지토리를 생성한다거나 커밋한 파일을 직접 삭제하면 색이 바뀌는데,

eclipse 에서 commit/push 할 경우 commit 기록엔 남게되나 차트 셀의 색이 바뀌지 않았다.

(혹시 몰라 sourcetree 도 사용해 보았지만 똑같았다)


위 이미지에서 Learn how we count contributions 링크를 통해 확인한 github 의 커밋(푸시)집계기준을 확인했으나 도저히 문제 파악이 되지 않았다.


문제는 로컬 git config 설정에 있었다.

.git/config 파일에 아래와 같이 본인이 사용중인 github 사용자 이름, email 정보를 넣어주자.

[git bash 를 사용하지 않는 경우]

[user]
name = develo-pyo
email = jungpyo9@gmail.com

[git bash 사용시]

1) repository 디렉토리로 이동

2)

>git config user.name "develo-pyo"

>git config user.email "jungpyo9@gmail.com"

혹은

>git config --global user.name "develo-pyo"

>git config --global user.email "jungpyo9@gmail.com"

※ repository 별 유저명, 메일주소 설정이 글로벌 유저명, 메일주소 설정보다 우선시 된다.


※ config 파일

  • /etc/gitconfig 파일: 시스템의 모든 사용자와 모든 저장소에 적용되는 설정이다. git config --system 옵션으로 이 파일을 읽고 쓸 수 있다. (git config --list 로 설정된 config 읽기 가능)
  • ~/.gitconfig 파일: 특정 사용자에게만 적용되는 설정이다. git config --global 옵션으로 이 파일을 읽고 쓸 수 있다.
  • .git/config: 이 파일은 Git 디렉토리에 있고 특정 저장소(혹은 현재 작업 중인 프로젝트)에만 적용된다. 각 설정은 역순으로 우선시 된다. 그래서 .git/config가 /etc/gitconfig보다 우선한다.

eclipse/sts git plugin 및 sourcetree 로 github 사용시 .git/config 파일만 생성되는 듯 하다.


참고 : https://alvinalexander.com/git/git-show-change-username-email-address

참고 : https://confluence.atlassian.com/bitbucket/configure-your-dvcs-username-for-commits-950301867.html
 

반응형

Q. 소스 충돌이 나서 Override and Commit 을 해야하는 상황인데, Override and Commit 이 없다?!

A. Mark as Merged 후 Commit 하면 된다.. 


https://stackoverflow.com/questions/1768691/subclipse-override-and-commit


반응형

+ Recent posts