Amazon MemoryDB for Redis 는 OpenSource 인 Redis 를 Amazon 클라우드 컴퓨팅 자원을 사용해 AWS 에서 지원하는 것으로, Redis 와 거의 모든 면에서 동일합니다.

다만 AWS Redis 를 사용할 경우, Redis 서버를 직접 구축하는 것 보다 Performance와 Durability 면에서 이점을 가지며, 설정이 편리한 장점이 있습니다.

이 글에선 Redis의 Persistence(영속성)/Durability(내구성) 측면을 중점적으로 다뤄보겠습니다.


[ Redis RDB vs AOF  ] 

메모리는 휘발성이므로 memory DB 인 Redis 프로세스를 종료하게 되면 데이터가 모두 유실됩니다.

따라서 단순 캐시용도가 아닌 Persistence 한 DB로 활용하기 위해서는 데이터를 Disk 에 저장하여 데이터 유실이 발생하지 않도록 해야합니다.

이를 위해 Redis 엔 RDB(snapshot) 와 AOF(Append Only File) 기능이 존재합니다.


1. RDB

  • RDB 는 memory snapshot 파일의 확장자인 .rdb 를 의미
  • 특정 시점/간격 마다 메모리의 전체 데이터를 디스크에 바이너리 파일로 저장(snapshot)하는 방식
  • 특정 시점마다 백업을 받을 때 사용
  • AOF 파일보다 사이즈가 작다는 특징이 있고 사이즈가 작으므로 로딩 속도도 AOF 보다 빠른 장점이 있습니다.
  • RDB 관련주요 redis.conf 파라미터
dbfilename $rdbTargetFileName RDB 파일명 지정 
save $duration $cnt  특정시간(duration)동안 특정횟수(cnt) 이상 key 변경이 발생하면 저장 (eg: save 300 10 : 300초 동안 10번 이상 key 변경 발생시 저장)
stop-writes-on-bgsave-error $yesOrNo RDB 파일을 디스크에 저장하다 실패하면 save 이벤트를 거부할지에 대한 파라미터(yes 일 경우 RDB 저장 실패시 쓰기 요청 거부)
rdbcompression $yesOrNo RDB 파일을 쓸 때 압축 여부
  • RDB 방식의 문제점
    Redis 장애 발생시 .rdb 백업 시점 이후에 발생한 데이터는 유실됨
# .rdb 데이터 유실 예시
> SET key val
> SET key1 val1
> SAVE
> SET key val2 #SAVE 이후로 데이터 유실
> SET key1 val3 #SAVE 이후로 데이터 유실


2. AOF

  • Append Only File 이라는 의미에서 알 수 있듯이 .aof 파일에 모든 쓰기 명령을 기록 (조회는 제외)
  • redis client 가 redis 에 쓰기 명령을 요청하면 Redis 는 해당 명령을 .aof 파일(디스크)에 저장한 후, 해당 명령을 수행하는 방식으로 RDB 방식과 달리 특정 시점이 아닌 항상 현재 시점까지의 로그를 기록
  • CUD 를 계속 append 하며 기록하게 되므로 파일 크기가 계속 커지게 되는데, Rewrite 를 하게 되면 최종 데이터만 기록되어 파일 크기가 작아진다
# 기존 appendonly.aof 파일 예시
SET key value
SET key value2
SET key value3
SET key value4

# AOF REWRITE 실행 후 appendonly.aof 파일
SET key value4 # 최종 데이터인 key value4 만 남게된다


  • AOF 관련 주요 redis.conf 파라미터
appendfilename $aofTargetFileName  AOF 파일명 지정
appendfsync $everysec  AOF 기록되는 시점 지정
  • always : 모든 명령 시행마다 기록
  • everysec : 1초마다 AOF 에 기록(권장)
  • no : 기록 시점을 OS 가 저장
auto-aof-rewrite-min-size $size  AOF 파일 사이즈가 64mb 이하면 rewrite 를 하지 않음(rewrite 를 자주 하는 것을 방지)
auto-aof-rewrite-percentage $percentage AOF 파일 사이즈가 rewrite 되는 파일 사이즈 기준으로, redis 서버가 시작할 시점의 AOF 파일 사이즈를 기준으로 함 (만약 redis 서버 시작시 AOF 파일 사이즈가 0 이라면 rewrite를 하지 않음)


  • AOF 를 사용한 복구 예시 
    .aof 파일에서 문제가 되는 명령어를 수정/제거한 후 redis 서버를 재시작하면 데이터 손실없이 DB를 살릴 수 있다
# .aof 를 사용한 복구 예시
*1
$8
flushall #문제가 되는 해당 명령어 삭제 후 저장
  • AOF 방식의 문제점
    모든 쓰기 기록이 남아있는 파일이므로 RDB 방식에 비해 백업 데이터 크기가 크고, 모든 라인이 한 줄 씩 재수행 되므로 서버자원을 많이 사용


[ RDB vs AOF 무엇을 써야하는가? ]

특정 시점을 기준으로 메모리 DB의 데이터를 백업하는 snapshot 방식의 RDB 방식과

조회 명령을 제외한 모든 쓰기 명령을 기록하는 AOF 방식은

각각의 장단점이 명확하므로 AOF 를 default로 사용하고 RDB 를 optional로 사용하는 방식으로 둘을 조합하여 사용합니다.

→ 서버가 실행될 때 백업된 .rdb 를 reload 하여 복구하고, snapshot 시점과 shutdown 사이의 데이터만 AOF 로그로 복구하여 서버 재기동 시간과 서버자원을 절약


그렇다면 RDB 와 AOF 방식을 통해 memory DB 인 Redis 를 Persistence 하게 사용 할 수 있을까요?

모든 쓰기 명령을 로그로 기록하는 AOF 방식도 아래와 같은 데이터 손실 가능성이 있다고 합니다.

아래는 AWS memoryDB 관련 가이드 발췌 글입니다. (출처: https://aws.amazon.com/ko/memorydb/faqs/)

How is MemoryDB’s durability functionality different from open source Redis’ append-only file (AOF)?
MemoryDB leverages a distributed transactional log to durably store data. By storing data across multiple AZs, MemoryDB has fast database recovery and restart. Also, MemoryDB offers eventual consistency for replica nodes and consistent reads on primary nodes.
Open source Redis includes an optional append-only file (AOF) feature, which persists data in a file on a primary node’s disk for durability. However, because AOF stores data locally on primary nodes in a single availability zone, there are risks for data loss. Also, in the event of a node failure, there are risks of consistency issues with replicas.

How does MemoryDB durably store my data?
MemoryDB stores your entire data set in memory and uses a distributed Multi-AZ transactional log to provide data durability, consistency, and recoverability. By storing data across multiple AZs, MemoryDB has fast database recovery and restart. By also storing the data in-memory, MemoryDB can deliver ultra-fast performance and high throughput.

위 글에서 알 수 있듯이 Redis AOF는 .aof 파일을 마스터 노드 디스크(싱글 AZ라 할 수 있는)에만 저장하여 데이터 loss risk가 있으며 노드 장애시 슬레이브 노드와 데이터 일관성 문제가 있을 수 있다고 합니다.

AWS memoryDB for Redis 는 모든 메모리 데이터를 분산된 multi AZ 에 transaction log 로 기록하여 durability 와 마스터 노드 ↔ 슬레이브 노드간의 데이터 일관성을 보장한다고 합니다.


아래는 Redis 와 AWS MemoryDB for Redis 의 차이를 정리한 차트입니다.


RedisAWS MemoryDB for RedisRedisAWS MemoryDB for Redis 
내구성(Durability) AOF, RDB 로 내구성 처리 Transaction log 까지 작성 후 응답하여 데이터 무손실 가능
성능 12만/sec read : 마이크로초
write : ms (한자리 milisecond)
Cluster mode Cluster mode 선택적 운영 Cluster mode 활성화 필수
접속 redis-cli 사용하여 접속
백업 특정 시점 RDB 백업
AOF 로 모든 CUD DML 저장
24시간 동안 20개 까지 스냅샷 생성 제한
해당 Region 에서 수동 스냅샷 보유 개수 제한 없음
복구 RDB 시점 복원
AOF 사용시 원하는 명령까지 복원
RDB 스냅샷 복원
특점시점 복원은 불가
Transaction log 사용하여 장애 최종 복구 가능
고가용성(HA) replica
shard 구성
replica node 의 복제가 실패할 경우
  • 실패 노드를 감지하여 오프라인 전환 및 동일 AZ에 교체노드 실행하여 동기화 진행
MemoryDB MultiAZ primary 장애
  • MemoryDB 에서 Primary 오류 감지하면, replica node들 중 primary 정합성 체크 후 primary 승격 후 다른 AZ에 있는 primary spin up 이후 동기화 진행
복제 replica 구성
  • async 복제
    • rdb로 먼저 전체 복제
    • 복제 버퍼 내용 복제
transaction lop 를 사용하는 async 복제
transaction log 에 저장(영구저장) 하므로 데이터 손실 위험 없음


참고 :

https://redis.io/docs/management/persistence/

https://docs.aws.amazon.com/memorydb/latest/devguide/what-is-memorydb-for-redis.html

https://aws.amazon.com/ko/memorydb/faqs/

https://hyunki1019.tistory.com/169

https://rmcodestar.github.io/redis/2018/12/10/redis-persistence/

https://www.youtube.com/watch?v=Jbq_XZMZEKY

반응형

'infra & cloud > AWS' 카테고리의 다른 글

[AWS] EC2 ssh 접속 및 bastion rsa 설정  (0) 2022.12.01
[AWS] VPC 구성  (0) 2022.12.01
[SSH] RSA 공유키 충돌 문제  (0) 2022.12.01
[AWS] SSO : Single Sign-On  (0) 2022.05.26
[AWS] 20-4. Resource Access Manager  (0) 2022.05.26

[ Login Shell vs Non-login Shell ]

Login Shell : 계정/암호를 입력하여 Shell 실행하는 것. ex) ssh 로그인 / GUI에서 로그인

Non-login Shell : 로그인 없이 실행되는 Shell. ex) ssh 접속 후 bash 를 다시 실행하는 경우, GUI에서 터미널을 띄운 경우 sudo su 로 계정 변경하는 경우


[ 파일 로드 순서 ]

1. /etc/profile

: /etc/profile.d 디렉토리 안의 모든 쉘 스크립트 실행시킴. /etc/profile.d 엔 vim, qt, lang 등 다양한 설정이 sh 파일 형태로 존재. 쉘에 로그인하면 일단 이 sh 파일을 모두 실행시키는 것.

2. ~/.bash_profile or ~/.profile

: 계정 디렉토리에 있는 .bash_profile or .profile 로드. 이 파일들은 계정에 종속적이기 때문에 계정 디렉토리에 존재하므로 ~/.bash_profile or ~/.profile 파일을 로드하게 되는 것. PATH 같은 환경변수를 설정할 때 이 파일을 수정하는 이유가 여기에 있다.

3. ~/.bashrc

: 계정 디렉토리에 있는 .bashrc 파일 로드. 이 파일은 로그인과 상관없이 bash 콘솔을 새롭게 열 때 실행됨. 파일 안에는 아래와 같은 구문이 있는데, /etc/bashrc 파일을 실행하라는 뜻.

if [ -f /etc/bashrc ]; then
    . /etc/bashrc
fi

4. /etc/bashrc

마지막으로 /etc/bashrc 파일 실행. 이 파일도 /etc/profile 과 마찬가지로 계정과 상관없이 전역적으로 영향을 미침.


[ /etc/profile , /etc/bashrc ]

이 파일들은 계정과 상관없이 전역적 설정


[ ~/.profile, ~/.bashrc ]

계정 디렉터리로 가면 .bashrc와 .bash_profile or .profile이라는 2개이 파일이 있다.

.bash_profile이란 bash로 로그인 할 때만 로드된다.

반면 .profile은 bash와 상관없이 로그인 하면 로드된다.

두 개 중 하나만 로드되며 bash로 로그인하면 .bash_profile만, bash 외 쉘로 로그인하면 .profile만 로드된다.

이 파일들은 공통적으로 환경변수를 세팅할 때 사용하고, 차이점은 실행되는 시점이 다르다는 것이다


1) .profile : 로그인 되는 시점에 실행 (Login Shell). bash와 상관 없는 것들을 넣는다.
2) .bash_profile : Bash로 로그인 되는 시점에 실행 (Login Shell).
3) .bashrc : 새로운 콘솔을 열 때 실행 (Non-login Shell). 로그인 없이 Bash가 실행될 때 로드된다. bash 쉘이 아닌 경우 각 쉘에 맞는 cshrc, tcshrc, kshrc 파일 등이 동일한 역할을 한다.


[ 환경변수 설정 ]

전역 파일 설정 :

환경설정은 /etc/profile에, 기타 함수나 alias 설정은 /etc/bashrc에..


/etc/profile : 

# System wide environment and startup programs, for login setup
# Functions and aliases go in /etc/bashrc

/etc/bashrc :

# System wide functions and aliases
# Environment stuff goes in /etc/profile


[ 사용자 계정 파일 설정 ]

사용자 디렉터리에 있는 .bash_profile 또는 .profile  .bashrc 가 위의 전역 파일들에 대응된다고 볼 수 있다. 다만 로드 순서는 전역 파일이 먼저고 사용자 파일이 그 다음이다. 두 파일에서 중복되지 않는 내용들은 둘 다 적용된다고 볼 수 있다. 하지만 만약 내용이 중복된다면 사용자 계정 파일의 내용이 우선된다.


가급적 사용자 계정 디렉터리에 있는 환경설정 파일을 수정하고, 전역 설정을 변경해야 하는 경우에도 직접 전역 파일을 건드리지 말고 사용자 계정의 환경설정 파일 내에서 연속성을 유지할 수 있도록 수정해야 한다.

ex)  PATH를 수정해야 하는 상황에 놓였을 때, /etc/profile 를 직접 수정하는 것이 아니라 ~/.profile을 아래와 같이 전역 설정을 기반으로 연속적으로 수정한다.

/etc/profile

PATH="/usr/local/sbin:/usr/local/bin:/usr/sbin:/usr/bin:/sbin:/bin"

~/.profile

PATH="$PATH:/usr/home/test"


https://projooni.tistory.com/entry/bashrc-%EC%99%80-profile-%EC%B0%A8%EC%9D%B4%EC%99%80-%EC%9E%91%EB%8F%99%EC%9B%90%EB%A6%AC


반응형

1. aws 에서 생성한 키페어를 사용하여 외부 접근이 허용된 서버 (ex: 0.0.0.0/0 에 대한 인바운드 허용 Security Group 사용중인 bastion 서버) 에 접속

ssh -i key.pem ubuntu@bastion서버publicIP


2. aws 에서 생성한 키페어 를 home 디렉토리에 key.pem 생성

sudo vi key.pem


3. bastion 서버에서 내부망 서버 접속

ssh -i key.pem ubuntu@내부망ip


[ 보다 쉽게 접속을 위한 ssh rsa 공유키/개인키 설정하기 ]

1) bastion 서버에서 공개키 생성

ssh-keygen -t rsa

2) bastion 에서 접속할 내부망 서버에 접속하여 공개키 추가 (공백 라인 추가 후 1)번의 bastion 서버 공개키 붙여넣기)

vi ~/.ssh/authorized_keys

3) 접속

ssh ubuntu@내부망서버IP

※ bastion 서버 /etc/hosts 에 내부망서버IP 를 등록 후 alias 사용하여 접속 가능

vi /etc/hosts
192.168.52.129 db

설정 후 접속

ssh db


https://johncom.tistory.com/42


반응형

'infra & cloud > AWS' 카테고리의 다른 글

AWS MemoryDB for Redis 영속성과 내구성  (0) 2023.03.31
[AWS] VPC 구성  (0) 2022.12.01
[SSH] RSA 공유키 충돌 문제  (0) 2022.12.01
[AWS] SSO : Single Sign-On  (0) 2022.05.26
[AWS] 20-4. Resource Access Manager  (0) 2022.05.26

1. VPC 생성

- ex) 192.168.52.0/24 생성


2. 서브넷 생성

- 할당할 IP 갯수를 고려하여 구성

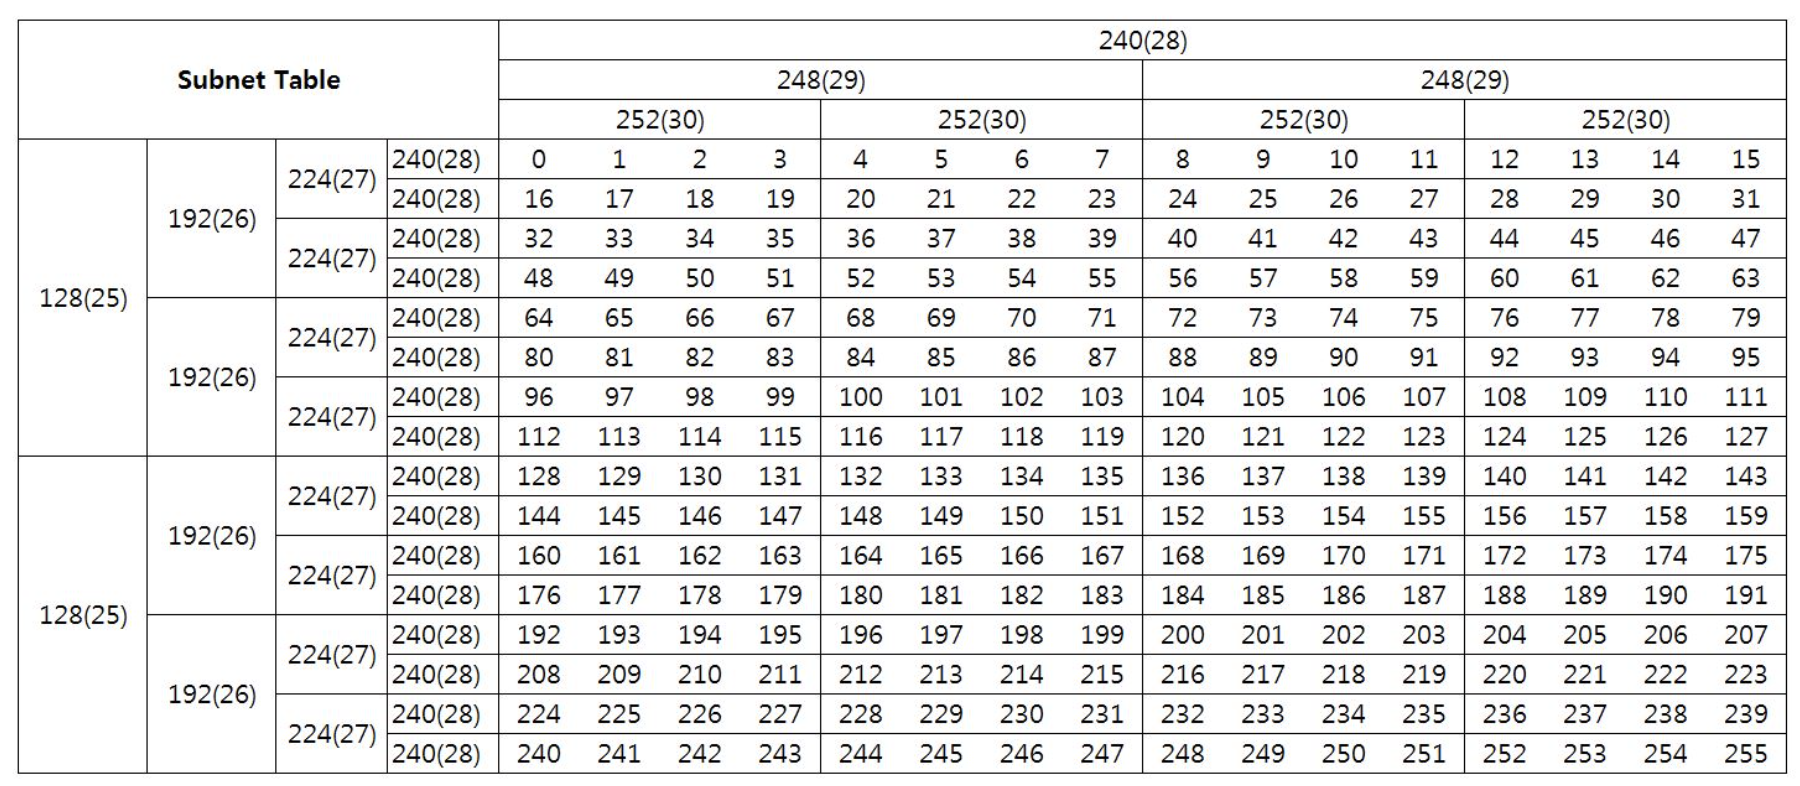
※ 서브넷마스크 테이블 

ex)

192.168.52.0/26 : 192.168.52.0 ~ 192.168.52.63 (64개 할당) - 서비스 외부망

192.168.52.64/26 : 192.168.52.64 ~ 192.168.52.127 (64개 할당) - 서비스 외부망

192.168.52.128/27 : 192.168.52.128 ~ 192.168.52.159 (32개 할당) - DB 내부망

192.168.52.160/27 : 192.168.52.160 ~ 192.168.52.191 (32개 할당) - bastion 외부망


3. Internet Gateway 생성 

- 서버와 인터넷망 연결에 필요. VPC 생성시 자동 생성


* Nat Gateway 생성

내부망서버가 인터넷 망으로 나가기 위해 Nat Gateway 필요 (eg: nat gw 없인 내부망 DB 서버에서 yum install mysql 불가)

라우팅 테이블에 0.0.0.0/0 nat gateway 지정 필요


4. Route Table 생성

1) 내부망 subnet (ex: DB) : 내부ip 대역 로컬 대상 설정

2) 외부망 subnet (ex: bastion) : 내부ip 대역 로컬 대상,

                                                     0.0.0.0/0 인터넷게이트웨이 설정


5. Security Group 설정

bastion 서버 inbound : 내공인IP 22번 port 허용

내부망서버(DB) inbound : DB port (3306)

                                          bastion서버 SG

외부망서버(웹서버) inbound : 서비스 port (ex: 8080, 443, 80) 

                                                bastion서버 SG 


6. EC2 생성

1~5 설정한 정보 기준으로 생성

※ AZ(Availability Zone) 은 이중화 구조에선 DR등을 고려하여 #1과 #2를 각각 다르게 설정


[ bastion (배스천) 서버란? ]

내부와 외부 네트워크 사이에서 내부망을 보호하기 위한 게이트웨이 역할을 수행하는 호스트서버

bastion 서버의 inbound 를 특정 ip(ex: 내 공인IP) 로 security group 을 설정해주고,

내부 서버의 inbound 설정은 22번 port 를 bastion 서버에게만 허용하여

bastion 서버에 보안을 집중.


https://www.youtube.com/watch?v=lqnncuQgz28&t=800s


반응형

[현상]

공개키와 개인키를 사용하여 서버 접속 시도시 하기와 같은 에러가 발생할 경우.

ubuntu@ip-192-168-52-177:~$ ssh ubuntu@db
@@@@@@@@@@@@@@@@@@@@@@@@@@@@@@@@@@@@@@@@@@@@@@@@@@@@@@@@@@@
@       WARNING: POSSIBLE DNS SPOOFING DETECTED!          @
@@@@@@@@@@@@@@@@@@@@@@@@@@@@@@@@@@@@@@@@@@@@@@@@@@@@@@@@@@@
The ECDSA host key for db has changed,
and the key for the corresponding IP address 192.168.52.148
is unknown. This could either mean that
DNS SPOOFING is happening or the IP address for the host
and its host key have changed at the same time.
@@@@@@@@@@@@@@@@@@@@@@@@@@@@@@@@@@@@@@@@@@@@@@@@@@@@@@@@@@@
@    WARNING: REMOTE HOST IDENTIFICATION HAS CHANGED!     @
@@@@@@@@@@@@@@@@@@@@@@@@@@@@@@@@@@@@@@@@@@@@@@@@@@@@@@@@@@@
IT IS POSSIBLE THAT SOMEONE IS DOING SOMETHING NASTY!
Someone could be eavesdropping on you right now (man-in-the-middle attack)!
It is also possible that a host key has just been changed.
The fingerprint for the ECDSA key sent by the remote host is
SHA256:e0+0wN11IMq46zRTMCLGotYpg3hm/oPWUAbPF1K72Zk.
Please contact your system administrator.
Add correct host key in /home/ubuntu/.ssh/known_hosts to get rid of this message.
Offending ECDSA key in /home/ubuntu/.ssh/known_hosts:4
  remove with:
  ssh-keygen -f "/home/ubuntu/.ssh/known_hosts" -R "db"
ECDSA host key for db has changed and you have requested strict checking.
Host key verification failed.


[원인]

기존에 접속한 적이 있는 서버와 RSA 공유키를 교환한 상태에서 서버가 바뀌었기 때문에 발생. 기존 서버 정보를 찾아갔으나 다른 서버로 접속된, man-in-the-middle attack(중간자 공격)으로 감지된 상황.

(ex: /etc/hosts 의 ip alias 에서 ip 정보가 바뀐 경우 발생 192.168.52.148 db 와 같이 로컬에 호스트정보가 있었으나, 접속한 이력이 있던 상태에서 로컬 hosts 설정의 ip를 바꾼경우 발생)


[해결]

하기와 같이 alias 혹은 ip 에 대한 인증키 제거

> ssh-keygen -R ip


https://cpuu.postype.com/post/30065


반응형

'infra & cloud > AWS' 카테고리의 다른 글

[AWS] EC2 ssh 접속 및 bastion rsa 설정  (0) 2022.12.01
[AWS] VPC 구성  (0) 2022.12.01
[AWS] SSO : Single Sign-On  (0) 2022.05.26
[AWS] 20-4. Resource Access Manager  (0) 2022.05.26
[AWS] 20-3. AWS IAM Advanced, IAM Policy Evaluation Logic  (0) 2022.05.25

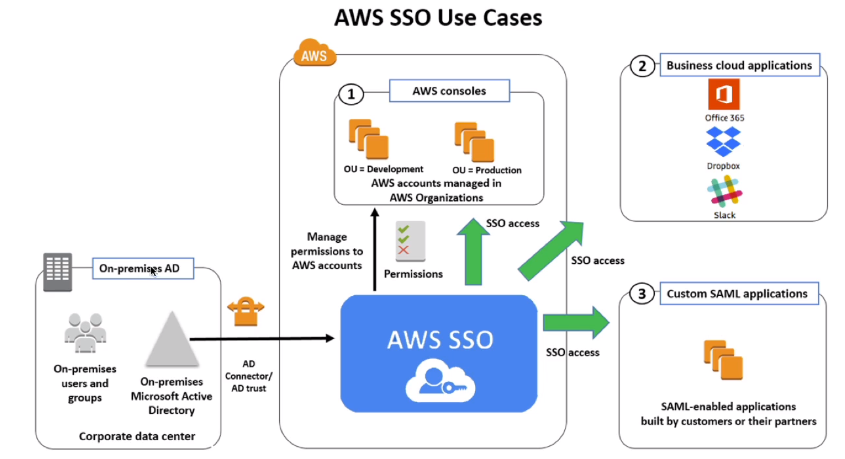
[ AWS SSO ]

- Centrally manage Single Sign-On to access multiple accounts and 3rd party business applications

- Integrated with AWS Organizations

- Supports SAML 2.0 markup

- Integration with on-premis Active Directory

- Centralized permission management

- Centralized auditing with CloudTrail


[ SSO vs AssumeRoleWithSAML ]


반응형

[ AWS Resource Access Manager (RAM) ]

자신의 AWS 리소스를 타 AWS 계정과 공유

리소스 중복 생성 막을 수 있음

VPC Subnets/AWS Transit Gateway/Route 53 Resolver Rules/License Manager Configurations 등 공유 가능

- Share AWS resources that you own with other AWS accounts

- Share with any account or within your Organization

- Avoid resource duplication!

- VPC Subnets:

  -- allow to have all the resources launched in the same subnets

  -- must be from the same AWS Organizations

  -- Cannot share security groups and default VPC

  -- Participants can manage their own resources in there

  -- Participants can't view, modify, delete resources that belong to other participants or the owner

- AWS Transit Gateway

- Route53 Resolver Rules

- License Manager Configurations

* VPC : Virtual Private Cloud


[ Resource Access Manager - VPC example ]

각각의 계정은 다른 계정의 리소스를 읽고쓰고지우는 행위를 할 수 없음

네트워크가 공유되기 때문에 resource 간의 통신이 가능, 이때 private IP 사용.

Each account is responsible for its own resources.

Each account cannot view, modify/delete other resources in other accounts.

Network is shared so, anything deployed in the VPC can talk to other resources in the VPC.

Applications are accessed easily across accounts, using private IP.

Security groups from other accounts can be referenced for maximum security


반응형

[ IAM Conditions ]

명시한 두 아이피 대역을 제외한 모든 클라이언트 호출을 제한함

Deny everything(*) 

aws:SourceIP: restrict the client IP from which the API calls are being made


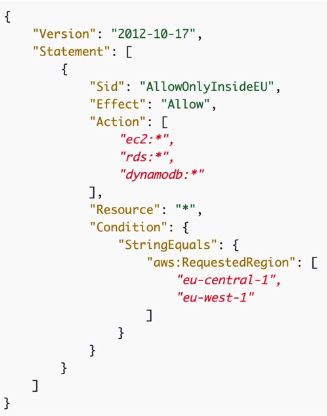
명시한 두개의 region 에게 ec2/rds/dynamodb 의 모든 액션을 허용

aws:RequestedRegion: restrict the region The API calls are made to


restrict based on tags


force MFA


[ IAM for S3 ]

ListBucket permission applies to 

arn:aws:s3:::test

=> bucket level permission


GetObject, PutObject, DeleteObject applies to

arn:aws:s3:::test/*


[ IAM Roles vs Resource Based Policies ]

Attach a policy to a resource (ex: S3 bucket policy) vs attaching of a using a role as a proxy

way1. Account A 가 Account B 의 S3 를 사용하려면 STS 를 사용하여 role assume 후 Account B 의 S3 접근

=> When you assume a role (user, application or service), you give up your original permissions and take the permissions assigned to the role

way2. S3 bucket policy 생성 후 Account A 의 액세스를 허용.

=> When using a resource based policy, the principal doesn't have to give up his permissions


way1의 role assume 을 사용할 때의 문제점 :

Account A 의 DynamoDB 테이블 스캔 후 타계정의 S3 bucket 에 저장할 때 Account B의 권한만 갖게 되므로 Account A 의 권한이 없어짐. 이와 같은 경우 Resource Based policy 를 사용해야함.

ex: User in account A needs to scan a DynamoDB table in Account A and dump it in an S3 bucket in AccountB

Resource Based policy Supported by : Amazon S3 buckets, SNS topics, SQS queues


[ IAM Permission Boundaries ]

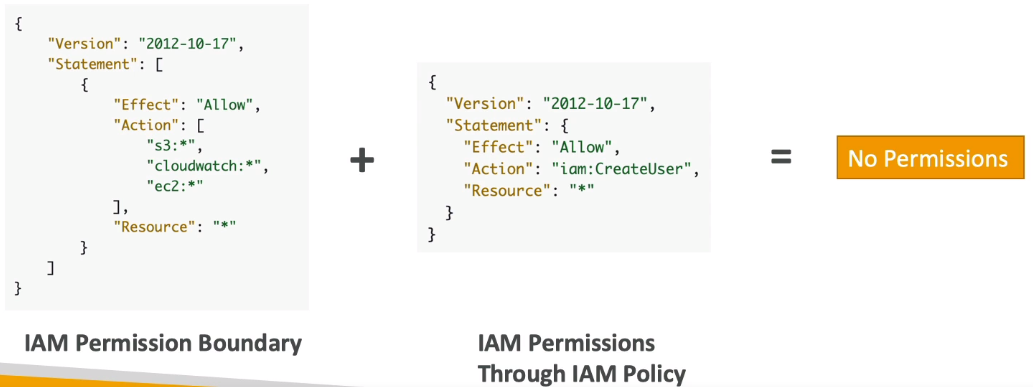
IAM Permission Boundaries are supported for users, groups and roles

Advanced feature to use a managed policy to set the maximum permissions and IAM entity can get

IAM Policy 로 유저생성 권한을 주었지만 IAM Permission Boundary 로 S3, cloudwatch, ec2 에 대한 권한만 주었기 때문에 실제론 아무 권한이 없음.

=> IAM Policy 로 권한을 부여해도 IAM Permission Boundary 가 우선적으로 권한을 제어


[ IAM Permission Boundaries ] 

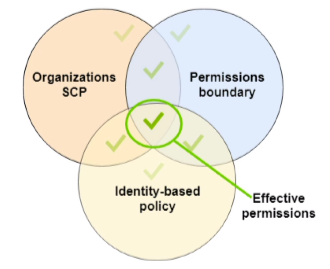
Can be used in combinations of AWS Organizations SCP

Organizagions SCP , Permissions boundary, Identity-based policy 를 조합하여 효율적인 권한제어 가능

특정 유저에게만 권한 제어 가능, 개발자들이 스스로 admin 권한을 주는 것을 막을 수 있음.. 등등

1. Delegate responsibilities to non administrators within their permission boundaries, for example create new IAM users

2. Allow developers to self-assign policies and manage their own permissions, while making sure they can't escalate their privileges (make themselves admin)

3. Useful to restrict one specific user (instead of a whole account using Organizations & SCP)


[ IAM Policy Evaluation Logic ]


[ Example IAM Policy ]

1.sqs:CreateQueue 권한 없음 : sqs:* 가 Deny 

2.sqs:DeleteQueue 권한 없음 : Deny on sqs:* 이로 다른블럭에 allow 로 명시되어 있어도 Deny.

3.ec2:DescribeInstance 권한 없음 : EC2에 대해 Allow 명시되어 있지 않으므로 (no explicit Allow) EC2 에 대한 권한 없음.


반응형

'infra & cloud > AWS' 카테고리의 다른 글

[AWS] SSO : Single Sign-On  (0) 2022.05.26
[AWS] 20-4. Resource Access Manager  (0) 2022.05.26
[AWS] 20-2. AWS AD (Active Directory), Organizations, OU  (0) 2022.05.24
[AWS] 20-1. AWS STS, Identity Federation  (0) 2022.05.24
AWS saml  (0) 2022.05.19

What is Microsoft Active Directory (AD)?

사용자가 공유된 자원의 위치와 해당 서버의 로컬 사용자 계정을 모두 알고있지 않아도 중앙에서 Admin 이 사용자 인증 및 권한 부여 처리가 가능하도록 하여 기업내 자원 및 권한 관리에 사용.

Windows 환경에서 사용하기 위해 개발된 LDAP 디렉토리 서비스

- Found on any Windows Server with AD Domain Services

- Database of objects : User Accounts, Computers, Printers, File Shares, Security Groups

- Centralized security management, create account, assign permissions

- Objects are organized in trees

- A group of trees is a forest

* AD(Active Directory) : https://mpain.tistory.com/153

* LDAP : https://yongho1037.tistory.com/796


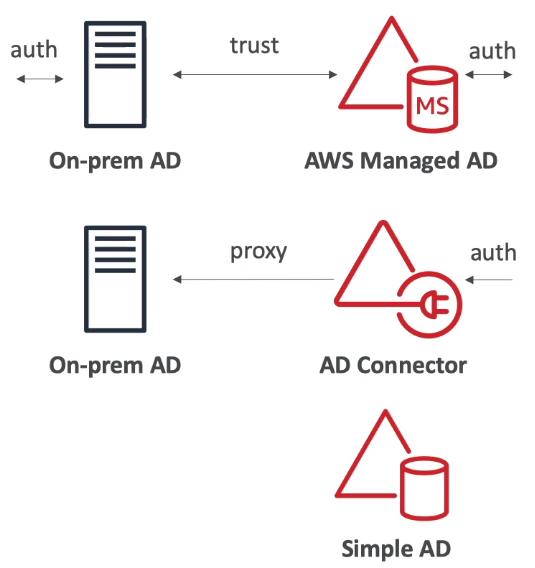
[ AWS Directory Services ] 

- AWS Managed Microsoft AD

  Create your own AD in AWS, managed users locally, supports MFA

  Establish "trust" connections with your on-premise AD

- AD Connector

  Directory Gateway (proxy) to redirect to on-premise AD, supports MFA

  Users are managed on the on-premise AD

- Simple AD

  AD-compatible managed directory on AWS

  Cannot be joined with on-premise AD


[ AWS Organizations ]

- Global sevice

- Allows to manage multiple AWS accounts

- The main account is the master account - you cannot change it

- Other accounts are member accounts

- Member accounts can only be part of one organization

- Consolidated(병합된) Billing across all accounts - single payment method

- Pricing benefits from aggregated usage (volume discount for EC2, S3..)

- API is available to automate AWS account creation


[ Multi Account Strategies ] 

- Create accounts per department, per cost center, per dev/test/prod, based on regulatory restrictions (using SCP), for better resource isolation (ex:VPC), to have separate per-account service limits, isolated account for logging

- Multi Account vs One Account Multi VPC

- Use tagging standards for billing purposes

- Enable CloudTrail on all accounts, send logs to central S3 account

- Send CloudWatch Logs to central logging account

- Establish Cross Account Roles for Admin purposes


[ Organizational Units (OU) - Examples ] 


[ Service Control Policies (SCP) ]

IAM 작업에 대한 화이트/블랙 리스트

OU 혹은 계정에 적용

마스터 계정엔 적용되지 않음

ROOT 를 포함한 모든 계정 및 Role 에 적용

service-linked role 엔 적용되지 않음

SCP 는 명시적 허용이 있어야함 (default 는 모든 권한이 없음)

특정 서비스에 대한 액세스 제한 등 권한 제한용으로 사용 가능

- Whitelist or blacklist IAM actions

- Applied at the OU or Account level

- Does not apply to the Master Account

- SCP is applied to all the Users and Roles of the Account, including ROOT

- The SCP does not affect service-linked roles

  Service-linked roles enable other AWS services to integrate with AWS Organizations and can't be restricted by SCPs

- SCP must have an explicit Allow (does not allow anything by default)

- Use cases :

  Restrict access to certain services (for example : can't use EMR)

  Enforce PCI compliance by explicitly disabling services


[ SCP - Hierarchy ]

하위 계층의 OU는 상위 계층의 OU 의 Access/Deny 정책을 따름

ex: Account B 는 Lambda와 Redshift 액세스 불가, Account A 는 Redshift 액세스 불가


[ AWS Organization - Moving Accounts ]

다른 organization 으로 계정 옮길 땐 asis organization 에서 계정 제거 후 tobe organization 에 초대 및 초대 수락하여 옮김


반응형

[ AWS STS (Security Token Service) ]

AWS 리소스에 대한 임시 접근 권한 부여(임시토큰)

토큰은 최대 1시간 유효 (refresh 필요)

AssumeRole/AssumeRoleWithSAML/AssumeRoleWithWebIdentity/GetSessionToken

- Allows to grant limited and temporary access to AWS resources

- Token is valid for up to one hour (must be refreshed)

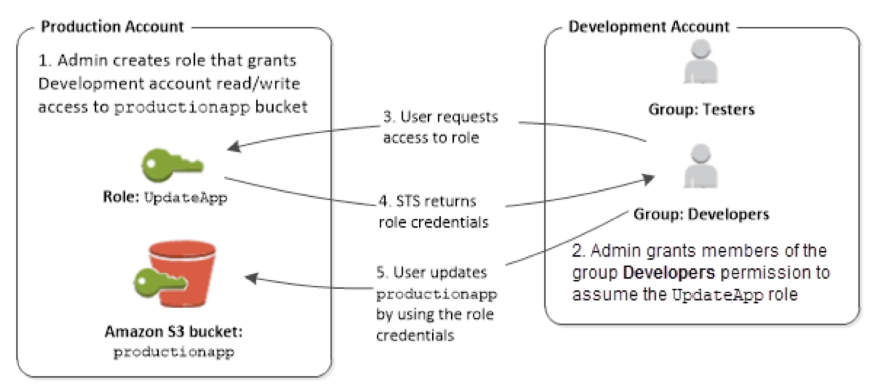
1. AssumeRole

  Within your own account: for enhanced security

  Cross Account Access : assume role in target account to perform actions there

2. AssumeRoleWithSAML

  return credentials for users logged with SAML

3. AssumeRoleWithWebIdentity

  return creds for users logged with an IDP(Identity Provider) (Facebook/Google Login..)

  AWS recommends against using this, and using Cognito instead

4. GetSessionToken

  for MFA(MultiFactorAthentication), from a user or AWS account root user


[ Using STS to Assume a Role ]

1. IAM Role 생성

2. IAM Role 에 대한 principal 생성

3. AWS STS 를 사용하여 자격 취득

4. 임시 자격은 15분에서 1시간 까지 유효

1. Define an IAM Role within your account or cross-account

2. Define which principals can access this IAM Role

3. Use AWS STS (Security Token Service) to retrieve credentials and impersonate(가장하다) the IAM Role you have access to (AsumeRole API)

4. Temporary credentials can be valid between 15 minutes to 1 hour


[ Identity Federation in AWS ]

Identity Federation 을 통해 외부 사용자가 AWS 자원에 대한 임시 접근 권한을 가질 수 있음

이를 사용하여 IAM 유저 생성 없이 AWS 접근 허용이 가능

- Federation lets users outside of AWS to assume temporary role for accessing AWS resources

- These users assume identity provided access role

- Federations can have many flavors

  -- SAML 2.0

  -- Custom Identity Broker

  -- Web Identity Federation with Amazon Cognito

  -- Web Identity Federation without Amazon Cognito

  -- Single Sign On

  -- Non-SAML with AWS Microsoft AD

- Using federation, you don't need to create IAM users (user management is outside of AWS)


[ SAML 2.0 Federation ] 

- To integrate Active Directory/ADFS with AWS (or any SAML 2.0)

- Provides access to AWS Console or CLI (through temporary creds)

- No need to create an IAM user for each of your employees

* SSO (Single Sign On) : 여러 AWS 계정 및 비지니스 앱에 대한 액세스를 중앙에서 관리 및 사용자에게 Single Sign-On 액세스 제공하여 할당된 모든 계정 및 앱을 한곳에서 액세스 가능케 하는 서비스

(AWS STS 사용하기(좌측) : https://gnidoc.tistory.com/entry/%EB%A7%A5%EC%97%90%EC%84%9C-AWS-STS-CodeCommit-%EC%82%AC%EC%9A%A9%ED%95%98%EA%B8%B0)

(SSO 사용 하기(우측 그림) : https://cloudest.tistory.com/62)


[ SAML 2.0 Federation - Active Directory FS ] 

Same process as with any SAML 2.0 compatible idp


[ SAML 2.0 Federation ]

IAM 과 SAML 간의 양방향 신뢰 설정 필요

SAML2.0 은 웹기반에서만 동작

AssumeRoleWithSAML STS API 사용

가급적 SSO 사용

- Needs to setup a trust between AWS IAM and SAML (both ways)

- SAML 2.0 enables web-based, cross domain SSO

- Uses the STS API : AssumeRoleWithSAML

- Note federation through SAML is the old way of doing things

- Amazon Single Sign On(SSO) Federation is the new managed and simpler way


[ Custom Identity Broker Application ]

SAML 2.0 사용 불가할 경우 사용

AssumeRole/GetFederation 토큰 등 STS API 사용

Use only if identity provider is not compatible with SAML 2.0

The identity broker must determine the appropriate IAM policy

Uses the STS API : AssumeRole or GetFederation Token


[ Web Identity Federation - AssumeRoleWithWebIdentity ]

Not recommended by AWS - use Cognito Instead (allows for anonymous users, data synchronization, MFA)

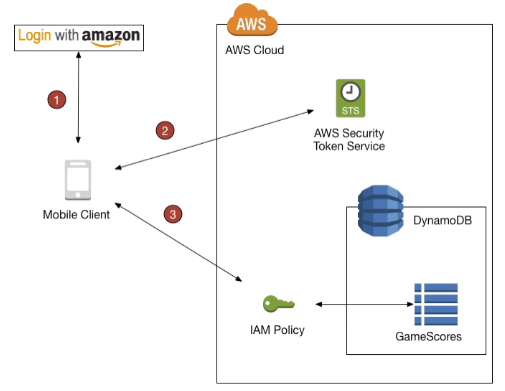
[ AWS Cognito ]

Goal :

- Provide direct access to AWS Resources from the Client Side(mobile/web app)

Example :

- provide (temporary) access to write to S3 bucket using Facebook Login

Problem :

- We don't want to create IAM users for our app users

How :

- Log in to federated identity provider - or remain anonymous

- Get temporary AWS credeantials back from the Federated Identity Pool

- These credentials come with a pre-defined IAM policy stating their permissions


반응형

+ Recent posts