Maven Build 시 test 건너뛰기 

Maven Build (install) 시 Maven Test 이후에 Build를 하게 된다.

이때 jUnit 테스트 에서 Exception 발생 및 Assert not Equal 등으로 Test가 실패할 경우 Build 는 실패 (Fail) 하게 된다.

jUnit Test 가 실패해도 Build 는 되게끔 Maven Test 단계를 건너뛰는 방법은 아래와 같다.


1. CMD 에서 빌드시

mvn install -DskipTests 


2. IDE Run configurations 에서 빌드시

1. Goals 에 다음과 같이 옵션 부여 : install -DskipTests 

2. Skip Tests 체크박스 체크 후 run

3. pom 수정 : surefire plugin 사용 (skipTests 속성 값 true/false 로 지정)

1
2
3
4
5
6
7
8
<plugin>
    <groupId>org.apache.maven.plugins</groupId>
    <artifactId>maven-surefire-plugin</artifactId>
    <version>3.0.0-M4</version>
    <configuration>
      <skipTests>true</skipTests>
    </configuration>
</plugin>
cs


surefire doc:

https://maven.apache.org/surefire/maven-surefire-plugin/examples/skipping-tests.html

반응형

1. Inter-bean reference 

@Configuration 과 함께 @Bean 을 사용 하는 경우.

cglib proxy 에 의해 생성된 proxy 객체를 사용.

@Bean 은 하나만 생성된다.

일반적인 경우 위 방법을 사용한다.


2. Lite Mode

@Configuration 없이 @Component 등의 annotation과 @Bean을 같이 사용.

cglib proxy 에 의한 객체를 사용하지 않고 일반 메소드 처럼 동작하게 된다.

@Bean 이 여러개 생성 될 수 있다.


Lite Mode를 언제 사용하는지 모르겠다. 알아만 두자.


한글 설명 :

https://multifrontgarden.tistory.com/253

공식 doc :

https://docs.spring.io/spring/docs/current/javadoc-api/org/springframework/context/annotation/Bean.html

반응형

application context

최상위 context

여러개의 servlet 에서 공통적으로 공유하여 사용할 수 있는 Bean 을 선언

Spring 에서 생성되는 Bean 에 대한 Ioc Container

application context 에 정의된 bean 은 servlet context에 정의된 bean 을 사용할 수 없다


servlet context

servlet 관련된 context

url 관련 설정 bean 생성 (intercepter, @Controller)

application context 를 부모 context 로 사용

application context와 servlet context에 같은 id 로 bean 등록된 경우 servlet context 의 bean을 사용한다.


* 빈 색인 순서

servlet context 에서 bean 을 못 찾을 경우 application context 에서 bean 을 찾는다.


https://jaehun2841.github.io/2018/10/21/2018-10-21-spring-context/

https://www.baeldung.com/spring-web-contexts


반응형

Spring Batch, Spring Quartz 메타테이블 들여다보기

Spring Batch, Spring Quartz 모두 InMemory 방식을 사용할 경우 Table 없이 사용가능하다.

하지만 Quartz Clustering 기능을 사용하는 경우 혹은 UI 로 배치(job) 및 스케쥴을 관리하는 경우 메타테이블 사용은 필수적이다.

Quartz , Batch 메타테이블 중 의미있는(내가 알고 있는..) 테이블 정보를 기록해둔다.


1. Quartz 메타테이블

1) FIRED_TRIGGERS; 현재 실행된(fired) 스케쥴의 트리거정보(비동기 동작시 바로 실행완료 상태가 되어버리므로 해당 테이블은 스쳐지나감)
2) PAUSED_TRIGGER_GRPS; 
3) LOCKS; 
4) SIMPLE_TRIGGERS; 
5) SIMPROP_TRIGGERS; 
6) CRON_TRIGGERS; 등록된 스케쥴의 cron 정보

7) BLOB_TRIGGERS; 
8) TRIGGERS; 등록된 스케쥴의 trigger 정보

9) JOB_DETAILS; 실행될 QuartzJob 정보

10) CALENDARS; 특정 시간에 스케쥴을 동작시키지 않길 원할 경우 사용

11) SCHEDULER_STATE; 스케쥴러 정보, instance_name 칼럼값으로 스케쥴러 구분이 가능, last_checkin_time이 checkin_interval 값의 간격으로 계속해서 갱신된다. 서버(scheduler)가 죽은 경우 last_checkin_time+checkin_interval 값이 now 값 보다 작아지게 되므로 이를 활용하여 scheduler 가 죽었는지 판별할 수 있다. checkin_interval 은 quartz property 값에서 지정할 수 있다.


quartz 메타테이블 정보


2. Batch 메타테이블

1) JOB_EXECUTION;  

job 정보 (실행/종료 시작, 실행 상태 등) 관리.

Clustering모드일 경우 어떤 서버(스케쥴러)에서 배치가 실행되었는지 알 수 없다. 만약 이를 저장하고 싶다면 별도의 테이블을 두기보단 해당 테이블에 칼럼을 하나 추가하여 job 데이터가 insert 될 때 서버정보를 함께 넣어주어 관리 할 수 있다.

CRUD는 JdbcJobExecutionDao.class에 있으므로 해당 파일과, JobRepositoryFactoryBean 을 구현해주고 bean 설정을 조금 손봐주면 된다.
2) JOB_EXECUTION_CONTEXT;  
3) JOB_EXECUTION_PARAMS; job parameter 정보 (jobLauncher 실행시 parameter 정보) 
4) JOB_INSTANCE;  
5) STEP_EXECUTION;  job 의 step 정보
6) STEP_EXECUTION_CONTEXT;

7) STEP_EXECUTION_SEQ; 시퀀스 관리용 테이블

8) JOB_SEQ; 시퀀스 관리용 테이블

9) JOB_EXECUTION_SEQ; 시퀀스 관리용 테이블


Batch 메타테이블 정보


반응형

1. Quartz 와 Batch

1-1. Quartz

- 언제 실행시킬지와 관련
- Scheduling

1-2. Batch

- 무엇을 실행시킬지와 관련
- Batch job
- 보통 배치를 짠다는 말은 Batch job 개발을 한다는 의미

2. Quartz와 Batch의 관계 및 함께 사용하는 이유

일괄처리(로직)을 batch job 으로, batch job 을 스케쥴링 하기 위해 quartz 를 사용
높은 Spring Version은 @Scheduled 어노테이션으로 Crontrigger와 같은 기능을 제공하여 Quartz 가 필요 없다곤 하나
Quartz 의 Clustering 기능, DB 값을 기준으로 동작 제어가 가능하다는 점에 Quartz를 함께 사용

3. Quartz Clustering + Batch 구현하기

3-1. 들어가기에 앞서

[환경]
- Spring 5.x
- jdk 1.8
- Quartz 2.3
- maven
- batch core 5.x

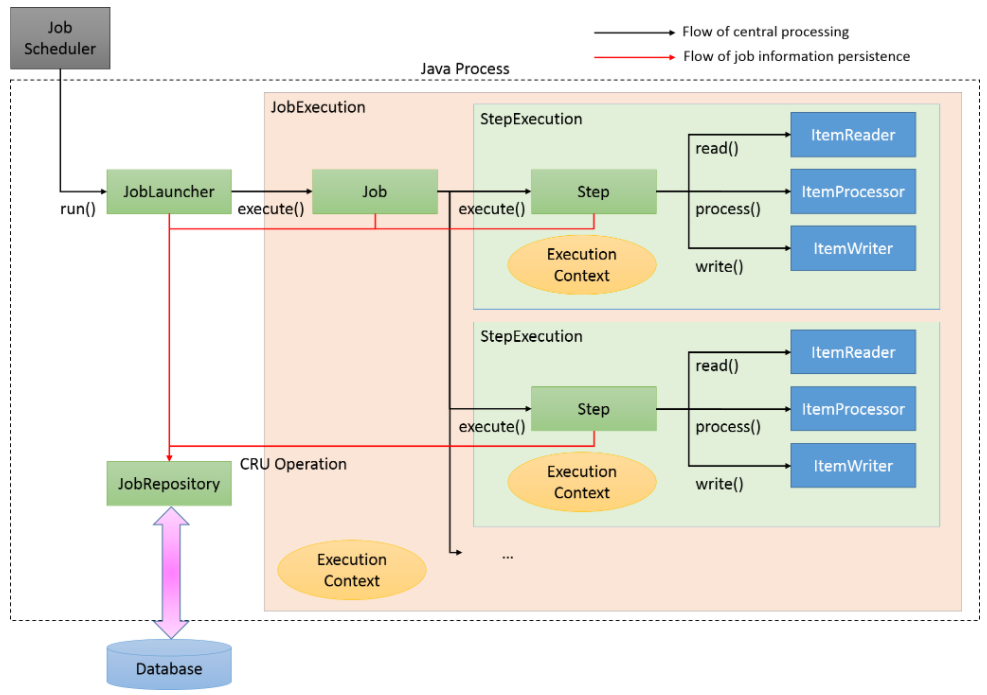
[스프링 배치 구조]


[구조 및 설계]
- 배치를 관리하는 서버, 배치를 실행하는 쿼츠 서버가 각각 존재.
- InMemory 방식으로 batch 와 quartz(scheduler) 를 사용할 수 있지만, 데이터를 DB로 관리해야 관리UI 구성이 가능하며 쿼츠 클러스터링을 사용할 수 있으므로 메타테이블 및 JDBC 방식을 사용한다.
- 쿼츠 클러스터링 모드를 사용한다 (서버 2대)
- Batch Job, Job parameter, Schedule, cron 과 관련된 데이터는 UI로 관리한다 (이에 대한 코드 및 설계 부분은 생략..)
- 배치 관리 서버에서 스케쥴을 등록/수정/삭제할 경우 쿼츠 서버의 스케쥴러에 배치가 등록/수정/삭제 된다.
- 배치 관리 서버에서 실행 중인 스케쥴을 중지 시킬 경우 쿼츠 서버에서 실행중이던 스케쥴이 중지된다(관련 내용은 이곳에 정리)

[쿼츠(스케쥴러) + 배치 동작 흐름]
1) 쿼츠 서버구동
2) Scheduler 생성
3) Schedule 조회
4) Scheduler에 조회된 Schedule 등록(Schedule은 job detail 을 포함하며 job detail은 batch 정보를 담은 job parameter map을 포함)
5) 등록된 스케쥴이 SchedulerJob(QuartzJob) 에서 실행됨
6) SchedulerJob(QuartzJob) 내에서 batch job 을 실행

[쿼츠, 배치 메타테이블]
들어가기에 앞서 배치, 쿼츠 메타테이블을 조금 살펴보자.. (Spring Batch, Spring Quartz meta-table)

3-2. 구현 및 관련 소스

[QuartzConfig]
Scheduler를 생성하는 SchedulerFactoryBean 을 스프링 빈으로 등록, dataSource 부분을 실환경에서 사용중인 dataSource 로 바꿔줌
배치서버 동작시 QuartzStarter Bean이 생성되며, 생성시 init 메소드가 동작하게 함. 그 안에서 스케쥴 등록 + 스케쥴러 실행을 시킴

1
2
3
4
5
6
7
8
9
10
11
12
13
14
15
16
17
18
19
20
21
22
23
24
25
26
27
28
29
30
31
32
33
34
35
36
37
38
39
40
41
42
43
44
45
46
47
48
49
50
51
52
53
54
55
56
57
58
59
60
61
62
63
64
65
66
67
68
69
70
71
72
73
74
package com.spring.quartz.config;
 
import java.util.Properties;
 
import javax.sql.DataSource;
 
import org.quartz.SchedulerException;
import org.slf4j.Logger;
import org.slf4j.LoggerFactory;
import org.springframework.beans.factory.annotation.Autowired;
import org.springframework.beans.factory.config.PropertiesFactoryBean;
import org.springframework.context.ApplicationContext;
import org.springframework.context.annotation.Bean;
import org.springframework.context.annotation.Configuration;
import org.springframework.core.io.ClassPathResource;
import org.springframework.scheduling.quartz.SchedulerFactoryBean;
import org.springframework.transaction.PlatformTransactionManager;
 
import com.spring.quartz.QuartzStarter;
 
@Configuration
public class QuartzConfig {
   
   private static final Logger logger = LoggerFactory.getLogger(QuartzConfig.class);
   
   @Autowired
   private DataSource dataSource;
   
   @Autowired
   private PlatformTransactionManager transactionManager;
   
   @Autowired
   private ApplicationContext applicationContext;
   
   @Bean
   public SchedulerFactoryBean schedulerFactory() throws SchedulerException {
       logger.info("SchedulerFactoryBean created!");
       SchedulerFactoryBean schedulerFactoryBean = new SchedulerFactoryBean();
       AutowiringSpringBeanJobFactory jobFactory = new AutowiringSpringBeanJobFactory();
       jobFactory.setApplicationContext(applicationContext);
       schedulerFactoryBean.setJobFactory(jobFactory);
       schedulerFactoryBean.setTransactionManager(transactionManager);
       schedulerFactoryBean.setDataSource(dataSource);
       schedulerFactoryBean.setOverwriteExistingJobs(true);
       schedulerFactoryBean.setAutoStartup(true);
       schedulerFactoryBean.setQuartzProperties(quartzProperties());
       
       return schedulerFactoryBean;
   }
 
 
   @Bean
   public Properties quartzProperties() {
       PropertiesFactoryBean propertiesFactoryBean = new PropertiesFactoryBean();
       propertiesFactoryBean.setLocation(new ClassPathResource("/quartz.properties"));
 
       Properties properties = null;
       try {
           propertiesFactoryBean.afterPropertiesSet();
           properties = propertiesFactoryBean.getObject();
       } catch (Exception e) {
          logger.warn("Cannot load quartz.properties");
       }
       return properties;
   }
   
   
   @Bean(initMethod="init", destroyMethod="destroy")
   public QuartzStarter quartzStarter() {
      return new QuartzStarter();
   }
   
}
 
cs


[quartz.properties]
SchedulerFactoryBean 에서 사용되는 property
1) ~.isClustered = true : Clustering 사용 여부
2) ~.jobStore.class = ~.JobStoreTX : 클러스터링 모드는 inMemory 모드에서 사용 불가
3) ~.jobStore.driverDelegateClass = ~StdJDBCDelegate : 클러스터링 모드는 inMemory 모드에서 사용 불가
4) ~.instanceName = ? : 인스턴스명을 기준으로 클러스터 서버들이 묶이게 되므로 반드시 동일한 인스턴스명을 사용
5) ~.instanceId = ? : 인스턴스명을 기준으로 클러스터 서버를 구분할 수 있다
기타 속성들은 이곳에 자세히 설명되어 있다.

1
2
3
4
5
6
7
8
9
10
11
12
13
14
15
16
17
18
19
20
21
22
23
24
25
26
27
28
29
30
31
32
33
34
35
36
37
38
39
40
41
42
43
44
# Using Spring datasource in quartzJobsConfig.xml
# Spring uses LocalDataSourceJobStore extension of JobStoreCMT
org.quartz.jobStore.tablePrefix = QRTZ_
org.quartz.jobStore.isClustered = true
org.quartz.jobStore.misfireThreshold=2000
org.quartz.jobStore.clusterCheckinInterval=1000
 
# Change this to match your DB vendor
org.quartz.jobStore.class = org.quartz.impl.jdbcjobstore.JobStoreTX
org.quartz.jobStore.driverDelegateClass = org.quartz.impl.jdbcjobstore.StdJDBCDelegate
#org.quartz.jobStore.dataSource = dataSource
 
#SCHED_NAME 속성. Clustering이 되는 기준이므로 clustering으로 묶이는 서버들은 모두 동일한 instanceName 을 사용해야 한다
spring.quartz.scheduler.instanceName=QuartzScheduler
#AUTO, NON_CLUSTERED, SYS_PROP 등의 옵션이 존재하며 SYS_PROP은 org.quartz.scheduler.instanceId 를 key값으로하는 system property를 가져온다 
org.quartz.scheduler.instanceId=SYS_PROP
 
org.quartz.scheduler.rmi.export = false
org.quartz.scheduler.rmi.proxy = false
org.quartz.threadPool.class = org.quartz.simpl.SimpleThreadPool
org.quartz.threadPool.threadCount = 10
org.quartz.threadPool.threadPriority = 5
org.quartz.threadPool.threadsInheritContextClassLoaderOfInitializingThread = true
 
 
spring.quartz.scheduler-name=QuartzScheduler
 
#============================================================================
# Configure Main Scheduler Properties
#============================================================================
org.quartz.scheduler.batchTriggerAcquisitionMaxCount=20
org.quartz.scheduler.idleWaitTime=1000
org.quartz.scheduler.skipUpdateCheck=true
 
#============================================================================
# Configure ThreadPool
#============================================================================
 
org.quartz.threadPool.threadNamePrefix=QuartzScheduler
 
#============================================================================
# Configure JobStore
#============================================================================
org.quartz.jobStore.acquireTriggersWithinLock=true
cs


[QuartzStarter]
bean 생성시 init() 실행. 서버 동작과 함께 배치 스케쥴러 생성+스케쥴 등록+스케쥴 실행이 이루어짐.
1) getScheduleList() : 편성해놓은 스케쥴 정보(스케쥴+배치잡) 조회
2) insertSchdul() : 조회한 스케쥴 정보들을 scheduler에 등록
3) scheduler.start : scheduler 를 실행
※ restart() : 외부 호출을 받아 스케쥴러를 재실행 할 경우 사용됨.
재실행을 목적으로 scheduler를 중지시킬 경우 scheduler.stop() 대신 stanby()를 사용해야 함을 주의

scheduler.scheduleJob(jobDetail, trigger)
jobDetail : Job의 실제 구현내용과 Job 실행에 필요한 상세 정보가 담겨있음
trigger : job을 언제 어떤 주기로 실행할지에 대한 정보가 담겨있음
1
2
3
4
5
6
7
8
9
10
11
12
13
14
15
16
17
18
19
20
21
22
23
24
25
26
27
28
29
30
31
32
33
34
35
36
37
38
39
40
41
42
43
44
45
46
47
48
49
50
51
52
53
54
55
56
57
58
59
60
61
62
63
64
65
66
67
68
69
70
71
72
73
74
75
76
77
78
79
80
81
82
83
84
85
86
87
88
89
90
91
92
93
94
95
96
97
98
99
100
101
102
103
104
105
106
107
108
109
110
111
112
113
114
115
116
117
118
119
120
 
public class QuartzStarter {
   
   private static final Logger LOGGER = LoggerFactory.getLogger(QuartzStarter.class);
   
   @Autowired
   private SchdulService schdulService;
 
   @Autowired
   private SchedulerFactoryBean schedulerFactoryBean;
   
   @Autowired
   private InitAbandonedJobService initAbandonedJobService;
   
   @Resource(name="scheduleListener")
   private JobListener scheduleListener;
   
   private Scheduler scheduler;
   
 
   /** 서버 launch 시 호출되는 메소드 
    *  1. 서버 shutdown 시 running 중이던 job의 status를 ABANDONED 로 UPDATE
    *  2. 스케쥴JOB 등록 및 스케쥴러 시작
    */
   public void init() throws Exception {
      scheduler = schedulerFactoryBean.getScheduler();
      addListener();
      scheduler.clear();
      List<SchdulVO> schdulList = getSchdulList();
      registScheduleForScheduler(schdulList);
      scheduler.start();
   }
 
   
   /** 스케쥴 리스트 조회 */
   public List<SchdulVO> getSchdulList() throws Exception {
      return schdulService.selectSchdulList();     
   }
   
   
   /** 스케쥴러에 스케쥴JOB 등록 */
   private void registScheduleForScheduler(List<SchdulVO> schdulList) throws Exception {
      for (SchdulVO schdul : schdulList) {
            schdul.setParamtrList(schdulService.selectSchdulParamtr(schdul));
            insertSchdul(schdul);
      }
   }
   
   /** scheduler 에 리스너 등록 */
   private void addListener() throws SchedulerException {
      scheduler.getListenerManager().addJobListener(scheduleListener);
   }
   
   
   /** scheduler 에 scheduleJob 등록 */
   public void insertSchdul(SchdulVO schdulVO) throws Exception {
      
      JobDetail jobDetail;          // Job 상세 정보 VO
      CronTrigger cronTrigger;      // Trigger 객체
      
      jobDetail = JobBuilder.newJob(SchedulerJob.class)
            .withIdentity(new JobKey(schdulVO.getSchdulNo()))
            .build();
      
      jobDetail.getJobDataMap().put("batchId"     , schdulVO.getBatchId    ());
      jobDetail.getJobDataMap().put("batchProgrm" , schdulVO.getBatchNm    ());
      jobDetail.getJobDataMap().put("paramtrList" , schdulVO.getParamtrList());
      
      cronTrigger = TriggerBuilder.newTrigger()
             .withIdentity(schdulVO.getSchdulNo())
             .withSchedule(CronScheduleBuilder.cronSchedule(schdulVO.getCronExpression()).withMisfireHandlingInstructionDoNothing())
             .forJob(schdulVO.getSchdulNo())
             .build();
      
      try {
         scheduler.scheduleJob(jobDetail, cronTrigger);
      } catch (SchedulerException e) {
         LOGGER.error("ex while registering schedule {}", e.getMessage());
      } catch (Exception e) {
         LOGGER.error("ex while registering schedule {}", e.getMessage());
      }
      
   }
   
   
   //https://stackoverflow.com/questions/3650539/what-is-the-difference-between-schedulers-standby-and-pauseall
   //stanby 는 scheduler 를 정지시키고 정지상태에서 misfire 된 job 들을 start가 된 이후 무시한다.
   /** 스케쥴러 재시작
    *  ADM 스케쥴 수정 및 삭제시 호출됨 
    */
   public void restart() {
      try {
         scheduler.standby();   
         addListener();
         scheduler.clear();
         List<SchdulVO> schdulList = getSchdulList();
         registScheduleForScheduler(schdulList);
         scheduler.start();
      } catch (Exception e) {
         LOGGER.error("ex in restart() {}", e.getMessage());
      }
   }
   
   
   /** 스케쥴러 종료
    *  WAS SERVER shutdown
    */
   public void destroy() {  
      try {
         if (scheduler != null) {  
            scheduler.shutdown();
            schedulerFactoryBean.destroy();
         }
      } catch(Exception e) {
         LOGGER.error("ex in destroy() {}", e.getMessage());
      }
   }
   
}
 
cs


[SchedulerJob]
아래와 같이 QuartzJobBean 의 executeInternal 추상메소드를 구현하여 job 에서 수행될 로직을 작성한다.
이는 Batch Job이 아닌 SchedulerJob(=QuartzJob)이며, 쿼츠잡에서 batch job 을 실행하도록 구현한다.
batch job 은 QuartzStarter 의 insertSchdul() 내에서 넘겨주었던 JobDataMap에서 꺼내온 데이터를 기준으로 한다.
1) jobContext 에서 배치 Bean name, 파라미터 정보들을 꺼낸 후
2) jobLauncher.run(배치Bean, 배치파라미터) 로 배치 실행
※ jobExecutionId는 job이 실행 된 이후 생성되므로(jobLauncher.run() 이후) 배치 결과 관리 화면과 같은 기능이 필요할 경우 이를 유의해야 한다.

1
2
3
4
5
6
7
8
9
10
11
12
13
14
15
16
17
18
19
20
21
22
23
24
25
26
27
28
29
30
31
32
33
34
35
36
37
38
39
40
41
42
43
44
45
46
47
import org.springframework.scheduling.quartz.QuartzJobBean;
 
@Transactional
//@DisallowConcurrentExecution   //클러스터링 환경에선 해당 어노테이션 작동하지 않음
public class SchedulerJob extends QuartzJobBean {
 
   private static final Logger LOGGER = LoggerFactory.getLogger(SchedulerJob.class);
      
   @Autowired
   private JobLauncher jobLauncher;
   
   @Resource(name="QuartzUtils")
   private QuartzUtils quartzUtils;
   
   @Override
   protected void executeInternal(JobExecutionContext jobContext) throws JobExecutionException {
      LOGGER.info("executeInternal()");
      try {
          JobDataMap dataMap = jobContext.getJobDetail().getJobDataMap();
          
          JobParametersBuilder jpb = new JobParametersBuilder();
          for (BatchParamtrVO paramtr : (List<BatchParamtrVO>)dataMap.get("paramtrList")) {
             jpb.addString(paramtr.getParamtrNm(), paramtr.getParamtr());
          }
          
          String schdulNo = jobContext.getJobDetail().getKey().getName();
          String currentTime = Long.toString(System.currentTimeMillis());
          String schdulResultNo = dataMap.getString("schdulResultNo");
          
          jpb.addString("schdulNo", schdulNo);
          jpb.addString("currentTime", currentTime);
          jpb.addString("schdulResultNo", schdulResultNo);
 
          JobExecution je = null;                
          je = jobLauncher.run((Job)BeanUtils.getBean(dataMap.getString("batchProgrm")), jpb.toJobParameters());
          result = je.getId(); //jobExecutionId 가 생성되는 시점에 유의 (배치 실행 후 리턴되며 실행 전 알 수 없음)
             
          jobContext.setResult(result);
         
      } catch (JobExecutionAlreadyRunningException e) {
         LOGGER.info("ex while excute : {}", e.getMessage());
      } catch (Exception e) {
         LOGGER.info("ex while excute : {}", e.getMessage()); 
      }
   }
   
}
cs


[BeanUtils]
context 에서 bean 정보를 가져오기 위한 유틸
batch job 이름을 기준으로 bean을 가져오기 위함. jobLauncher run 을 할 때 사용.

1
2
3
4
5
6
7
8
9
10
11
12
13
14
15
16
17
18
19
20
21
22
23
24
25
26
package com.spring.quartz.utils;
 
import org.springframework.context.ApplicationContext;
import org.springframework.context.ApplicationContextAware;
import org.springframework.stereotype.Component;
 
// bean에 ApplicationContext 정보 주입
@Component
public class BeanUtils implements ApplicationContextAware {
   private static ApplicationContext context;
 
   @Override
   public void setApplicationContext(ApplicationContext applicationContext) {
      // TODO Auto-generated method stub
      context = applicationContext;
   }
   
   public static <T> T getBean(Class<T> beanClass) {
      return context.getBean(beanClass);
   }
   
   public static Object getBean(String beanName) {
      return context.getBean(beanName);
   }
}
 
cs


[BatchConfig]
Spring Batch 와 관련된 설정.
JobRepository : batch job meta data 에 대한 CRUD
JobExplorer : batch job meta data 에 대한 read-only 기능
JobOperation : stop, restart 등 job 에 대한 제어

※ jobLauncher 의 taskExecutor 는 여러종류가 있으며 그 중 비동기 처리를 위한 taskExecutor 사용시 실행 순서에 유의해야 함.
1) sync 방식에서의 순서 :
jobToBeExecuted(scheduler listener 전처리) -> scheduler job(batch job 실행) -> step 실행 -> tasklet 실행 [tasklet beforeStep -> tasklet execute -> tasklet AfterStep] -> jobWasExecuted(scheduler listener 후처리)
2) async 방식에서의 순서 :
jobToBeExecuted(scheduler listener 전처리) -> scheduler job(batch job 실행) -> jobWasExecuted(scheduler listener 후처리) -> step 실행 -> tasklet 실행 [tasklet beforeStep -> tasklet execute -> tasklet AfterStep]

1
2
3
4
5
6
7
8
9
10
11
12
13
14
15
16
17
18
19
20
21
22
23
24
25
26
27
28
29
30
31
32
33
34
35
36
37
38
39
40
41
42
43
44
45
46
47
48
49
50
51
52
53
54
55
56
57
58
59
60
61
62
63
64
65
66
67
68
69
70
71
72
73
74
75
76
77
78
79
80
81
82
83
84
85
86
87
88
89
90
91
92
93
94
95
96
97
98
99
100
package com.spring.batch.config;
 
import javax.sql.DataSource;
 
import org.springframework.batch.core.configuration.JobRegistry;
import org.springframework.batch.core.configuration.support.JobRegistryBeanPostProcessor;
import org.springframework.batch.core.configuration.support.MapJobRegistry;
import org.springframework.batch.core.explore.JobExplorer;
import org.springframework.batch.core.explore.support.JobExplorerFactoryBean;
import org.springframework.batch.core.launch.JobLauncher;
import org.springframework.batch.core.launch.JobOperator;
import org.springframework.batch.core.launch.support.SimpleJobLauncher;
import org.springframework.batch.core.launch.support.SimpleJobOperator;
import org.springframework.batch.core.repository.JobRepository;
import org.springframework.beans.factory.annotation.Autowired;
import org.springframework.beans.factory.annotation.Qualifier;
import org.springframework.context.annotation.Bean;
import org.springframework.context.annotation.Configuration;
import org.springframework.scheduling.quartz.SimpleThreadPoolTaskExecutor;
import org.springframework.transaction.PlatformTransactionManager;
 
/** https://docs.spring.io/spring-batch/docs/current/reference/html/job.html */
@Configuration
public class BatchConfig {
   
   private static final String TABLE_PREFIX = "BATCH_";
   private static final int THREAD_COUNT = 10;
   
   @Autowired
   private DataSource dataSource;
   @Autowired
   @Qualifier("txManager")
   private PlatformTransactionManager txManager; 
   
   /** job 메타데이터에 대한 CRUD 제공 */
   @Bean
   public JobRepository jobRepository() throws Exception {
      CustomJobRepositoryFactoryBean jfb = new CustomJobRepositoryFactoryBean();
      jfb.setTablePrefix(TABLE_PREFIX);
      jfb.setDataSource(dataSource);
      jfb.setTransactionManager(txManager);
      jfb.afterPropertiesSet();
      return (JobRepository) jfb.getObject();
   }
   
   /** job 실행시키는 런쳐 */
   @Bean
   public JobLauncher jobLauncher() throws Exception {
      SimpleJobLauncher jobLauncher = new SimpleJobLauncher();
      jobLauncher.setJobRepository(jobRepository());
      jobLauncher.setTaskExecutor(simpleThreadPoolTaskExecutor());
      jobLauncher.afterPropertiesSet();
      return jobLauncher;
   }
   
   /** 비동기처리 및 job을 thread pool 로 동작시키기 위해 
    * (quartz thread count 와 일치시켜야 함) */
   @Bean
   public SimpleThreadPoolTaskExecutor simpleThreadPoolTaskExecutor() throws Exception {
      SimpleThreadPoolTaskExecutor stpte = new SimpleThreadPoolTaskExecutor();
      stpte.setThreadCount(THREAD_COUNT);
      return stpte;
   }
   
   /** 현재 실행중인 job 정보 및 job 제어 */
   @Bean
   public JobExplorer jobExplorer() throws Exception {
      JobExplorerFactoryBean jfb = new JobExplorerFactoryBean();
      jfb.setDataSource(dataSource);
      jfb.setTablePrefix(TABLE_PREFIX);
      jfb.afterPropertiesSet();
      return (JobExplorer) jfb.getObject();
   }
   
   /** 현재 실행중인 job 정보 및 job 제어 */
   @Bean
   public JobOperator jobOperator() throws Exception {
      SimpleJobOperator sjo = new SimpleJobOperator();
      sjo.setJobLauncher(jobLauncher());
      sjo.setJobRepository(jobRepository());
      sjo.setJobRegistry(jobRegistry());
      sjo.setJobExplorer(jobExplorer());
      return sjo;
   }
   
   @Bean
   public JobRegistryBeanPostProcessor JobRegistryBeanPostProcessor() throws Exception {
      JobRegistryBeanPostProcessor postProcessor = new JobRegistryBeanPostProcessor();
      postProcessor.setJobRegistry(jobRegistry());
      return postProcessor;
   }
   
   @Bean
   public JobRegistry jobRegistry() throws Exception {
      MapJobRegistry mjr = new MapJobRegistry();
      return mjr;
   }
   
}
 
cs


[Sample Batch Job Bean]
Batch job bean 설정이 되어있는 xml

1
2
3
4
5
6
7
8
9
10
11
12
13
14
15
16
17
18
19
<?xml version="1.0" encoding="UTF-8"?>
<beans xmlns="http://www.springframework.org/schema/beans" xmlns:xsi="http://www.w3.org/2001/XMLSchema-instance"
    xmlns:util="http://www.springframework.org/schema/util"
    xsi:schemaLocation="http://www.springframework.org/schema/beans http://www.springframework.org/schema/beans/spring-beans-3.0.xsd
        http://www.springframework.org/schema/util http://www.springframework.org/schema/util/spring-util.xsd
        http://www.springframework.org/schema/batch http://www.springframework.org/schema/batch/spring-batch.xsd
        ">
 
    <job id="SampleJob" xmlns="http://www.springframework.org/schema/batch">
        <step id="SampleJob.step1">
            <tasklet ref="SampleJob.step1Adapter"/>
        </step>
    </job>
 
    <bean id="SampleJob.step1Adapter" class="com.spring.batch.job.tasklet.SampleJob">
    </bean>
        
</beans>
 
cs


[Sample Step]

1
2
3
4
5
6
7
8
9
10
11
12
13
14
15
16
17
18
19
20
21
22
23
24
25
26
27
28
 
public class SampleJob implements Tasklet , StepExecutionListener 
{
    private static final Logger LOGGER = LoggerFactory.getLogger(SampleJob.class);
 
 
    public void beforeStep(StepExecution stepExecution) 
    {
        //전처리
    }
    
 
    public ExitStatus afterStep(StepExecution stepExecution) 
    {
        //후처리
        return ExitStatus.COMPLETED;
    }
    
 
    @Override
    public RepeatStatus execute(StepContribution contribution, ChunkContext chunkContext) throws Exception 
    {
        //로직
        return RepeatStatus.FINISHED;
    }
 
}
 
cs


4. batch job junit 테스트하기

특정 배치를 테스트 해보자.
jUnit 으로 batch job 을 테스트하기 위해선 아래와 같이 실환경보다 필요한 bean 이 좀 적다.
※ jobLauncher 의 경우 실환경에선 비동기 동작을 위해 async taskExecutor 를 사용했지만 테스트환경에선 해당 부분을 제거해준다.
jobLauncherTestUtils 은 배치테스트를 위한 bean

[4-1. bean 설정]
기타 설정들은 생략하겠다.

1
2
3
4
5
<bean id="jobLauncherTestUtils"  class="org.springframework.batch.test.JobLauncherTestUtils"/>
<bean id="jobRepository" class="org.springframework.batch.core.repository.support.MapJobRepositoryFactoryBean" />
<bean id="jobLauncher" class="org.springframework.batch.core.launch.support.SimpleJobLauncher">
   <property name="jobRepository" ref="jobRepository" />
</bean>
cs


[4-2. 테스트코드 작성]
1) 테스트를 하고자 하는 batch xml 을 context config 에 추가
2) job parameter 가 필요한 경우 생성
3) launchJob 을 사용해 배치 실행
※ jndi 사용시 SpringJUnit4ClassRunner 를 구현하여 dataSource를 바인딩해준다. (이와 관련된 자세한 내용은 이곳을 참고)

1
2
3
4
5
6
7
8
9
10
11
12
13
14
15
16
17
18
19
20
21
22
23
24
25
26
27
28
29
30
31
32
33
34
35
36
37
//@RunWith(SpringJUnit4ClassRunner.class)
@RunWith(ExtSpringJUnit4ClassRunner.class)   //jndi 사용시 datasource binding 
@ContextConfiguration(locations = { 
                                      "classpath:batch/job/sampleJob.xml"    //테스트하고자 하는 batch xml 
                                    , "classpath:test-*.xml"
                                    , "classpath:bmp/batch/context-datasource.xml"
                                    , "classpath:bmp/spring/context-mybatis.xml"
                                    , "classpath:bmp/spring/context-datasource.xml"
                                   })
public class BatchTest {
 
   //* 테스트 주입설정 주의사항
   //  org.springframework.core.task.SimpleAsyncTaskExecutor 사용시 비동기 aync 로 배치가 동작하므로 테스트시 결과값 확인이 불가
   //  junit test 는 test xml 을 따로 두어 asyncTaskExecutor 제거
   
   private static final Logger LOGGER = LoggerFactory.getLogger(BatchTest.class);
   
   @Autowired
   private JobLauncherTestUtils jobLauncherTestUtils;
   
   @Test
   public void testJob() throws Exception {
      
     JobExecution jobExecution = null;
     
     try {
        Map<String, JobParameter> map = new HashMap<>();
        map.put("sampleInputKey"new JobParameter("sampleInputValue"));
        JobParameters jps = new JobParameters(map);
        jobExecution = jobLauncherTestUtils.launchJob(jps);
     } catch(Exception e) {
        e.printStackTrace();
     }
     
     Assert.assertEquals(ExitStatus.COMPLETED.getExitCode(), jobExecution.getExitStatus().getExitCode());
   }
}
cs


5. 중복 스케쥴에 대한 SKIP 처리

멱등성이 보장되지 않는 배치잡에 대한 중복 실행은 각종 에러가 발생할 수 있다. (스케쥴 간격보다 배치 수행시간이 긴 경우)
위 경우 중복 스케쥴에 대한 SKIP 처리가 필요한데,
동기식 방식 및 클러스터링 모드가 아닌 단일 쿼츠 환경에서는 쿼츠잡 쪽에 @DisallowConcurrentExecution 어노테이션을 붙여주어 스케쥴 중복실행을 쉽게 막아 줄 수 있지만, 동기방식 혹은 클러스터링을 사용하는 배치서버의 경우 중복 스케쥴에 SKIP 처리가 쉽지 않다.
이 부분은 quartz 메타테이블인 schedule_state 을 사용하여 처리 했다.
해당 부분은 추후 정리하여 포스팅하겠다..

6. 개선 및 보완 사항

1) 스프링 배치 공부하기
스프링 쿼츠로 스프링 배치를 실행시키기 위해 쿼츠 쪽 설계만 됐을 뿐 Spring Batch 쪽 활용이 부족하다.
스프링 배치 쪽 공부는 추후에 더 해보는 걸로..(chunk 방식, 중단된 step 에서의 재시작 등)

2) 핫디플로이 관련 공부하기
#스케쥴 등록/수정/삭제 후 반영
해당 기능은 큰 어려움 없이 구현이 가능했다.
배치서버에 스케쥴러를 재기동 시키는 API를 두고, 관리UI(관리서버)에서 스케쥴 등록/수정/삭제시 해당 API를 호출하여 스케쥴 변경사항을 서버재기동없이 즉시 반영가능하다.

#배치잡 등록/수정/삭제 후 반영
관련 기능은 요구사항에 없었으므로 구현되지 않았으나, 관련 기능을 어떻게 구현할 수 있을지 고민해볼 필요가 있겠다.
관리서버에서 추가한 배치잡과 관련된 소스(class파일 등)가 배치서버 쪽에 존재해야 이를 사용한 스케쥴 편성이 의미가 있으므로(동작 하므로) 배치잡 추가시 배치서버 쪽에 새로운 class 파일 및 bean 설정이 되어있는 xml 파일 등을 배치서버 쪽에 ftp 전송등을 하여 업로드해준 후 배치서버가 재기동 되어야 할 듯 하다. (핫디플로이 및 기타 방법 알아보기)


깃헙 :
https://github.com/develo-pyo/springfw-batch

참고 자료 :
Quartz Clustering1 (quartz doc)
Quartz Clustering2
schedule cron expression
Quartz Schedule Tutorial
Spring Batch doc

반응형

1. Transaction 설정방법

트랜잭션 설정 방법은 이곳을 참고.


2. Isolation 

SQL 의 Isolation level 과 동일하게 동작 (SQL 격리수준 속성에 대한 자세한 내용은 이곳을 참고)

- READ_UNCOMMITED : commit 되지 않은 데이터를 읽는다

- READ_COMMITED : commit 된 데이터만 읽는다

- REPEATABLE_READ : 자신의 트랜잭션이 생성되기 이전의 트랜잭션(낮은 번호의 트랜잭션)의 커밋된 데이터만 읽는다 

- SERIALIZABLE : LOCK 을 걸고 사용

- DEFAULT : 사용하는 DB 기본 설정을 따른다. (Oracle 은 READ_COMMITED, Mysql InnoDB 는 REPEATABLE_READ 가 Default)


3. Propagation

- REQUIRE : 부모 트랜잭션(자신을 호출한 메소드의 Transaction)이 존재한다면 그에 포함되어 동작. 부모 트랜잭션이 존재하지 않을 경우 새로 트랜잭션 생성(default 속성)

- SUPPORTS : 부모 트랜잭션이 존재하면 그에 포함되어 동작. 부모 트랜잭션이 없다면 트랜잭션 없이 동작.

- MANDATORY : 부모 트랜잭션이 존재하면 그에 포함되어 동작. 부모 트랜잭션이 없다면 예외 발생시킨다.

- REQUIRES_NEW : 부모 트랜잭션 존재 여부와 상관없이 트랜잭션을 새로 생성

- NOT_SUPPORTED : 트랜잭션을 사용하지 않는다. 부모 트랜잭션이 존재하면 보류시킨다.

- NEVER : 트랜잭션을 사용하지 않도록 강제한다. 부모 트랜잭션이 존재할 경우 예외를 발생시킨다.

- NESTED : 부모 트랜잭션이 존재하면 부모 트랜잭션 안에 트랜잭션을 만든다. 부모트랜잭션의 커밋과 롤백에 영향을 받지만 자신의 커밋과 롤백은 부모 트랜잭션에 영향을 주지 않는다.


※ NESTED 사용의 예 :

메인 작업을 진행하며 이와 관련된 로그를 DB에 저장해야 한다.

로그를 저장하는 작업이 실패하더라도 메인 작업의 트랜잭션은 롤백하지 않는다.

하지만 메인 작업이 실패할 경우 로그 또한 저장하지 않아야 한다(롤백 되어야 한다).

Propagation 과 관련된 부분은 이곳을 참고


4. 전파속성(Propagation)과 격리레벨(Isolation Level) 사용 예제

[에러가 발생하는 코드]

1
2
3
4
5
6
7
8
9
10
11
12
13
14
15
16
17
18
19
20
21
22
23
24
25
26
27
28
29
30
31
32
33
34
35
36
37
38
39
@Component
class SeqUtil {
    @Resource
    private DAO dao;
    
    public long getNextSeq(){
        long currentSeq = dao.getCurrentSeq(); //현재 seq를 가져온다
        long nextSeq = currentSeq+1L; // seq + 1
       dao.updateSeq(currentSeq+1L); //DB seq 를 +1 한 값으로 update 한다
        return nextSeq;
    }
}
 
 
@Component
class InfoUtil {
    @Resource
    private DAO dao;
    
    public void insertInfo(long nextSeq){
        dao.insertInfo(nextSeq);  //+1 한 seq 및 기타 정보를 저장한다
    }
}
 
 
@Service
class Service {
    @Autowired
    private SeqUtil seqUtil;
    
    @Autowired
    private InfoUtil infoUtil;
    
    @Transactional
    public void service(){
      long nextSeq = seqUtil.getNextSeq(); //+1 한 seq 를 가져온다
       infoUtil.insertInfo(nextSeq);        //+1 한 seq 및 기타 정보를 저장한다
    }
}


cs

[의도]

autoincrement 속성을 사용하지 않고 위의 getNextSeq() 와 같이 직접 구현한 상황.

getNextSeq() : 현재 seq 값을 가져온 후 +1 증가 시킨다. 증가시킨 값으로 seq 값을 update 하고 증가시킨 seq 값을 return 한다.

insertInfo() : seq 값을 받아 기타 정보들과 함께 데이터를 저장한다.

Service() : getNextSeq(), insertInfo() 메소드를 사용하는 메소드 (getNextSeq(), insertInfo() 메소드가 service() 메소드 하위에 속해 있으므로 상위 메소드인 service()의 Transaction에 묶이게 된다)


[문제]

배치와 같이 동시각에 N개의 서비스가 처리된다면 문제가 발생한다.

insert 한 레코드의 seq 값이 1, 2, 3, 4 .... 와 같이 1씩 순차적으로 증가하길 기대했지만 증가하길 기대했지만 1, 1, 2, 2 ... 와 같이 중복이 발생되며 저장된다.


[해결 방안 1. 격리수준을 SERIALIZABLE 로 올린다]

1
2
3
4
5
6
7
8
9
10
11
12
13
14
15
16
17
18
19
20
21
22
23
24
25
26
27
28
29
30
31
32
33
34
35
36
37
38
39
40
@Component
class SeqUtil {
    @Resource
    private DAO dao;
    
    @Transactional(isolation=Isolation.SERIALIZABLE, propagation=Propagation.REQUIRES_NEW)
    public long getNextSeq(){
        long currentSeq = dao.getCurrentSeq(); //현재 seq를 가져온다
        long nextSeq = currentSeq+1L; // seq + 1
      dao.updateSeq(currentSeq+1L); //DB seq 를 +1 한 값으로 update 한다
        return nextSeq;
    }
}
 
 
@Component
class InfoUtil {
    @Resource
    private DAO dao;
    
    public void insertInfo(long nextSeq){
        dao.insertInfo(nextSeq);  //+1 한 seq 및 기타 정보를 저장한다
    }
}
 
 
@Service
class Service {
    @Autowired
    private SeqUtil seqUtil;
    
    @Autowired
    private InfoUtil infoUtil;
    
    @Transactional
    public void service(){
        long nextSeq = seqUtil.getNextSeq(); //+1 한 seq 를 가져온다
        infoUtil.insertInfo(nextSeq);         //+1 한 seq 및 기타 정보를 저장한다
    }
}
cs

1) service() 메소드 에서 getNextSeq() 메소드를 분리하여 별도의 Transaction 으로 동작하도록 REQUIRES_NEW 전파속성을 적용시킨다. (혹은 service() 메소드의 @Tranactional 어노테이션을 제거하고 해당 메소드가 사용하는 getNextSeq() 메소드와 insertInfo(..) 메소드에 각각 @Transactional 어노테이션을 붙인다)

2) SERIALIZABLE 격리 레벨을 적용시킨다.


[해결 방안 2. 동기화 synchronized 키워드를 사용하여 임계영역 문제 해결]

1
2
3
4
5
6
7
8
9
10
11
12
13
14
15
16
17
18
19
20
21
22
23
24
25
26
27
28
29
30
31
32
33
34
35
36
37
38
39
40
41
42
43
44
@Component
class SeqUtil {
    @Resource
    private DAO dao;
    
    @Transactional(propagation=Propagation.REQUIRES_NEW)
    public long getNextSeq(){
        long currentSeq = dao.getCurrentSeq(); //현재 seq를 가져온다
        long nextSeq = currentSeq+1L; // seq + 1
      dao.updateSeq(currentSeq+1L); //DB seq 를 +1 한 값으로 update 한다
        return nextSeq;
    }
}
 
 
@Component
class InfoUtil {
    @Resource
    private DAO dao;
    
    public void insertInfo(long nextSeq){
        dao.insertInfo(nextSeq);  //+1 한 seq 및 기타 정보를 저장한다
    }
}
 
 
@Service
class Service {
    @Autowired
    private SeqUtil seqUtil;
    
    @Autowired
    private InfoUtil infoUtil;
 
    private final Object semaphore = new Object();
    
    @Transactional
    public void service(){
        synchronized(semaphore){
            long nextSeq = seqUtil.getNextSeq(); //+1 한 seq 를 가져온다
        }
        infoUtil.insertInfo(nextSeq);         //+1 한 seq 및 기타 정보를 저장한다
    }
}
cs

1) service() 메소드 에서 getNextSeq() 메소드를 분리하여 별도의 Transaction 으로 동작하도록 REQUIRES_NEW 전파속성을 적용시킨다. (혹은 service() 메소드의 @Tranactional 어노테이션을 제거하고 해당 메소드가 사용하는 getNextSeq() 메소드와 insertInfo(..) 메소드에 각각 @Transactional 어노테이션을 붙인다)

2) 임계영역을 synchronized 키워드 및 블록으로 감싸 준다.


반응형

1. JobRepository, JobExplorer, JobOperation 의 역할

- JobRepository : meta-data 에 대한 CRUD

- JobExplorer : meta-data 에 대한 read-only 기능

- JobOperation : stop, restart 등 job 에 대한 제어


2. jobOperator 의 stop(jobExecutionId) 메소드

- 실행중인 job 을 stop 시킨다.

- Stop 은 graceful 하게 동작한다. (Stop이 즉시 이뤄지지 않으며 현재 실행중이던 step 은 끝까지 다 실행 된 후 job이 stop 된다)


3.  jobOperator 의 stop(jobExecutionId) 메소드 들여다 보기

(spring-batch-core-4.2.1 org.springframework.batch.core.launch.support.SimpleJobOperator.stop())

1
2
3
4
5
6
7
8
9
10
11
12
13
14
15
16
17
18
19
20
21
22
23
24
25
26
27
28
29
30
31
32
33
34
35
36
37
38
39
40
41
42
43
44
45
46
47
48
49
@Override
@Transactional
public boolean stop(long executionId) throws NoSuchJobExecutionException, JobExecutionNotRunningException {
  JobExecution jobExecution = findExecutionById(executionId);
  // Indicate the execution should be stopped by setting it's status to
  // 'STOPPING'. It is assumed that
  // the step implementation will check this status at chunk boundaries.
  BatchStatus status = jobExecution.getStatus();
  if (!(status == BatchStatus.STARTED || status == BatchStatus.STARTING)) {
     throw new JobExecutionNotRunningException("JobExecution must be running so that it can be stopped: "+jobExecution);
  }
  jobExecution.setStatus(BatchStatus.STOPPING);
  jobRepository.update(jobExecution);
  
  try {
     Job job = jobRegistry.getJob(jobExecution.getJobInstance().getJobName());
     
     if (job instanceof StepLocator) {//can only process as StepLocator is the only way to get the step object
        //get the current stepExecution
        for (StepExecution stepExecution : jobExecution.getStepExecutions()) {
           logger.info("STOP 메소드 내의 jobExecutionId : "  + stepExecution.getJobExecutionId());
           
           if (stepExecution.getStatus().isRunning()) {
              try {
                 //have the step execution that's running -> need to 'stop' it
                 Step step = ((StepLocator)job).getStep(stepExecution.getStepName());
                 if (step instanceof TaskletStep) {
                    Tasklet tasklet = ((TaskletStep)step).getTasklet();
                    if (tasklet instanceof StoppableTasklet) {
                       StepSynchronizationManager.register(stepExecution);
                       logger.info("stop stoppableTasklet ! ");
                       ((StoppableTasklet)tasklet).stop();
                       StepSynchronizationManager.release();
                    }
                 }
              }
              catch (NoSuchStepException e) {
                 logger.warn("Step not found",e);
              }
           }
        }
     }
  }
  catch (NoSuchJobException e) {
     logger.warn("Cannot find Job object in the job registry. StoppableTasklet#stop() will not be called",e);
  }
  
  return true;
}
cs

- StoppableTasklet 의 stop() 을 호출하고 있음을 알 수 있다.

- StoppableTasklet 은 Tasklet interface를 상속받는 interface이며 내부적으로 stop() 추상메소드를 갖고있다.

- batch job 에서 Tasklet 대신 StopTasklet 을 구현한 후 stop() 메소드를 오버라이딩 할 경우, jobOperator.stop() 호출시에 batch job 내의 flag 값 제어 등을 할 수 있다. 마치 리스너와 같이 동작한다.


4. stop 호출에 따른 meta-data 의 STATUS 필드 값 변화 순서

1. jobOperator.stop(jobExecutionId); 호출

2. step의 STATUS필드값이 stopped 로 바뀜 (step_execution 테이블의 status 필드값)

3. job 의 STATUS필드값이 stopping 으로 바뀜 (job_execution 테이블의 status 필드값)

4. 스텝이 끝난 후 job의 status를 stopped 로 바꿈


https://docs.spring.io/spring-batch/docs/current/reference/html/step.html


반응형

1. Servlet 생명주기

Init > Service(get/post) > Destory

https://minwan1.github.io/2017/10/08/2017-10-08-Spring-Container,Servlet-Container/

https://javannspring.tistory.com/231


2. BeanFactory 와 ApplicationContext 구조

https://whiteship.tistory.com/518

BeanFactory 를 ListenableBeanFactory, HierachialBeanFactory가 구현

ListenableBeanFactory, HierachialBeanFactory를 ApplicationContext가 구현

XmlWebApplicationContext, FileSystemXmlApplicationContext, ClassPathXmlApplicationContext 등이ApplicationContext 구현


3. 객체 생성의 차이

https://otep.tistory.com/19

ApplicationContext 는 Bean을 preload.

BeanFactory getBean 은 lazy 


4. Init/Destroy Method 지정 방법

Init 지정 방법

https://www.baeldung.com/running-setup-logic-on-startup-in-spring

1. @PostConstruct 사용

2. InitializingBean Interface 구현, afterPropertiesSet() 사용

3. ApplicationListener<ContextEvt> 구현

4. @Bean InitMethod 사용

순서 : @PostConstruct > InitializingBean > init-method > ContextStartedEvent 

https://programmer.ink/think/5ddc351b29481.html


Destory 지정 방법

https://www.baeldung.com/spring-shutdown-callbacks

1. @PreDestroy 사용

2. DisposableBean Interface 구현, Destroy() 사용

3. ApplicationListener<ContextEvt> 구현

4. ServletContetListener 구현 (web.xml 등록)

5. @Bean destroyMethod 사용

순서 : ContextClosedEvent > @PreDestroy > DisposableBean > destroy-method 

https://programmer.ink/think/5ddc351b29481.html


※ Init 은 Order @DependOn 등을 사용하여 주입 순서를 지정 할 수 있음

※ Bean Destroy 는 Bean Init 의 역순으로 이루어짐


반응형

@Autowired

Type --> 이름 --> Qualifier --> fail

@Resource

이름 --> Type --> Qualifier --> fail

@Inject

Type --> Qualifier --> 이름 --> fail


https://engkimbs.tistory.com/682

반응형

[ redirect 시 attribute 전달하는방법 ]

redirectAttributes.addFlashAttribute 사용

1
2
3
4
5
6
7
8
9
10
11
12
13
14
15
@RequestMapping(value="/save.do")
public String save(HttpServletRequest request, RedirectAttributes redirectAttributes, paramVO vo) throws Exception { 
    ...        
    redirectAttributes.addFlashAttribute("param", param);
    return "redirect:/result.do";
}
 
 
@RequestMapping(value="/result.do")
public ModelAndView result(HttpServletRequest request, @ModelAttribute("paramVO") paramVO vo) throws Exception {
    ModelAndView mav = new ModelAndView("bmp/Result");
    ...
    logger.info(vo.getName());
    return mav;
}
cs


https://stackoverflow.com/questions/19266427/what-are-ways-for-pass-parameters-from-controller-after-redirect-in-spring-mvc


※ addFlashAttribute 와 addAttribute 차이

addAttribute 는 단수개의 파라미터들 (내부적으로 redirect url 뒤에 붙여서(get과 같이) 나가는 방식)

addFlashAttribute 복수개의 파라미터(map , vo 등)

https://bactoria.tistory.com/entry/%EC%8A%A4%ED%94%84%EB%A7%81-addAttribute-addFlashAttribute-%EC%B0%A8%EC%9D%B4%EC%A0%90-RedirectAttributes-rttr-%EB%A6%AC%EB%8B%A4%EC%9D%B4%EB%A0%89%ED%8A%B8


[ redirect, forward 차이 ]

redirect

request, response 를 새로 생성, 새로운 호출 (뒤로가기 가능(A에서 B로 리다이렉트시 B에서 뒤로가기로 A 이동 가능))

ex) 고객센터에 전화를 걸었더니 다른 번호로 연결시켜주어 새로운 곳에 문의사항을 다시 전달해야 하는 상황


forward

request, response 를 공유, 기존 호출에 이어서 진행 (뒤로가기 불가(A에서 B로 포워딩시 B에서 뒤로가기로 A를 부른 C로 이동(전전 화면)))

ex) 고객센터에 전화를 걸었더니 담당자가 잘 모르겠다며 옆의 직원에게 상황을 전달하며 수화기를 넘긴 상황

https://doublesprogramming.tistory.com/63

반응형

+ Recent posts