application context

최상위 context

여러개의 servlet 에서 공통적으로 공유하여 사용할 수 있는 Bean 을 선언

Spring 에서 생성되는 Bean 에 대한 Ioc Container

application context 에 정의된 bean 은 servlet context에 정의된 bean 을 사용할 수 없다


servlet context

servlet 관련된 context

url 관련 설정 bean 생성 (intercepter, @Controller)

application context 를 부모 context 로 사용

application context와 servlet context에 같은 id 로 bean 등록된 경우 servlet context 의 bean을 사용한다.


* 빈 색인 순서

servlet context 에서 bean 을 못 찾을 경우 application context 에서 bean 을 찾는다.


https://jaehun2841.github.io/2018/10/21/2018-10-21-spring-context/

https://www.baeldung.com/spring-web-contexts


반응형


1. callback을 사용한 비동기 후처리

1
2
3
4
5
6
7
8
9
10
11
12
13
14
15
16
17
18
19
20
21
22
var callApi = function(successCallback, failCallback){
        $.post('/user.do', $("#parameter").serialize())
        .done(function(response){
              successCallback(response);
          })
        .fail(function(xhr, status, err){
               failCallback(err);                    
        });
     }
 
 
//on button click
callApi(function(data){
                  alert("this is successCallback!");
                  if(data.alertMssage !== undefined){
                    alert(data.alertMssage);
                  }
            },
            function(err){
                alert("this is failCallback!");
                alert(err);
            });    
cs


2. promise 를 사용한 비동기 후처리

1
2
3
4
5
6
7
8
9
10
11
12
13
14
15
16
17
18
var callApi = function(){
    return new Promise(function(resolve, reject){
                                $.post('/user.do', $("#parameter").serialize())
                                   .done((response)=>resolve(response))
                                   .fail((xhr, status, err)=>reject(err));
                               });
}
 
//on button click
callApi().then(function(data){
            alert("this is successCallback!");
            if(data.alertMssage !== undefined){
              alert(data.alertMssage);
            }
          }).catch(function(err){
              alert("this is failCallback!");
              alert("failed!");
          }); 
cs


promise에 대한 설명이 아래 링크에 워낙 잘 되어 있으므로 모든 설명은 생략.

설명이 매우 잘 되어있는 글


반응형

자바 8부터 람다와 함께 사용되는 스트림.

아직 자바 8 환경에서 개발해 볼 경험이 없었지만 정리를 미리 해둔다.


스트림은 아래와 같은 파이프라인으로 작성한다.

객체집합.스트림생성().중개연산().최종연산() 

1. 스트림 생성

1
2
3
4
5
6
7
8
9
10
11
12
13
14
15
private static void construct() {
  //1. Collection으로 스트림 생성
  //collection.stream();
  List<String> names = Arrays.asList("pyo""sue");
  names.stream();
  
  //2. 배열로 스트림 생성
  //array.stream();
  int[] arr = {123};
  Arrays.stream(arr);  
  
  //3. 스트림 직접 생성
  //Stream.of(~);
  Stream<Integer> stream = Stream.of(1,2,3);   
}
cs


2. 중개연산

1
2
3
4
5
6
7
8
9
10
11
12
13
14
15
16
17
18
19
20
21
22
23
24
25
26
27
28
29
30
31
32
33
34
35
36
37
private static List<String> names = Arrays.asList("pyo""sue""aron""ballack""pyo");
 
//2. 중개연산
private static void middle() {
  //2-1. Filter : 특정 조건에 부합하는 데이터만 뽑을 때 사용
  long cnt = names.stream().filter(new Predicate<String>() {
     @Override
     public boolean test(String t) {
        return t.contains("y");
     }
  }).count();
  System.out.print("result of counting after filtering : " + cnt);
  System.out.println("\n-----------------------------");
  
  //2-2. Map : 특정 연산을 할 때 사용
  names.stream().map(new Function<StringString>() {
     @Override
     public String apply(String t) {
        return t.concat("@gmail.com");
     }
  }).forEach(x -> System.out.print(x+" "));
  System.out.println("\n-----------------------------");
  
  //2-3. sort : 정렬
  names.stream().sorted((x1, x2)->x1.compareTo(x2)).forEach(x->System.out.print(x+" "));
  System.out.println("\n-----------------------------");
  
  //2-4. limit : 출력 수 제한
  names.stream().limit(2).forEach(x->System.out.print(x+" "));
  System.out.println("\n-----------------------------");
  
  //2-5. distinct : 중복 제거
  names.stream().distinct().forEach(x->System.out.print(x+" "));
  System.out.println("\n-----------------------------");
  
}
 
cs


결과

result of counting after filtering : 2
-----------------------------
pyo@gmail.com sue@gmail.com aron@gmail.com ballack@gmail.com pyo@gmail.com
-----------------------------
aron ballack pyo pyo sue
-----------------------------
pyo sue
-----------------------------
pyo sue aron ballack
-----------------------------

3. 최종연산

1
2
3
4
5
6
7
8
private static List<String> names = Arrays.asList("pyo""sue""aron""ballack""pyo");
 
//3. 최종연산
private static void finalOperate() {
  names.stream().forEach(x->System.out.print(x+" "));
  names.stream().count();
  //names.stream().max();
}
cs


람다보단 개념이 단순해 보이나

적응되는데 시간이 필요할 듯 하다.


참고

반응형

Spring Batch, Spring Quartz 메타테이블 들여다보기

Spring Batch, Spring Quartz 모두 InMemory 방식을 사용할 경우 Table 없이 사용가능하다.

하지만 Quartz Clustering 기능을 사용하는 경우 혹은 UI 로 배치(job) 및 스케쥴을 관리하는 경우 메타테이블 사용은 필수적이다.

Quartz , Batch 메타테이블 중 의미있는(내가 알고 있는..) 테이블 정보를 기록해둔다.


1. Quartz 메타테이블

1) FIRED_TRIGGERS; 현재 실행된(fired) 스케쥴의 트리거정보(비동기 동작시 바로 실행완료 상태가 되어버리므로 해당 테이블은 스쳐지나감)
2) PAUSED_TRIGGER_GRPS; 
3) LOCKS; 
4) SIMPLE_TRIGGERS; 
5) SIMPROP_TRIGGERS; 
6) CRON_TRIGGERS; 등록된 스케쥴의 cron 정보

7) BLOB_TRIGGERS; 
8) TRIGGERS; 등록된 스케쥴의 trigger 정보

9) JOB_DETAILS; 실행될 QuartzJob 정보

10) CALENDARS; 특정 시간에 스케쥴을 동작시키지 않길 원할 경우 사용

11) SCHEDULER_STATE; 스케쥴러 정보, instance_name 칼럼값으로 스케쥴러 구분이 가능, last_checkin_time이 checkin_interval 값의 간격으로 계속해서 갱신된다. 서버(scheduler)가 죽은 경우 last_checkin_time+checkin_interval 값이 now 값 보다 작아지게 되므로 이를 활용하여 scheduler 가 죽었는지 판별할 수 있다. checkin_interval 은 quartz property 값에서 지정할 수 있다.


quartz 메타테이블 정보


2. Batch 메타테이블

1) JOB_EXECUTION;  

job 정보 (실행/종료 시작, 실행 상태 등) 관리.

Clustering모드일 경우 어떤 서버(스케쥴러)에서 배치가 실행되었는지 알 수 없다. 만약 이를 저장하고 싶다면 별도의 테이블을 두기보단 해당 테이블에 칼럼을 하나 추가하여 job 데이터가 insert 될 때 서버정보를 함께 넣어주어 관리 할 수 있다.

CRUD는 JdbcJobExecutionDao.class에 있으므로 해당 파일과, JobRepositoryFactoryBean 을 구현해주고 bean 설정을 조금 손봐주면 된다.
2) JOB_EXECUTION_CONTEXT;  
3) JOB_EXECUTION_PARAMS; job parameter 정보 (jobLauncher 실행시 parameter 정보) 
4) JOB_INSTANCE;  
5) STEP_EXECUTION;  job 의 step 정보
6) STEP_EXECUTION_CONTEXT;

7) STEP_EXECUTION_SEQ; 시퀀스 관리용 테이블

8) JOB_SEQ; 시퀀스 관리용 테이블

9) JOB_EXECUTION_SEQ; 시퀀스 관리용 테이블


Batch 메타테이블 정보


반응형

1. Quartz 와 Batch

1-1. Quartz

- 언제 실행시킬지와 관련
- Scheduling

1-2. Batch

- 무엇을 실행시킬지와 관련
- Batch job
- 보통 배치를 짠다는 말은 Batch job 개발을 한다는 의미

2. Quartz와 Batch의 관계 및 함께 사용하는 이유

일괄처리(로직)을 batch job 으로, batch job 을 스케쥴링 하기 위해 quartz 를 사용
높은 Spring Version은 @Scheduled 어노테이션으로 Crontrigger와 같은 기능을 제공하여 Quartz 가 필요 없다곤 하나
Quartz 의 Clustering 기능, DB 값을 기준으로 동작 제어가 가능하다는 점에 Quartz를 함께 사용

3. Quartz Clustering + Batch 구현하기

3-1. 들어가기에 앞서

[환경]
- Spring 5.x
- jdk 1.8
- Quartz 2.3
- maven
- batch core 5.x

[스프링 배치 구조]


[구조 및 설계]
- 배치를 관리하는 서버, 배치를 실행하는 쿼츠 서버가 각각 존재.
- InMemory 방식으로 batch 와 quartz(scheduler) 를 사용할 수 있지만, 데이터를 DB로 관리해야 관리UI 구성이 가능하며 쿼츠 클러스터링을 사용할 수 있으므로 메타테이블 및 JDBC 방식을 사용한다.
- 쿼츠 클러스터링 모드를 사용한다 (서버 2대)
- Batch Job, Job parameter, Schedule, cron 과 관련된 데이터는 UI로 관리한다 (이에 대한 코드 및 설계 부분은 생략..)
- 배치 관리 서버에서 스케쥴을 등록/수정/삭제할 경우 쿼츠 서버의 스케쥴러에 배치가 등록/수정/삭제 된다.
- 배치 관리 서버에서 실행 중인 스케쥴을 중지 시킬 경우 쿼츠 서버에서 실행중이던 스케쥴이 중지된다(관련 내용은 이곳에 정리)

[쿼츠(스케쥴러) + 배치 동작 흐름]
1) 쿼츠 서버구동
2) Scheduler 생성
3) Schedule 조회
4) Scheduler에 조회된 Schedule 등록(Schedule은 job detail 을 포함하며 job detail은 batch 정보를 담은 job parameter map을 포함)
5) 등록된 스케쥴이 SchedulerJob(QuartzJob) 에서 실행됨
6) SchedulerJob(QuartzJob) 내에서 batch job 을 실행

[쿼츠, 배치 메타테이블]
들어가기에 앞서 배치, 쿼츠 메타테이블을 조금 살펴보자.. (Spring Batch, Spring Quartz meta-table)

3-2. 구현 및 관련 소스

[QuartzConfig]
Scheduler를 생성하는 SchedulerFactoryBean 을 스프링 빈으로 등록, dataSource 부분을 실환경에서 사용중인 dataSource 로 바꿔줌
배치서버 동작시 QuartzStarter Bean이 생성되며, 생성시 init 메소드가 동작하게 함. 그 안에서 스케쥴 등록 + 스케쥴러 실행을 시킴

1
2
3
4
5
6
7
8
9
10
11
12
13
14
15
16
17
18
19
20
21
22
23
24
25
26
27
28
29
30
31
32
33
34
35
36
37
38
39
40
41
42
43
44
45
46
47
48
49
50
51
52
53
54
55
56
57
58
59
60
61
62
63
64
65
66
67
68
69
70
71
72
73
74
package com.spring.quartz.config;
 
import java.util.Properties;
 
import javax.sql.DataSource;
 
import org.quartz.SchedulerException;
import org.slf4j.Logger;
import org.slf4j.LoggerFactory;
import org.springframework.beans.factory.annotation.Autowired;
import org.springframework.beans.factory.config.PropertiesFactoryBean;
import org.springframework.context.ApplicationContext;
import org.springframework.context.annotation.Bean;
import org.springframework.context.annotation.Configuration;
import org.springframework.core.io.ClassPathResource;
import org.springframework.scheduling.quartz.SchedulerFactoryBean;
import org.springframework.transaction.PlatformTransactionManager;
 
import com.spring.quartz.QuartzStarter;
 
@Configuration
public class QuartzConfig {
   
   private static final Logger logger = LoggerFactory.getLogger(QuartzConfig.class);
   
   @Autowired
   private DataSource dataSource;
   
   @Autowired
   private PlatformTransactionManager transactionManager;
   
   @Autowired
   private ApplicationContext applicationContext;
   
   @Bean
   public SchedulerFactoryBean schedulerFactory() throws SchedulerException {
       logger.info("SchedulerFactoryBean created!");
       SchedulerFactoryBean schedulerFactoryBean = new SchedulerFactoryBean();
       AutowiringSpringBeanJobFactory jobFactory = new AutowiringSpringBeanJobFactory();
       jobFactory.setApplicationContext(applicationContext);
       schedulerFactoryBean.setJobFactory(jobFactory);
       schedulerFactoryBean.setTransactionManager(transactionManager);
       schedulerFactoryBean.setDataSource(dataSource);
       schedulerFactoryBean.setOverwriteExistingJobs(true);
       schedulerFactoryBean.setAutoStartup(true);
       schedulerFactoryBean.setQuartzProperties(quartzProperties());
       
       return schedulerFactoryBean;
   }
 
 
   @Bean
   public Properties quartzProperties() {
       PropertiesFactoryBean propertiesFactoryBean = new PropertiesFactoryBean();
       propertiesFactoryBean.setLocation(new ClassPathResource("/quartz.properties"));
 
       Properties properties = null;
       try {
           propertiesFactoryBean.afterPropertiesSet();
           properties = propertiesFactoryBean.getObject();
       } catch (Exception e) {
          logger.warn("Cannot load quartz.properties");
       }
       return properties;
   }
   
   
   @Bean(initMethod="init", destroyMethod="destroy")
   public QuartzStarter quartzStarter() {
      return new QuartzStarter();
   }
   
}
 
cs


[quartz.properties]
SchedulerFactoryBean 에서 사용되는 property
1) ~.isClustered = true : Clustering 사용 여부
2) ~.jobStore.class = ~.JobStoreTX : 클러스터링 모드는 inMemory 모드에서 사용 불가
3) ~.jobStore.driverDelegateClass = ~StdJDBCDelegate : 클러스터링 모드는 inMemory 모드에서 사용 불가
4) ~.instanceName = ? : 인스턴스명을 기준으로 클러스터 서버들이 묶이게 되므로 반드시 동일한 인스턴스명을 사용
5) ~.instanceId = ? : 인스턴스명을 기준으로 클러스터 서버를 구분할 수 있다
기타 속성들은 이곳에 자세히 설명되어 있다.

1
2
3
4
5
6
7
8
9
10
11
12
13
14
15
16
17
18
19
20
21
22
23
24
25
26
27
28
29
30
31
32
33
34
35
36
37
38
39
40
41
42
43
44
# Using Spring datasource in quartzJobsConfig.xml
# Spring uses LocalDataSourceJobStore extension of JobStoreCMT
org.quartz.jobStore.tablePrefix = QRTZ_
org.quartz.jobStore.isClustered = true
org.quartz.jobStore.misfireThreshold=2000
org.quartz.jobStore.clusterCheckinInterval=1000
 
# Change this to match your DB vendor
org.quartz.jobStore.class = org.quartz.impl.jdbcjobstore.JobStoreTX
org.quartz.jobStore.driverDelegateClass = org.quartz.impl.jdbcjobstore.StdJDBCDelegate
#org.quartz.jobStore.dataSource = dataSource
 
#SCHED_NAME 속성. Clustering이 되는 기준이므로 clustering으로 묶이는 서버들은 모두 동일한 instanceName 을 사용해야 한다
spring.quartz.scheduler.instanceName=QuartzScheduler
#AUTO, NON_CLUSTERED, SYS_PROP 등의 옵션이 존재하며 SYS_PROP은 org.quartz.scheduler.instanceId 를 key값으로하는 system property를 가져온다 
org.quartz.scheduler.instanceId=SYS_PROP
 
org.quartz.scheduler.rmi.export = false
org.quartz.scheduler.rmi.proxy = false
org.quartz.threadPool.class = org.quartz.simpl.SimpleThreadPool
org.quartz.threadPool.threadCount = 10
org.quartz.threadPool.threadPriority = 5
org.quartz.threadPool.threadsInheritContextClassLoaderOfInitializingThread = true
 
 
spring.quartz.scheduler-name=QuartzScheduler
 
#============================================================================
# Configure Main Scheduler Properties
#============================================================================
org.quartz.scheduler.batchTriggerAcquisitionMaxCount=20
org.quartz.scheduler.idleWaitTime=1000
org.quartz.scheduler.skipUpdateCheck=true
 
#============================================================================
# Configure ThreadPool
#============================================================================
 
org.quartz.threadPool.threadNamePrefix=QuartzScheduler
 
#============================================================================
# Configure JobStore
#============================================================================
org.quartz.jobStore.acquireTriggersWithinLock=true
cs


[QuartzStarter]
bean 생성시 init() 실행. 서버 동작과 함께 배치 스케쥴러 생성+스케쥴 등록+스케쥴 실행이 이루어짐.
1) getScheduleList() : 편성해놓은 스케쥴 정보(스케쥴+배치잡) 조회
2) insertSchdul() : 조회한 스케쥴 정보들을 scheduler에 등록
3) scheduler.start : scheduler 를 실행
※ restart() : 외부 호출을 받아 스케쥴러를 재실행 할 경우 사용됨.
재실행을 목적으로 scheduler를 중지시킬 경우 scheduler.stop() 대신 stanby()를 사용해야 함을 주의

scheduler.scheduleJob(jobDetail, trigger)
jobDetail : Job의 실제 구현내용과 Job 실행에 필요한 상세 정보가 담겨있음
trigger : job을 언제 어떤 주기로 실행할지에 대한 정보가 담겨있음
1
2
3
4
5
6
7
8
9
10
11
12
13
14
15
16
17
18
19
20
21
22
23
24
25
26
27
28
29
30
31
32
33
34
35
36
37
38
39
40
41
42
43
44
45
46
47
48
49
50
51
52
53
54
55
56
57
58
59
60
61
62
63
64
65
66
67
68
69
70
71
72
73
74
75
76
77
78
79
80
81
82
83
84
85
86
87
88
89
90
91
92
93
94
95
96
97
98
99
100
101
102
103
104
105
106
107
108
109
110
111
112
113
114
115
116
117
118
119
120
 
public class QuartzStarter {
   
   private static final Logger LOGGER = LoggerFactory.getLogger(QuartzStarter.class);
   
   @Autowired
   private SchdulService schdulService;
 
   @Autowired
   private SchedulerFactoryBean schedulerFactoryBean;
   
   @Autowired
   private InitAbandonedJobService initAbandonedJobService;
   
   @Resource(name="scheduleListener")
   private JobListener scheduleListener;
   
   private Scheduler scheduler;
   
 
   /** 서버 launch 시 호출되는 메소드 
    *  1. 서버 shutdown 시 running 중이던 job의 status를 ABANDONED 로 UPDATE
    *  2. 스케쥴JOB 등록 및 스케쥴러 시작
    */
   public void init() throws Exception {
      scheduler = schedulerFactoryBean.getScheduler();
      addListener();
      scheduler.clear();
      List<SchdulVO> schdulList = getSchdulList();
      registScheduleForScheduler(schdulList);
      scheduler.start();
   }
 
   
   /** 스케쥴 리스트 조회 */
   public List<SchdulVO> getSchdulList() throws Exception {
      return schdulService.selectSchdulList();     
   }
   
   
   /** 스케쥴러에 스케쥴JOB 등록 */
   private void registScheduleForScheduler(List<SchdulVO> schdulList) throws Exception {
      for (SchdulVO schdul : schdulList) {
            schdul.setParamtrList(schdulService.selectSchdulParamtr(schdul));
            insertSchdul(schdul);
      }
   }
   
   /** scheduler 에 리스너 등록 */
   private void addListener() throws SchedulerException {
      scheduler.getListenerManager().addJobListener(scheduleListener);
   }
   
   
   /** scheduler 에 scheduleJob 등록 */
   public void insertSchdul(SchdulVO schdulVO) throws Exception {
      
      JobDetail jobDetail;          // Job 상세 정보 VO
      CronTrigger cronTrigger;      // Trigger 객체
      
      jobDetail = JobBuilder.newJob(SchedulerJob.class)
            .withIdentity(new JobKey(schdulVO.getSchdulNo()))
            .build();
      
      jobDetail.getJobDataMap().put("batchId"     , schdulVO.getBatchId    ());
      jobDetail.getJobDataMap().put("batchProgrm" , schdulVO.getBatchNm    ());
      jobDetail.getJobDataMap().put("paramtrList" , schdulVO.getParamtrList());
      
      cronTrigger = TriggerBuilder.newTrigger()
             .withIdentity(schdulVO.getSchdulNo())
             .withSchedule(CronScheduleBuilder.cronSchedule(schdulVO.getCronExpression()).withMisfireHandlingInstructionDoNothing())
             .forJob(schdulVO.getSchdulNo())
             .build();
      
      try {
         scheduler.scheduleJob(jobDetail, cronTrigger);
      } catch (SchedulerException e) {
         LOGGER.error("ex while registering schedule {}", e.getMessage());
      } catch (Exception e) {
         LOGGER.error("ex while registering schedule {}", e.getMessage());
      }
      
   }
   
   
   //https://stackoverflow.com/questions/3650539/what-is-the-difference-between-schedulers-standby-and-pauseall
   //stanby 는 scheduler 를 정지시키고 정지상태에서 misfire 된 job 들을 start가 된 이후 무시한다.
   /** 스케쥴러 재시작
    *  ADM 스케쥴 수정 및 삭제시 호출됨 
    */
   public void restart() {
      try {
         scheduler.standby();   
         addListener();
         scheduler.clear();
         List<SchdulVO> schdulList = getSchdulList();
         registScheduleForScheduler(schdulList);
         scheduler.start();
      } catch (Exception e) {
         LOGGER.error("ex in restart() {}", e.getMessage());
      }
   }
   
   
   /** 스케쥴러 종료
    *  WAS SERVER shutdown
    */
   public void destroy() {  
      try {
         if (scheduler != null) {  
            scheduler.shutdown();
            schedulerFactoryBean.destroy();
         }
      } catch(Exception e) {
         LOGGER.error("ex in destroy() {}", e.getMessage());
      }
   }
   
}
 
cs


[SchedulerJob]
아래와 같이 QuartzJobBean 의 executeInternal 추상메소드를 구현하여 job 에서 수행될 로직을 작성한다.
이는 Batch Job이 아닌 SchedulerJob(=QuartzJob)이며, 쿼츠잡에서 batch job 을 실행하도록 구현한다.
batch job 은 QuartzStarter 의 insertSchdul() 내에서 넘겨주었던 JobDataMap에서 꺼내온 데이터를 기준으로 한다.
1) jobContext 에서 배치 Bean name, 파라미터 정보들을 꺼낸 후
2) jobLauncher.run(배치Bean, 배치파라미터) 로 배치 실행
※ jobExecutionId는 job이 실행 된 이후 생성되므로(jobLauncher.run() 이후) 배치 결과 관리 화면과 같은 기능이 필요할 경우 이를 유의해야 한다.

1
2
3
4
5
6
7
8
9
10
11
12
13
14
15
16
17
18
19
20
21
22
23
24
25
26
27
28
29
30
31
32
33
34
35
36
37
38
39
40
41
42
43
44
45
46
47
import org.springframework.scheduling.quartz.QuartzJobBean;
 
@Transactional
//@DisallowConcurrentExecution   //클러스터링 환경에선 해당 어노테이션 작동하지 않음
public class SchedulerJob extends QuartzJobBean {
 
   private static final Logger LOGGER = LoggerFactory.getLogger(SchedulerJob.class);
      
   @Autowired
   private JobLauncher jobLauncher;
   
   @Resource(name="QuartzUtils")
   private QuartzUtils quartzUtils;
   
   @Override
   protected void executeInternal(JobExecutionContext jobContext) throws JobExecutionException {
      LOGGER.info("executeInternal()");
      try {
          JobDataMap dataMap = jobContext.getJobDetail().getJobDataMap();
          
          JobParametersBuilder jpb = new JobParametersBuilder();
          for (BatchParamtrVO paramtr : (List<BatchParamtrVO>)dataMap.get("paramtrList")) {
             jpb.addString(paramtr.getParamtrNm(), paramtr.getParamtr());
          }
          
          String schdulNo = jobContext.getJobDetail().getKey().getName();
          String currentTime = Long.toString(System.currentTimeMillis());
          String schdulResultNo = dataMap.getString("schdulResultNo");
          
          jpb.addString("schdulNo", schdulNo);
          jpb.addString("currentTime", currentTime);
          jpb.addString("schdulResultNo", schdulResultNo);
 
          JobExecution je = null;                
          je = jobLauncher.run((Job)BeanUtils.getBean(dataMap.getString("batchProgrm")), jpb.toJobParameters());
          result = je.getId(); //jobExecutionId 가 생성되는 시점에 유의 (배치 실행 후 리턴되며 실행 전 알 수 없음)
             
          jobContext.setResult(result);
         
      } catch (JobExecutionAlreadyRunningException e) {
         LOGGER.info("ex while excute : {}", e.getMessage());
      } catch (Exception e) {
         LOGGER.info("ex while excute : {}", e.getMessage()); 
      }
   }
   
}
cs


[BeanUtils]
context 에서 bean 정보를 가져오기 위한 유틸
batch job 이름을 기준으로 bean을 가져오기 위함. jobLauncher run 을 할 때 사용.

1
2
3
4
5
6
7
8
9
10
11
12
13
14
15
16
17
18
19
20
21
22
23
24
25
26
package com.spring.quartz.utils;
 
import org.springframework.context.ApplicationContext;
import org.springframework.context.ApplicationContextAware;
import org.springframework.stereotype.Component;
 
// bean에 ApplicationContext 정보 주입
@Component
public class BeanUtils implements ApplicationContextAware {
   private static ApplicationContext context;
 
   @Override
   public void setApplicationContext(ApplicationContext applicationContext) {
      // TODO Auto-generated method stub
      context = applicationContext;
   }
   
   public static <T> T getBean(Class<T> beanClass) {
      return context.getBean(beanClass);
   }
   
   public static Object getBean(String beanName) {
      return context.getBean(beanName);
   }
}
 
cs


[BatchConfig]
Spring Batch 와 관련된 설정.
JobRepository : batch job meta data 에 대한 CRUD
JobExplorer : batch job meta data 에 대한 read-only 기능
JobOperation : stop, restart 등 job 에 대한 제어

※ jobLauncher 의 taskExecutor 는 여러종류가 있으며 그 중 비동기 처리를 위한 taskExecutor 사용시 실행 순서에 유의해야 함.
1) sync 방식에서의 순서 :
jobToBeExecuted(scheduler listener 전처리) -> scheduler job(batch job 실행) -> step 실행 -> tasklet 실행 [tasklet beforeStep -> tasklet execute -> tasklet AfterStep] -> jobWasExecuted(scheduler listener 후처리)
2) async 방식에서의 순서 :
jobToBeExecuted(scheduler listener 전처리) -> scheduler job(batch job 실행) -> jobWasExecuted(scheduler listener 후처리) -> step 실행 -> tasklet 실행 [tasklet beforeStep -> tasklet execute -> tasklet AfterStep]

1
2
3
4
5
6
7
8
9
10
11
12
13
14
15
16
17
18
19
20
21
22
23
24
25
26
27
28
29
30
31
32
33
34
35
36
37
38
39
40
41
42
43
44
45
46
47
48
49
50
51
52
53
54
55
56
57
58
59
60
61
62
63
64
65
66
67
68
69
70
71
72
73
74
75
76
77
78
79
80
81
82
83
84
85
86
87
88
89
90
91
92
93
94
95
96
97
98
99
100
package com.spring.batch.config;
 
import javax.sql.DataSource;
 
import org.springframework.batch.core.configuration.JobRegistry;
import org.springframework.batch.core.configuration.support.JobRegistryBeanPostProcessor;
import org.springframework.batch.core.configuration.support.MapJobRegistry;
import org.springframework.batch.core.explore.JobExplorer;
import org.springframework.batch.core.explore.support.JobExplorerFactoryBean;
import org.springframework.batch.core.launch.JobLauncher;
import org.springframework.batch.core.launch.JobOperator;
import org.springframework.batch.core.launch.support.SimpleJobLauncher;
import org.springframework.batch.core.launch.support.SimpleJobOperator;
import org.springframework.batch.core.repository.JobRepository;
import org.springframework.beans.factory.annotation.Autowired;
import org.springframework.beans.factory.annotation.Qualifier;
import org.springframework.context.annotation.Bean;
import org.springframework.context.annotation.Configuration;
import org.springframework.scheduling.quartz.SimpleThreadPoolTaskExecutor;
import org.springframework.transaction.PlatformTransactionManager;
 
/** https://docs.spring.io/spring-batch/docs/current/reference/html/job.html */
@Configuration
public class BatchConfig {
   
   private static final String TABLE_PREFIX = "BATCH_";
   private static final int THREAD_COUNT = 10;
   
   @Autowired
   private DataSource dataSource;
   @Autowired
   @Qualifier("txManager")
   private PlatformTransactionManager txManager; 
   
   /** job 메타데이터에 대한 CRUD 제공 */
   @Bean
   public JobRepository jobRepository() throws Exception {
      CustomJobRepositoryFactoryBean jfb = new CustomJobRepositoryFactoryBean();
      jfb.setTablePrefix(TABLE_PREFIX);
      jfb.setDataSource(dataSource);
      jfb.setTransactionManager(txManager);
      jfb.afterPropertiesSet();
      return (JobRepository) jfb.getObject();
   }
   
   /** job 실행시키는 런쳐 */
   @Bean
   public JobLauncher jobLauncher() throws Exception {
      SimpleJobLauncher jobLauncher = new SimpleJobLauncher();
      jobLauncher.setJobRepository(jobRepository());
      jobLauncher.setTaskExecutor(simpleThreadPoolTaskExecutor());
      jobLauncher.afterPropertiesSet();
      return jobLauncher;
   }
   
   /** 비동기처리 및 job을 thread pool 로 동작시키기 위해 
    * (quartz thread count 와 일치시켜야 함) */
   @Bean
   public SimpleThreadPoolTaskExecutor simpleThreadPoolTaskExecutor() throws Exception {
      SimpleThreadPoolTaskExecutor stpte = new SimpleThreadPoolTaskExecutor();
      stpte.setThreadCount(THREAD_COUNT);
      return stpte;
   }
   
   /** 현재 실행중인 job 정보 및 job 제어 */
   @Bean
   public JobExplorer jobExplorer() throws Exception {
      JobExplorerFactoryBean jfb = new JobExplorerFactoryBean();
      jfb.setDataSource(dataSource);
      jfb.setTablePrefix(TABLE_PREFIX);
      jfb.afterPropertiesSet();
      return (JobExplorer) jfb.getObject();
   }
   
   /** 현재 실행중인 job 정보 및 job 제어 */
   @Bean
   public JobOperator jobOperator() throws Exception {
      SimpleJobOperator sjo = new SimpleJobOperator();
      sjo.setJobLauncher(jobLauncher());
      sjo.setJobRepository(jobRepository());
      sjo.setJobRegistry(jobRegistry());
      sjo.setJobExplorer(jobExplorer());
      return sjo;
   }
   
   @Bean
   public JobRegistryBeanPostProcessor JobRegistryBeanPostProcessor() throws Exception {
      JobRegistryBeanPostProcessor postProcessor = new JobRegistryBeanPostProcessor();
      postProcessor.setJobRegistry(jobRegistry());
      return postProcessor;
   }
   
   @Bean
   public JobRegistry jobRegistry() throws Exception {
      MapJobRegistry mjr = new MapJobRegistry();
      return mjr;
   }
   
}
 
cs


[Sample Batch Job Bean]
Batch job bean 설정이 되어있는 xml

1
2
3
4
5
6
7
8
9
10
11
12
13
14
15
16
17
18
19
<?xml version="1.0" encoding="UTF-8"?>
<beans xmlns="http://www.springframework.org/schema/beans" xmlns:xsi="http://www.w3.org/2001/XMLSchema-instance"
    xmlns:util="http://www.springframework.org/schema/util"
    xsi:schemaLocation="http://www.springframework.org/schema/beans http://www.springframework.org/schema/beans/spring-beans-3.0.xsd
        http://www.springframework.org/schema/util http://www.springframework.org/schema/util/spring-util.xsd
        http://www.springframework.org/schema/batch http://www.springframework.org/schema/batch/spring-batch.xsd
        ">
 
    <job id="SampleJob" xmlns="http://www.springframework.org/schema/batch">
        <step id="SampleJob.step1">
            <tasklet ref="SampleJob.step1Adapter"/>
        </step>
    </job>
 
    <bean id="SampleJob.step1Adapter" class="com.spring.batch.job.tasklet.SampleJob">
    </bean>
        
</beans>
 
cs


[Sample Step]

1
2
3
4
5
6
7
8
9
10
11
12
13
14
15
16
17
18
19
20
21
22
23
24
25
26
27
28
 
public class SampleJob implements Tasklet , StepExecutionListener 
{
    private static final Logger LOGGER = LoggerFactory.getLogger(SampleJob.class);
 
 
    public void beforeStep(StepExecution stepExecution) 
    {
        //전처리
    }
    
 
    public ExitStatus afterStep(StepExecution stepExecution) 
    {
        //후처리
        return ExitStatus.COMPLETED;
    }
    
 
    @Override
    public RepeatStatus execute(StepContribution contribution, ChunkContext chunkContext) throws Exception 
    {
        //로직
        return RepeatStatus.FINISHED;
    }
 
}
 
cs


4. batch job junit 테스트하기

특정 배치를 테스트 해보자.
jUnit 으로 batch job 을 테스트하기 위해선 아래와 같이 실환경보다 필요한 bean 이 좀 적다.
※ jobLauncher 의 경우 실환경에선 비동기 동작을 위해 async taskExecutor 를 사용했지만 테스트환경에선 해당 부분을 제거해준다.
jobLauncherTestUtils 은 배치테스트를 위한 bean

[4-1. bean 설정]
기타 설정들은 생략하겠다.

1
2
3
4
5
<bean id="jobLauncherTestUtils"  class="org.springframework.batch.test.JobLauncherTestUtils"/>
<bean id="jobRepository" class="org.springframework.batch.core.repository.support.MapJobRepositoryFactoryBean" />
<bean id="jobLauncher" class="org.springframework.batch.core.launch.support.SimpleJobLauncher">
   <property name="jobRepository" ref="jobRepository" />
</bean>
cs


[4-2. 테스트코드 작성]
1) 테스트를 하고자 하는 batch xml 을 context config 에 추가
2) job parameter 가 필요한 경우 생성
3) launchJob 을 사용해 배치 실행
※ jndi 사용시 SpringJUnit4ClassRunner 를 구현하여 dataSource를 바인딩해준다. (이와 관련된 자세한 내용은 이곳을 참고)

1
2
3
4
5
6
7
8
9
10
11
12
13
14
15
16
17
18
19
20
21
22
23
24
25
26
27
28
29
30
31
32
33
34
35
36
37
//@RunWith(SpringJUnit4ClassRunner.class)
@RunWith(ExtSpringJUnit4ClassRunner.class)   //jndi 사용시 datasource binding 
@ContextConfiguration(locations = { 
                                      "classpath:batch/job/sampleJob.xml"    //테스트하고자 하는 batch xml 
                                    , "classpath:test-*.xml"
                                    , "classpath:bmp/batch/context-datasource.xml"
                                    , "classpath:bmp/spring/context-mybatis.xml"
                                    , "classpath:bmp/spring/context-datasource.xml"
                                   })
public class BatchTest {
 
   //* 테스트 주입설정 주의사항
   //  org.springframework.core.task.SimpleAsyncTaskExecutor 사용시 비동기 aync 로 배치가 동작하므로 테스트시 결과값 확인이 불가
   //  junit test 는 test xml 을 따로 두어 asyncTaskExecutor 제거
   
   private static final Logger LOGGER = LoggerFactory.getLogger(BatchTest.class);
   
   @Autowired
   private JobLauncherTestUtils jobLauncherTestUtils;
   
   @Test
   public void testJob() throws Exception {
      
     JobExecution jobExecution = null;
     
     try {
        Map<String, JobParameter> map = new HashMap<>();
        map.put("sampleInputKey"new JobParameter("sampleInputValue"));
        JobParameters jps = new JobParameters(map);
        jobExecution = jobLauncherTestUtils.launchJob(jps);
     } catch(Exception e) {
        e.printStackTrace();
     }
     
     Assert.assertEquals(ExitStatus.COMPLETED.getExitCode(), jobExecution.getExitStatus().getExitCode());
   }
}
cs


5. 중복 스케쥴에 대한 SKIP 처리

멱등성이 보장되지 않는 배치잡에 대한 중복 실행은 각종 에러가 발생할 수 있다. (스케쥴 간격보다 배치 수행시간이 긴 경우)
위 경우 중복 스케쥴에 대한 SKIP 처리가 필요한데,
동기식 방식 및 클러스터링 모드가 아닌 단일 쿼츠 환경에서는 쿼츠잡 쪽에 @DisallowConcurrentExecution 어노테이션을 붙여주어 스케쥴 중복실행을 쉽게 막아 줄 수 있지만, 동기방식 혹은 클러스터링을 사용하는 배치서버의 경우 중복 스케쥴에 SKIP 처리가 쉽지 않다.
이 부분은 quartz 메타테이블인 schedule_state 을 사용하여 처리 했다.
해당 부분은 추후 정리하여 포스팅하겠다..

6. 개선 및 보완 사항

1) 스프링 배치 공부하기
스프링 쿼츠로 스프링 배치를 실행시키기 위해 쿼츠 쪽 설계만 됐을 뿐 Spring Batch 쪽 활용이 부족하다.
스프링 배치 쪽 공부는 추후에 더 해보는 걸로..(chunk 방식, 중단된 step 에서의 재시작 등)

2) 핫디플로이 관련 공부하기
#스케쥴 등록/수정/삭제 후 반영
해당 기능은 큰 어려움 없이 구현이 가능했다.
배치서버에 스케쥴러를 재기동 시키는 API를 두고, 관리UI(관리서버)에서 스케쥴 등록/수정/삭제시 해당 API를 호출하여 스케쥴 변경사항을 서버재기동없이 즉시 반영가능하다.

#배치잡 등록/수정/삭제 후 반영
관련 기능은 요구사항에 없었으므로 구현되지 않았으나, 관련 기능을 어떻게 구현할 수 있을지 고민해볼 필요가 있겠다.
관리서버에서 추가한 배치잡과 관련된 소스(class파일 등)가 배치서버 쪽에 존재해야 이를 사용한 스케쥴 편성이 의미가 있으므로(동작 하므로) 배치잡 추가시 배치서버 쪽에 새로운 class 파일 및 bean 설정이 되어있는 xml 파일 등을 배치서버 쪽에 ftp 전송등을 하여 업로드해준 후 배치서버가 재기동 되어야 할 듯 하다. (핫디플로이 및 기타 방법 알아보기)


깃헙 :
https://github.com/develo-pyo/springfw-batch

참고 자료 :
Quartz Clustering1 (quartz doc)
Quartz Clustering2
schedule cron expression
Quartz Schedule Tutorial
Spring Batch doc

반응형

1. Transaction 설정방법

트랜잭션 설정 방법은 이곳을 참고.


2. Isolation 

SQL 의 Isolation level 과 동일하게 동작 (SQL 격리수준 속성에 대한 자세한 내용은 이곳을 참고)

- READ_UNCOMMITED : commit 되지 않은 데이터를 읽는다

- READ_COMMITED : commit 된 데이터만 읽는다

- REPEATABLE_READ : 자신의 트랜잭션이 생성되기 이전의 트랜잭션(낮은 번호의 트랜잭션)의 커밋된 데이터만 읽는다 

- SERIALIZABLE : LOCK 을 걸고 사용

- DEFAULT : 사용하는 DB 기본 설정을 따른다. (Oracle 은 READ_COMMITED, Mysql InnoDB 는 REPEATABLE_READ 가 Default)


3. Propagation

- REQUIRE : 부모 트랜잭션(자신을 호출한 메소드의 Transaction)이 존재한다면 그에 포함되어 동작. 부모 트랜잭션이 존재하지 않을 경우 새로 트랜잭션 생성(default 속성)

- SUPPORTS : 부모 트랜잭션이 존재하면 그에 포함되어 동작. 부모 트랜잭션이 없다면 트랜잭션 없이 동작.

- MANDATORY : 부모 트랜잭션이 존재하면 그에 포함되어 동작. 부모 트랜잭션이 없다면 예외 발생시킨다.

- REQUIRES_NEW : 부모 트랜잭션 존재 여부와 상관없이 트랜잭션을 새로 생성

- NOT_SUPPORTED : 트랜잭션을 사용하지 않는다. 부모 트랜잭션이 존재하면 보류시킨다.

- NEVER : 트랜잭션을 사용하지 않도록 강제한다. 부모 트랜잭션이 존재할 경우 예외를 발생시킨다.

- NESTED : 부모 트랜잭션이 존재하면 부모 트랜잭션 안에 트랜잭션을 만든다. 부모트랜잭션의 커밋과 롤백에 영향을 받지만 자신의 커밋과 롤백은 부모 트랜잭션에 영향을 주지 않는다.


※ NESTED 사용의 예 :

메인 작업을 진행하며 이와 관련된 로그를 DB에 저장해야 한다.

로그를 저장하는 작업이 실패하더라도 메인 작업의 트랜잭션은 롤백하지 않는다.

하지만 메인 작업이 실패할 경우 로그 또한 저장하지 않아야 한다(롤백 되어야 한다).

Propagation 과 관련된 부분은 이곳을 참고


4. 전파속성(Propagation)과 격리레벨(Isolation Level) 사용 예제

[에러가 발생하는 코드]

1
2
3
4
5
6
7
8
9
10
11
12
13
14
15
16
17
18
19
20
21
22
23
24
25
26
27
28
29
30
31
32
33
34
35
36
37
38
39
@Component
class SeqUtil {
    @Resource
    private DAO dao;
    
    public long getNextSeq(){
        long currentSeq = dao.getCurrentSeq(); //현재 seq를 가져온다
        long nextSeq = currentSeq+1L; // seq + 1
       dao.updateSeq(currentSeq+1L); //DB seq 를 +1 한 값으로 update 한다
        return nextSeq;
    }
}
 
 
@Component
class InfoUtil {
    @Resource
    private DAO dao;
    
    public void insertInfo(long nextSeq){
        dao.insertInfo(nextSeq);  //+1 한 seq 및 기타 정보를 저장한다
    }
}
 
 
@Service
class Service {
    @Autowired
    private SeqUtil seqUtil;
    
    @Autowired
    private InfoUtil infoUtil;
    
    @Transactional
    public void service(){
      long nextSeq = seqUtil.getNextSeq(); //+1 한 seq 를 가져온다
       infoUtil.insertInfo(nextSeq);        //+1 한 seq 및 기타 정보를 저장한다
    }
}


cs

[의도]

autoincrement 속성을 사용하지 않고 위의 getNextSeq() 와 같이 직접 구현한 상황.

getNextSeq() : 현재 seq 값을 가져온 후 +1 증가 시킨다. 증가시킨 값으로 seq 값을 update 하고 증가시킨 seq 값을 return 한다.

insertInfo() : seq 값을 받아 기타 정보들과 함께 데이터를 저장한다.

Service() : getNextSeq(), insertInfo() 메소드를 사용하는 메소드 (getNextSeq(), insertInfo() 메소드가 service() 메소드 하위에 속해 있으므로 상위 메소드인 service()의 Transaction에 묶이게 된다)


[문제]

배치와 같이 동시각에 N개의 서비스가 처리된다면 문제가 발생한다.

insert 한 레코드의 seq 값이 1, 2, 3, 4 .... 와 같이 1씩 순차적으로 증가하길 기대했지만 증가하길 기대했지만 1, 1, 2, 2 ... 와 같이 중복이 발생되며 저장된다.


[해결 방안 1. 격리수준을 SERIALIZABLE 로 올린다]

1
2
3
4
5
6
7
8
9
10
11
12
13
14
15
16
17
18
19
20
21
22
23
24
25
26
27
28
29
30
31
32
33
34
35
36
37
38
39
40
@Component
class SeqUtil {
    @Resource
    private DAO dao;
    
    @Transactional(isolation=Isolation.SERIALIZABLE, propagation=Propagation.REQUIRES_NEW)
    public long getNextSeq(){
        long currentSeq = dao.getCurrentSeq(); //현재 seq를 가져온다
        long nextSeq = currentSeq+1L; // seq + 1
      dao.updateSeq(currentSeq+1L); //DB seq 를 +1 한 값으로 update 한다
        return nextSeq;
    }
}
 
 
@Component
class InfoUtil {
    @Resource
    private DAO dao;
    
    public void insertInfo(long nextSeq){
        dao.insertInfo(nextSeq);  //+1 한 seq 및 기타 정보를 저장한다
    }
}
 
 
@Service
class Service {
    @Autowired
    private SeqUtil seqUtil;
    
    @Autowired
    private InfoUtil infoUtil;
    
    @Transactional
    public void service(){
        long nextSeq = seqUtil.getNextSeq(); //+1 한 seq 를 가져온다
        infoUtil.insertInfo(nextSeq);         //+1 한 seq 및 기타 정보를 저장한다
    }
}
cs

1) service() 메소드 에서 getNextSeq() 메소드를 분리하여 별도의 Transaction 으로 동작하도록 REQUIRES_NEW 전파속성을 적용시킨다. (혹은 service() 메소드의 @Tranactional 어노테이션을 제거하고 해당 메소드가 사용하는 getNextSeq() 메소드와 insertInfo(..) 메소드에 각각 @Transactional 어노테이션을 붙인다)

2) SERIALIZABLE 격리 레벨을 적용시킨다.


[해결 방안 2. 동기화 synchronized 키워드를 사용하여 임계영역 문제 해결]

1
2
3
4
5
6
7
8
9
10
11
12
13
14
15
16
17
18
19
20
21
22
23
24
25
26
27
28
29
30
31
32
33
34
35
36
37
38
39
40
41
42
43
44
@Component
class SeqUtil {
    @Resource
    private DAO dao;
    
    @Transactional(propagation=Propagation.REQUIRES_NEW)
    public long getNextSeq(){
        long currentSeq = dao.getCurrentSeq(); //현재 seq를 가져온다
        long nextSeq = currentSeq+1L; // seq + 1
      dao.updateSeq(currentSeq+1L); //DB seq 를 +1 한 값으로 update 한다
        return nextSeq;
    }
}
 
 
@Component
class InfoUtil {
    @Resource
    private DAO dao;
    
    public void insertInfo(long nextSeq){
        dao.insertInfo(nextSeq);  //+1 한 seq 및 기타 정보를 저장한다
    }
}
 
 
@Service
class Service {
    @Autowired
    private SeqUtil seqUtil;
    
    @Autowired
    private InfoUtil infoUtil;
 
    private final Object semaphore = new Object();
    
    @Transactional
    public void service(){
        synchronized(semaphore){
            long nextSeq = seqUtil.getNextSeq(); //+1 한 seq 를 가져온다
        }
        infoUtil.insertInfo(nextSeq);         //+1 한 seq 및 기타 정보를 저장한다
    }
}
cs

1) service() 메소드 에서 getNextSeq() 메소드를 분리하여 별도의 Transaction 으로 동작하도록 REQUIRES_NEW 전파속성을 적용시킨다. (혹은 service() 메소드의 @Tranactional 어노테이션을 제거하고 해당 메소드가 사용하는 getNextSeq() 메소드와 insertInfo(..) 메소드에 각각 @Transactional 어노테이션을 붙인다)

2) 임계영역을 synchronized 키워드 및 블록으로 감싸 준다.


반응형

1. JobRepository, JobExplorer, JobOperation 의 역할

- JobRepository : meta-data 에 대한 CRUD

- JobExplorer : meta-data 에 대한 read-only 기능

- JobOperation : stop, restart 등 job 에 대한 제어


2. jobOperator 의 stop(jobExecutionId) 메소드

- 실행중인 job 을 stop 시킨다.

- Stop 은 graceful 하게 동작한다. (Stop이 즉시 이뤄지지 않으며 현재 실행중이던 step 은 끝까지 다 실행 된 후 job이 stop 된다)


3.  jobOperator 의 stop(jobExecutionId) 메소드 들여다 보기

(spring-batch-core-4.2.1 org.springframework.batch.core.launch.support.SimpleJobOperator.stop())

1
2
3
4
5
6
7
8
9
10
11
12
13
14
15
16
17
18
19
20
21
22
23
24
25
26
27
28
29
30
31
32
33
34
35
36
37
38
39
40
41
42
43
44
45
46
47
48
49
@Override
@Transactional
public boolean stop(long executionId) throws NoSuchJobExecutionException, JobExecutionNotRunningException {
  JobExecution jobExecution = findExecutionById(executionId);
  // Indicate the execution should be stopped by setting it's status to
  // 'STOPPING'. It is assumed that
  // the step implementation will check this status at chunk boundaries.
  BatchStatus status = jobExecution.getStatus();
  if (!(status == BatchStatus.STARTED || status == BatchStatus.STARTING)) {
     throw new JobExecutionNotRunningException("JobExecution must be running so that it can be stopped: "+jobExecution);
  }
  jobExecution.setStatus(BatchStatus.STOPPING);
  jobRepository.update(jobExecution);
  
  try {
     Job job = jobRegistry.getJob(jobExecution.getJobInstance().getJobName());
     
     if (job instanceof StepLocator) {//can only process as StepLocator is the only way to get the step object
        //get the current stepExecution
        for (StepExecution stepExecution : jobExecution.getStepExecutions()) {
           logger.info("STOP 메소드 내의 jobExecutionId : "  + stepExecution.getJobExecutionId());
           
           if (stepExecution.getStatus().isRunning()) {
              try {
                 //have the step execution that's running -> need to 'stop' it
                 Step step = ((StepLocator)job).getStep(stepExecution.getStepName());
                 if (step instanceof TaskletStep) {
                    Tasklet tasklet = ((TaskletStep)step).getTasklet();
                    if (tasklet instanceof StoppableTasklet) {
                       StepSynchronizationManager.register(stepExecution);
                       logger.info("stop stoppableTasklet ! ");
                       ((StoppableTasklet)tasklet).stop();
                       StepSynchronizationManager.release();
                    }
                 }
              }
              catch (NoSuchStepException e) {
                 logger.warn("Step not found",e);
              }
           }
        }
     }
  }
  catch (NoSuchJobException e) {
     logger.warn("Cannot find Job object in the job registry. StoppableTasklet#stop() will not be called",e);
  }
  
  return true;
}
cs

- StoppableTasklet 의 stop() 을 호출하고 있음을 알 수 있다.

- StoppableTasklet 은 Tasklet interface를 상속받는 interface이며 내부적으로 stop() 추상메소드를 갖고있다.

- batch job 에서 Tasklet 대신 StopTasklet 을 구현한 후 stop() 메소드를 오버라이딩 할 경우, jobOperator.stop() 호출시에 batch job 내의 flag 값 제어 등을 할 수 있다. 마치 리스너와 같이 동작한다.


4. stop 호출에 따른 meta-data 의 STATUS 필드 값 변화 순서

1. jobOperator.stop(jobExecutionId); 호출

2. step의 STATUS필드값이 stopped 로 바뀜 (step_execution 테이블의 status 필드값)

3. job 의 STATUS필드값이 stopping 으로 바뀜 (job_execution 테이블의 status 필드값)

4. 스텝이 끝난 후 job의 status를 stopped 로 바꿈


https://docs.spring.io/spring-batch/docs/current/reference/html/step.html


반응형

P2P (Peer to Peer)

- always-on server 가 없다

- end systems 간의 직접 communicate

eg) BitTorrent, VoIP(Skype)


1. 보통의 Server-Client 간 File Distribution Time

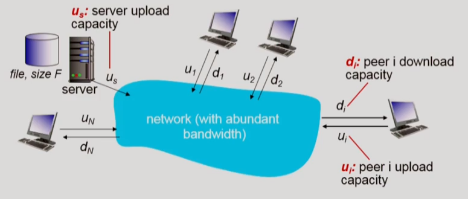
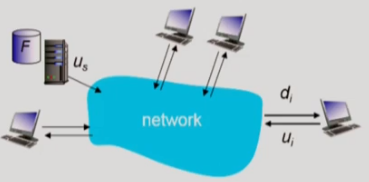
1) File F 를 N 번 업로드 하는데 걸리는 서버의 전송 시간 : NF/Us

2) 클라이언트가 파일 F를 다운로드 받는데 걸리는 최대 시간 F/dmin

파일 F를 N개의 클라이언트에 distribute 하는데 걸리는 시간 : max { NF/Us , F/dmin }

    : 서버가 파일을 업로드 하는 시간 or 클라이언트 중 파일을 다운로드하는데 최대로 걸리는 시간 중 최대 시간

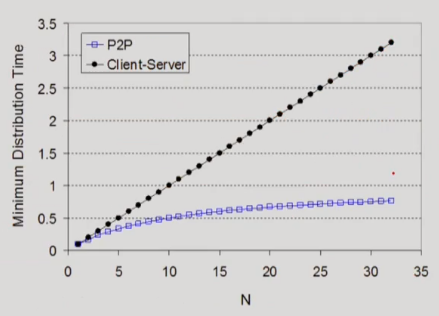
    : 유저가 많아질 수록 N 이 증가하므로 속도가 느려짐


2. P2P 에서의 File Distribution Time

1) 서버에서 하나의 카피를 올리는 경우 걸리는 시간 : F/Us

2) 클라이언트가 파일 F를 다운로드 받는데 걸리는 최대 시간 : F/dmin

N명의 클라이언트 모두가 파일을 받을 경우 NF bits

max upload rate : Us + ∑Ui

파일 F를 N개의 클라이언트에 distribute 하는데 걸리는 시간 : max {F/Us, F/dmin, NF/(Us+∑Ui)}

: 유저가 많아질수록 N 과 Ui 모두 증가하므로 속도가 느려지지 않음


Client-Server vs P2P Distribution Time 비교


BitTorrent

- file 을 256Kb chucks로 나눔

- torrent : 파일 chunk를 교환하는 peer 그룹

- tracker : 토렌트에 속하는 peer 가 누구인지 tracking

- churn : peer 가 들어갔다 나갔다 하는 것

- rarest first : chunk를 보유한 peer 가 가장 적은 것 부터 request

- selfish peer : 다운로드만 받고 업로드는 하지 않는 peer


※ tit-for-tat

좋은 partner peer 를 남기고 selfish peer 를 버리기 위한 전략

- 가장 많은 chunk 를 제공하는 peer top 4 에게 chunk 를 보내준다

- 10초마다 top 4를 재평가

- 30초마다 랜덤으로 peer 를 선택하고 chunk를 보낸다. (top 4 가 고정되는 것을 방지하기 위해)


※ 이화여대 이미정 교수님의 네트워크 강의 내용 정리


반응형

DNS : Domain Name System

hostname 를 ip 주소로 해석

centralize DNS 사용하지 않는 이유

1) 트래픽 집중

2) 먼 거리에 위치한 국가의 데이터베이스 접근 불리

3) 유지보수

4) 에러를 대비한 클러스터링 없음


DNS 서버의 위계구조 (hierarchial database)

- Root DNS Servers

- Top-level Domain Servers (TLD)

  : .com, .org, .edu, .net 및 .jp .kr 등의 국가 도메인을 담당 eg) 한국인터넷정보센터가 .kr 을 담당하는 TLD

- Authoritative DNS Servers

  : 각 기관이 가지고 있는 DNS 서버

  : 기관내 connected 된 모든 hostname, IP 매핑정보를 가지고 있음

- Local DNS name Server

  : 위계구조에 포함되진 않음, 매핑정보를 caching 하며 proxy server로도 불림


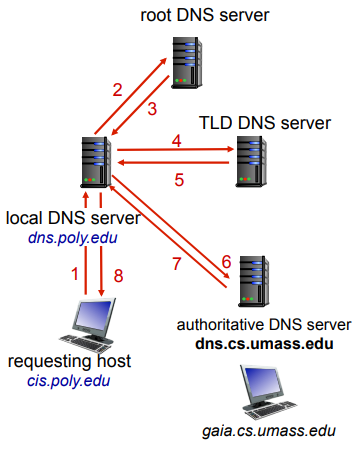
1) client는 root dns server에 com DNS server 질의

2) client는 get amazon.com DNS 서버를 알아내기 위해 .com DNS server에 질의

3) client는 www.amazon.com IP 주소를 알아내기 위해 amazon.com DNS server에 질의


DNS root name servers 는 세계 총 13군데 위치

우리나라는 가장 가까운 일본 DNS 사용


DNS 위계 구조 호출 순서

root > TLD > authoritative 순서로 호출

local DNS server에 캐싱하여 상위 레벨 DNS 서버의 부하방지

Local DNS Server 의 Outdated Domain name 정보의 확인을 위해 TTL(Time-To-Live) 레코드 사용

유효기간(TTL) 이 지난 경우 캐시 삭제됨


DNS records

name, value, type, ttl


레코드 타입별 name/value

A (Host) : name(호스트 서버네임) value(IPv4) eg)authoritative DNS 

AAAA : name(호스트 서버네임) value(IPv6) 

NS (Name Server) : name(도메인네임) value(authoritative 서버네임) eg) TLD DNS

CNAME : name(alias) value(canonical name)


DNS query 순서

1) 

클라이언트(브라우저)에서 /etc/resolv.conf 에 지정되어있는 로컬 NS 서버 (네임서버) 로 www.yahoo.com 에 대한 요청

2)

네임서버는 root DNS 서버 IP 주소를 기록한 hint 파일을 가지고 있으며 이를 참조하여 root DNS 서버에 www.yahoo.com 에 대한 요청 전달.

root DNS 서버는 TDL(최상위네임서버)들의 글루레코드를 가지고 있으며 이를 참조하여 .com 네임서버를 참조하라고 응답.

글루레코드(glue record)란 네임서버명(NS 레코드)과 IP주소(A 레코드)을 의미

3)

.com 네임서버 즉, TDL 서버는 .com 을 TDL (최상위도메인) 로 사용하는 도메인들의 글루레코드를 가지고 있으며 이를 참조하여 www.yahoo.com 의 네임서버를 참조하라고 응답

(authoritative DNS server의 글루레코드(NS + A) 응답)

4) 

yahoo.com의 네임서버는 yahoo.com 도메인에 대한 존(zone)파일을 참조하여 www.yahoo.com의 의 IP주소를 네임서버(로컬 NS)로 돌려준다.

(authoritative DNS server 는 IP주소(A 레코드) 를 클라이언트가 최초 요청을 한 네임 서버(로컬 NS)로 응답)

5) 

최초 요청을 했던 네임 서버(로컬 NS)는 클라이언트에게 IP 주소를 전송


※ 한양대학교 이석복 교수님의 컴퓨터네트워크 강의 내용 정리

※ https://webdir.tistory.com/161

반응형

IP와 PORT

IP : 호스트

port : 호스트 내의 프로그램


application layer 는 transport layer에 종속적이며 transport layer에서 application layer에 다음과 같은 것들을 지원해준다.

1) data integrity

2) timing

3) throughput

4) security


HTTP (hypertext transfer protocol)

- WEB's application layer protocol

- TCP 사용

- default 80번 port 사용

- stateless : 클라이언트 요청에 대한 상태저장 없음 (cookie 사용)

* safari, explorer, chrome 은 모두 다른 application 이지만 모두 같은 HTTP (protocol) 을 사용하므로 브라우저와 무관하게 application 사용이 가능하다


HTTP 의 두가지 방식

1. non-persistent HTTP

- TCP 커넥션을 HTTP 사용후 close

- 매 http 마다 TCP 커넥션을 새로 맺음

- 응답시간이 persistent 방식보다 더 많이 걸림

* RTT : round trip time


2. persistent HTTP

- multiple objects can be sent over single TCP connection between client, server

  클라이언트/서버 간 하나의 TCP 커넥션으로 여러개의 HTTP 송수신을 수행

- 현재 사용하는 HTTP 1.1 버전은 persistent 가 default. (지속커넥션 사용)

* 파이프라인 사용


HTTP request message


Cookie 동작 순서


Web caches(Proxy server)

origin server에 HTTP 요청을 하는 서버대신 proxy 서버에 HTTP 요청

- origin server의 부하를 줄이고

- 비용을 줄임

- 속도가 빠름


※ Cache에 저장된 데이터가 최신이 아닐 수 있다.

브라우저로 전달되는 객체들이 최신임을 확인하며 캐싱할 수 있도록 Conditional GET 사용


Conditional GET

- HTTP 요청에 If-Modified-Since 헤더 라인 포함.

- 서버에 있는 객체의 마지막 수정된 날짜와 비교.

수정된 객체라면 객체를 보내줌 (200 OK + data)

최신 상태이면 object를 보내지 않음 (304 Not modified)


SMTP (Simple Mail Transfer Protocol)

- 메일서버에 송신자가 메일을 보낼때, 송신메일서버가 수신메일서버에 메일을 보낼 때 사용되는 프로토콜

- 수신메일서버에서 수신인이 메일을 읽어갈 땐 POP/IMAP/HTTP 등의 프로토콜을 사용

- persistent connection 사용

- default 25번 포트  사용

- handshaking > transfer > closure 순서로 동작

HTTP : 클라이언트 입장에서 데이터를 가져오므로 pull protocol

SMTP : 클라이언트 입장에서 데이터를 보내므로 push protocol


※ 한양대학교 이석복 교수님 컴퓨터네트워크 강의 내용 정리

※ 이화여대 이미정 교수님 컴퓨터네트워크 강의 내용 정리


반응형

+ Recent posts