1. 접근 허용 IP 제한 설정.

방법1) 웹어드민서버 웹페이지에 접속 후 설정

Servers -> admin Server 선택 -> Engine 탭 -> Web Connections 탭 -> ADMIN-HTTP 선택

Server Access Control: check 

Allowed Server: 10.*.*.* (접근허용 IP 대역 설정)


방법2) 터미널에서 작업

$JEUS_HOME/domains/노드/config/domain.xml 수정: 47, 48, 49라인 참고

※ JEUS v7.0 이상은 domain.xml, 이하 버전은 JEUSmain.xml

1
2
3
4
5
6
7
8
9
10
11
12
13
14
15
16
17
18
19
20
21
22
23
24
25
26
27
28
29
30
31
32
33
34
35
36
37
38
39
40
41
42
43
44
45
46
47
48
49
50
51
<web-connections>
   <http-listener>
      <name>http1</name>
      <postdata-read-timeout>50000</postdata-read-timeout>
      <max-post-size>-1</max-post-size>
      <max-parameter-count>-1</max-parameter-count>
      <max-header-count>-1</max-header-count>
      <max-header-size>-1</max-header-size>
      <max-querystring-size>8192</max-querystring-size>
      <server-listener-ref>http-server</server-listener-ref>
      <thread-pool>
         <use-auto-tuning>false</use-auto-tuning>
         <limit>0</limit>
         <min>10</min>
         <max>20</max>
         <max-idle-time>300000</max-idle-time>
         <max-queue>-1</max-queue>
      </thread-pool>
      <server-access-control>false</server-access-control>
   </http-listener>
   <http-listener>
      <name>ADMIN-HTTP</name>
      <output-buffer-size>8192</output-buffer-size>
      <postdata-read-timeout>50000</postdata-read-timeout>
      <max-post-size>-1</max-post-size>
      <max-parameter-count>-1</max-parameter-count>
      <max-header-count>-1</max-header-count>
      <max-header-size>-1</max-header-size>
      <max-querystring-size>8192</max-querystring-size>
      <server-listener-ref>BASE</server-listener-ref>
      <thread-pool>
         <use-auto-tuning>false</use-auto-tuning>
         <limit>0</limit>
         <min>1</min>
         <max>32</max>
         <max-idle-time>300000</max-idle-time>
         <max-wait-queue>0</max-wait-queue>
         <max-queue>-1</max-queue>
         <thread-state-notify>
            <max-thread-active-time>0</max-thread-active-time>
            <interrupt-thread>false</interrupt-thread>
            <active-timeout-notification>false</active-timeout-notification>
            <notify-threshold-ratio>0.0</notify-threshold-ratio>
            <restart-threshold-ratio>0.0</restart-threshold-ratio>
         </thread-state-notify>
      </thread-pool>
      <server-access-control>true</server-access-control>
      <allowed-server>10.149.153.*</allowed-server>
      <allowed-server>10.253.44.*</allowed-server>
   </http-listener>
</web-connections>
cs


2. DAS(DomainAdminServer) 재기동

startDomainAdminServer -u adminId -p adminPw
stopServer -host ip:port  -u adminId -p adminPw


참고:

steemit.com/jeus/@ckolivia/jeus-server-access-control


반응형

'Server' 카테고리의 다른 글

jeus charset encoding 수정  (0) 2021.07.15
webtob minproc maxproc  (0) 2021.05.26
MobaXTerm : SSH Tunneling (터널링) 사용하기  (0) 2019.10.01

1. 패스워드 바꾸기 (현재 계정의 패스워드 수정)

> passwd 


2. 특정 사용자 패스워드 바꾸기

> passwd [username]


3. 최소기한이 되지 않아 암호를 바꿀 수 없는 경우 아래와 같은 메시지 발생

You must wait longer to change your password


4. 위와 같은 메시지 발생시 암호변경에 필요한 최소한의 경과 일수 확인하기

> chage -l [username]

* 아래는 암호를 바꾸면 7일 뒤 암호를 다시 설정할 수 있는 경우

Minimum number of days between password change : 7


5. 기한 설정 바꾸기(root 권한):

case1) 0일 기한 : chage -M0 [username]

case2) 7일 기한 : chage -M7 [username]


참고1

참고2


반응형

POM

1
2
3
4
5
<dependency>
    <groupId>io.jsonwebtoken</groupId>
    <artifactId>jjwt</artifactId>
    <version>0.9.1</version>
</dependency>
cs


1
2
3
4
5
6
7
8
9
10
11
12
13
14
15
16
17
18
19
20
21
22
23
24
25
26
27
28
29
30
31
32
33
34
35
36
37
38
39
40
41
42
43
44
45
46
47
48
49
50
51
52
53
54
55
56
57
    @Override
    public String makeJwt(HttpServletRequest res) throws Exception {
        String secretKey = PropertiesService.getPropertiesValue(Constants.PROP_KEY_JWT_SECRET);
        SignatureAlgorithm signatureAlgorithm = SignatureAlgorithm.HS256;
        Date expireTime = new Date();
        
        byte[] apiKeySecretBytes = DatatypeConverter.parseBase64Binary(secretKey);
        Key signingKey = new SecretKeySpec(apiKeySecretBytes, signatureAlgorithm.getJcaName());
        
        Map<String, Object> headerMap = new HashMap<String, Object>();
        headerMap.put("typ","JWT");
        headerMap.put("alg","HS256");
        
        expireTime.setTime(expireTime.getTime() + 1000 * 60 * 1);
        String name = res.getParameter("name");
        String email = res.getParameter("email");
        
        Map<String, Object> map= new HashMap<String, Object>();
        map.put("name", name);
        map.put("email", email);
        
        JwtBuilder builder = Jwts.builder().setHeader(headerMap)
            .setClaims(map)
            .setExpiration(expireTime)
            .signWith(signatureAlgorithm, signingKey);
        
        return builder.compact();
    }
   
    @Override
    public HashMap<StringString> checkJwt(String jwt) throws Exception {
        HashMap<StringString> jwtInfo = new HashMap<StringString>();
        
        try {
            String secretKey = PropertiesService.getPropertiesValue(Constants.PROP_KEY_JWT_SECRET);
            logger.info("- token: "+ jwt);
            
            // base64 none
            byte[] token = secretKey.getBytes("UTF-8");
            // base64 check
//            byte[] token = DatatypeConverter.parseBase64Binary(secretKey);
            Claims claims = Jwts.parser().setSigningKey(token)
                    .parseClaimsJws(jwt).getBody(); // 정상 수행된다면 해당 토큰은 정상토큰
            jwtInfo.put("exp", claims.getExpiration().toString());
            jwtInfo.put("sno", claims.get("sno").toString());
            jwtInfo.put("result""OK");
            logger.info("- expireTime :" + claims.getExpiration());
            logger.info("- sno: "+ claims.get("sno").toString());
        } catch (ExpiredJwtException exception) {
            logger.info("token expired");
            jwtInfo.put("result""False");
        } catch (JwtException exception) {
            logger.info("token falsified");
            jwtInfo.put("result""False");
        }
        return jwtInfo;
    }
cs

반응형

'back' 카테고리의 다른 글

[Java] 일급콜렉션 : First Class Collection  (0) 2022.10.06
[TDD] 테스트주도개발  (0) 2022.10.04
[gradle] jar build, war build  (0) 2020.03.25

MS SQL

EXEC procedure();


그외 ORACLE, MYSQL 등

CALL procedure();

EXEC vs CALL 차이


리턴(out) 파라미터가 있는 경우 프로시저 호출 방법

DECLARE
var aa VARCHAR(10);
var bb VARCHAR(10);
BEGIN
CALL PROCEDURE(
aa,
bb,
param
);
END;


Mybatis xml 에서의 프로시저 호출 방법

{CALL SEND_PROC(#{retCd, jdbcType=NUMERIC, mode=OUT},
                         #{retMsg, jdbcType=VARCHAR, mode=OUT},
                         #{flag, jdbcType=VARCHAR, mode=IN},
                         #{msg, jdbcType=VARCHAR, mode=IN},
                         #{tel, jdbcType=VARCHAR, mode=IN},
                         #{id, jdbcType=VARCHAR, mode=IN},
                         TO_CHAR(SYSDATE +
                                      (#{seq, jdbcType=NUMERIC, mode=IN}) * 10 / (24*60*60),                                                                    'YYYYMMDDHH24MISS') ,'')
}


반응형

'DB > ORACLE' 카테고리의 다른 글

[ORACLE] CLOB BLOB  (0) 2021.04.14
[ORACLE] 실행중인 쿼리 조회  (0) 2021.03.25
ORACLE 로컬 bit 확인  (0) 2021.03.16
[oracle] sysdate  (0) 2021.02.08
LEAD, LAG  (0) 2021.02.03

Resource interpreted as Stylesheet but transferred with MIME type text/html : "~.css"

[원인]

css 파일이 text/html Content-Type 으로 처리되어 나타나는 현상


[관련 자료]

1. stackoverflow.com/questions/22631158/resource-interpreted-as-stylesheet-but-transferred-with-mime-type-text-html-see 

2. www.mins01.com/mh/tech/read/877?ct=&tq=tt&q=css+mime


[해결방법]

컨테이너 webcommon.xml 의 확장자별 MIME 타입을 지정한다.

1
2
3
4
<mime-mapping>
  <extension>css</extension>
  <mime-type>text/css</mime-type>
</mime-mapping>
cs

참고:

czar.tistory.com/627


반응형

ORA-04091 trigger 가 호출될 때 아래와 같은 exception 으로 실행되지 않을 때가 있다.


ORA-04091: ?테이블이 변경되어 트리거/함수가 볼 수 없습니다. (한글)
ORA-04091: table ~.~, trigger/function may not see it (영문)


원인 : 

table A 에 데이터를 insert 하기 위해 사용하는 trigger.

이 trigger 내부에서 A table 을 참조해서 사용하는 경우 발생.

(loop 발생여지가 있어 oracle 에서 이를 막기위한 ex 를 던짐)


www.techonthenet.com/oracle/errors/ora04091.php


반응형

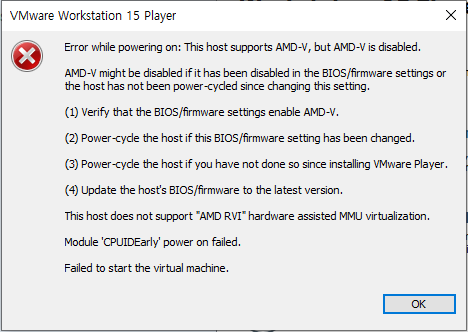
vmware 에 우분투 install 시도시 위와 같은 에러팝업이 뜰경우 조치

error : This host supports AMD-V, but AMD-V is diabled 

bios 진입 후 virtualization 옵션(SVM mode)을 찾아 disabled -> enabled 로 수정한다

* bios 는 운영체재 부팅시에 F2/del 키 연타로 접근

반응형

메소드 안에서 다음과 같이 쌩뚱맞은 중괄호 블락이 보인다면,

이는 변수의 유효 범위(scope)를 제한하기 위함이다.


1
2
3
4
5
6
7
8
9
public void methodA(){
    {
        int a = 0;
    }
    
    int a = 2;
 
    return b;
}
cs

3번째 라인의 a 변수는 { } 안에서만 유효한 지역변수이며,

위와 같이 a 변수를 6번라인에서 선언해도 문제 되지 않는다.


* 변수 유효범위를 제한하여 코딩할 때 사용하나, 드물게 사용된다. 


반응형

톰캣을 내렸다 올렸다 하다보면

실제로 톰캣은 내려갔음에도 위와같은 에러로 인해 런칭이 불가한 경우가 자주 발생한다.

이땐 IDE 를 껐다 켜도 서버를 런칭할 수 없다.

아래와 같이 프로세스를 죽일 수 있다.


1. 현재 사용중인 tomcat port 의 PID 확인. (cmd)

>netstat -ao tcp


2. PID 기준으로 프로세스 죽이기

>taskkill /f /pid PID


3. 톰캣 재시작


반응형

Exception message : Got minus one from a read call


원인 :

1. If the remote server has been configured (e.g. in the "SQLNET.ora" file) to not accept connections from your IP.

2. If the JDBC url is incorrect, you could be attempting to connect to something that isn't a database.

3. If there are too many open connections to the database service, it could refuse new connections.


멀쩡히 사용중이던 JDBC connection 에서 위와같은 에러를 뱉는다면 대개 3번 케이스.


https://stackoverflow.com/questions/19660336/how-to-approach-a-got-minus-one-from-a-read-call-error-when-connecting-to-an-a


반응형

+ Recent posts