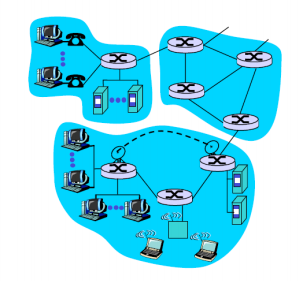
Network Structure : 네트워크 구성요소

1. network edge :

- applications and hosts

2. network core :

- routers

3. access networks, physical media :

- communication links 라우터들을 연결시켜주는 링크


1. network edge :

1) end systems (hosts) : run application programs

eg) Web, email

2) client/server model : client host requests, receives service from always-on swerver

eg) web browser/server; email client/server

3) peer-peer model : minimal use of dedicated servers

eg) Skype, BitTorrent


데이터 통신방식 

1. connection-oriented service

TCP (Transmission Control Protocol)

- reliable : 신뢰할 수 있음

- flow control : 수신자 능력 고려하여 받을 수 있는 만큼 전송

- congestion control : 네트워크 막힘현상시 속도 낮춰서 전송

사용: HTTP, FTP, Telnet, SMTP(email)


2. connectionless service

UDP (User Datagram Protocol)

- connectionless

- unreliable data transfer

- no flow control

- no congestion control

사용: Streaming media, DNS


2. network core :

라우터간의 연결들의 집합


네트워크를 통한 데이터 전송방식

1. circuit switching :

출발지에서 목적지까지 가는 길을 미리 설정
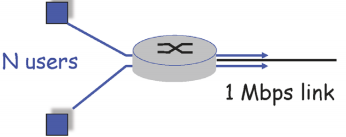
bandwidth 가 1Mpbs이고 1명의 유저당 active 상태에서 100kb/s 사용시 최대 10명의 유저만 사용가능


2. packet-switching : 

패킷 순서가 정해져있지 않으며 패킷을 요청시 공유한다. (statistical multiplexing )
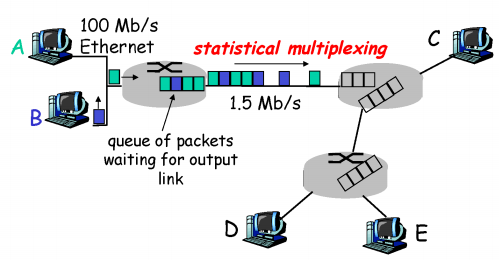
패킷 딜레이

1) nodal processing

check bit errors : 패키지 검사


2) queueing : 큐 순서 기다리기

※ queue 가 초과하는 경우 packet 이 유실된다. (대부분의 packet 유실은 queue 초과로 일어난다)


3) Transmission delay

R = link bandwidth(bps)

L = packet length (bits)

L/R : time to send bits into lnk

 : 큐 순서 도달 후, 시작 bit 부터 끝 bit 까지 link 를 통해 bit가 나가는데 총 걸리는 시간


4) Propagation delay : 

d = length of physical link

s = propagation speed in medium (광속)

d/s = propagation delay


패킷 딜레이를 줄이려면?

1) processing delay : 라우터 성능 업그레이드

2) queueing delay : 사용자 수에 의해 결정되므로 제어 불가

3) transmission delay : 케이블 업그레이드

4) propagation delay : 광속이므로 제어 불가


※ 한양대학교 이석복 교수님의 컴퓨터네트워크 강의 내용 정리

반응형

Mybatis if test 문자열처리

동적쿼리(dynamic sql)에서 많이 사용되는 Mybatis if test 에서의 문자열 처리.

※ java 문법과 동일하다고 보면 된다.


즉 문자열 비교를 위해 연산자 사용을 해선 안되고

equals 함수 사용시 null 값이 파라미터로 들어올 가능성을 대비하여 코딩해야 한다.


[Mybatis if test 에서의 문자열 처리]

1. null 체크

1
2
3
<if test = 'id neq null and id neq ""'>
<if test = 'id != null and id neq ""'>
<if test = 'id != null and !"".equals(id)'>
cs


2. 문자 비교

java단에서 gender를 'M' 으로 저장시(Char)

1
<if test=" 'M'.equals(gender) ">
cs

java단에서 gender를 "F" 으로 저장시(String)

1
<if test=' "F".equals(gender) '>
cs


3. 문자열 비교

1) equalsIgnoreCase 사용

1
<if test = '"pyo".equalsIgnoreCase(id)'> 
cs

2) == 연산자 사용

1
<if test = "id == 'pyo'.toString()"> 
cs

3) eq 사용

1
<if test = "id eq 'pyo'.toString()"> 
cs


[사용하지 말아야 할 문자열 비교 방법]

1
2
3
4
5
6
<!-- 1 -->
<if test = 'id == "pyo"'>
<!-- 2 -->
<if test = "gender.equals('X')">
<!-- 3 -->
<if test = 'id.equalsIgnoreCase("pyo")'>
cs

순서대로

1) 연산자를 사용한 참조객체의 비교는 에러 유발

2) String.equals(character) 로 취급하여 에러발생

3) java.lang.String 의 .equalsIgnoreCase 와 마찬가지로 위에서 id 가 null 인 경우 exception 발생하므로

<if test = '"pyo".equalsIgnoreCase(id)'> 와 같이 처리해야 한다.


결론:

character 를 사용하는 특별한 케이스를 제외하고

항상 가장 바깥쪽은 quote( ' ) 로 감싸고 안쪽 문자열은 double quote( " ) 로 감싼다


참고:

https://sinpk.tistory.com/entry/Mybatis-if-%EB%AC%B8%EC%9E%90%EC%97%B4-%EB%B9%84%EA%B5%90


반응형

'back > Mybatis,Ibatis' 카테고리의 다른 글

[mybatis] xml에서 java method 사용  (0) 2020.08.24
[Ibatis] dtd 경로 문제  (1) 2019.12.30
[Mybatis] $과 # 차이  (0) 2019.12.05
[Mybatis] like 조건시 문자열 처리  (1) 2019.02.13


현상 : 

QueryDSL 을 위해 Entity에 대한 Query Class 생성 후,

junit 테스트를 돌렸으나 생성한 Query Class 를 찾지 못한다는 NoDefClassFoundError 발생

※ NoDefClassFoundError : compile 시엔 문제없으나, runtime 시 class를 찾지 못하는 현상 (참고)


해결 :
1. compile 은 성공적으로 되었으며, compile 한 jar 파일을 실행하여 해당 메소드 호출할 경우 문제가 없는 것으로 보아

build.gradle 혹은 코드문제가 아닌 eclipse 설정이 문제라고 판단.

2. project property > Java Build Path > Source 탭 확인 : 이상없음

3. project property > Deployment Assembly 확인 : 상대경로로 지정된 패키징 경로가 존재.. 해당 부분 제거 후 문제 해결


반응형


[ Error vs Exception ]

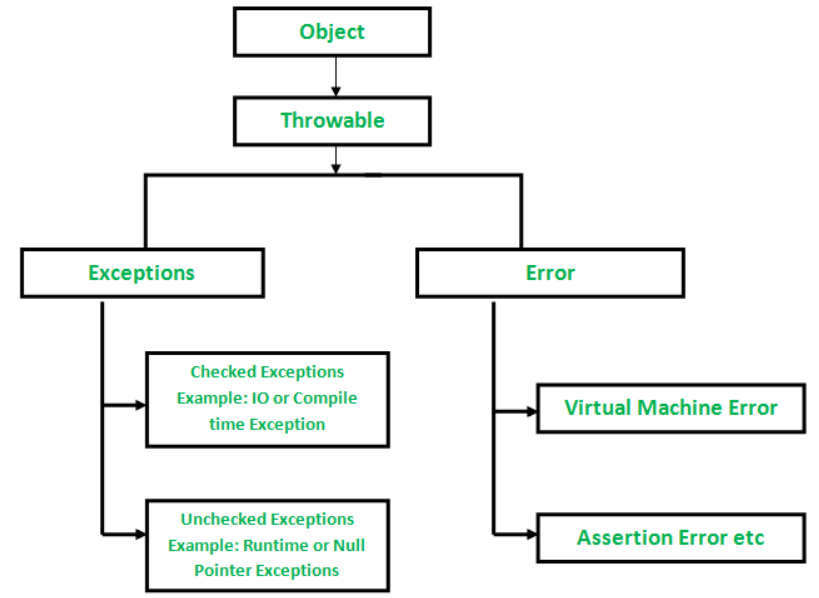
Error: An Error indicates serious problem that a reasonable application should not try to catch.

> 애플리케이션이 잡지 말아야 할 심각한 에러(핸들링이 어려운 에러)


Exception: Exception indicates conditions that a reasonable application might try to catch.

> 애플리케이션이 잡을 수 있는 에러(핸들링이 할 수 있는 에러)


[ ClassNotFoundError vs NoDefClassFoundError ]

ClassNotFoundException is an exception that occurs when you try to load a class at run time using Class.forName() or loadClass() methods and mentioned classes are not found in the classpath.

> 런타임에 Class.forName() 혹은 loadClass() 메소드를 사용했고 refrection에 사용된 class가 classpath에 없는 경우 발생


NoClassDefFoundError is an error that occurs when a particular class is present at compile time, but was missing at run time.

> 특정 클래스가 컴파일시엔 존재했으나 런타임 때 찾을 수 없는 경우

위와 관련된 경험: https://developyo.tistory.com/241?category=747217


[Checked Exception vs Unchecked Exception ]

Checked Exception : Java forces you to handle these error scenarios in some manner in your application code. 

> java 가 핸들링을 강요하는 exception (ex: sqlException, IOException)


Unchecked Exception : A method is not forced by compiler to declare the unchecked exceptions thrown by its implementation. Generally, such methods almost always do not declare them, as well.

Spring Transaction only supervise Unchecked Exceptions.

> 핸들링을 강요하지 않는 exception (ex: NullPointerException)


참고)

error vs exception

https://www.geeksforgeeks.org/exceptions-in-java/

ClassNotFoundError vs NoDefClassFoundError

https://dzone.com/articles/java-classnotfoundexception-vs-noclassdeffounderro

CheckedException vs Unchecked Exception

https://www.geeksforgeeks.org/checked-vs-unchecked-exceptions-in-java/


반응형


[ jar 빌드 ]

apply plugin: 'java'
@SpringBootApplication
public class Application {
   //jar
   public static void main(String[] args) {
      SpringApplication.run(Application.class, args);
   }
}


[ war 빌드 ]

내장 tomcat 의 scope를 runtime 으로 바꿔준다

apply plugin: 'war'

dependencies {
    compile('org.springframework.boot:spring-boot-starter-web')
    providedRuntime 'org.springframework.boot:spring-boot-starter-tomcat'
}
@SpringBootApplication
public class Application extends SpringBootServletInitializer {
   //war
   @Override
   protected SpringApplicationBuilder configure(SpringApplicationBuilder application) {
      return application.sources(Application.class);
   }

   public static void main(String[] args) {
      SpringApplication.run(Application.class, args);
   }
}


반응형

'back' 카테고리의 다른 글

[Java] 일급콜렉션 : First Class Collection  (0) 2022.10.06
[TDD] 테스트주도개발  (0) 2022.10.04
JWT  (0) 2020.11.18

아래의 색인창(ctrl+F 단축키)에서 정규식 사용이 가능하다.


[실제 사용 사례]

iBatis 의 동적쿼리를 위한 파라미터 매핑구문은 #param# 을 사용하고

Mybatis 의 동적쿼리를 위한 파라미터 매핑구문은 #{param} 을 사용한다.


프레임워크의 버전이 올라가면서 iBatis를 Mybatis로 바꾸게 된다면

iBatis의 #parameter#를 Mybatis의 #{parameter} 로 바꿔줘야 한다.


이 때 아래와 같이 손쉽게 바꿔줄 수 있다.

Find : #([a-zA-Z]+)#

Replace with : #{$1}


위와 같이 정규식 중 캡쳐하고싶은 그룹을 () 로 묶고

묶은 순서대로 $ 식별자와 함께 index 를 넣어 치환해줄 수 있다.

반응형

JPQL : 객체지향쿼리

- SQL을 추상화한 JPA의 객체지향 쿼리

- 테이블이 아닌 엔티티 객체를 대상으로 쿼리

- 엔티티와 속성은 대소문자 구분

- 테이블 이름이 아닌 엔티티 이름 사용

- 별칭(alias) 사용 필수


1. EntityManager 사용시

select alias 시 전체 조회 (sql 에서 a.* 와 같음)

변수바인딩은 :이름 혹은 ?시퀀스 로 할 수 있다

1
2
3
4
5
6
7
8
9
10
11
12
@Autowired
EntityManager em;
 
User user = new User();
user.setName("pyo");
userRepository.save(user);
      
TypedQuery<User> tq = em.createQuery("select u from User u where u.name = :name", User.class);
tq.setParameter("name""pyo");
      
List<User> rs = tq.getResultList();
LOGGER.info("id : " + rs.get(0).getId());
cs


2. repository interface 사용시

@Query를 사용해서 직접 JPQL 지정

이름을 사용한 바인딩시 @Param("이름") 을 사용하지 않을 경우 에러가 발생하니 주의

1
2
3
4
5
6
7
8
9
10
11
12
13
public interface UserRepository extends JpaRepository<User, Long>{
    
   List<User> findByName(String name);
   User findById(long id);
   
   @Query("select u from User u where u.name = ?1")
   User customFind1(String nm);
   
   
   @Query("select u from User u where u.name = :name")
   User customFind2(@Param("name"String nm);
   
}
cs


JPQL , SQL 의 문제점

- JPQL 은 문자(String)이며, Type-Check가 불가능.

- 해당 로직 실행 전까지 작동여부 확인이 불가

- 실행시점에 오류가 발견됨


QueryDSL

- 문자가 아닌 코드로 작성

- 컴파일 시점 문법 오류 발견이 가능

- 코드 자동 완성

- 동적쿼리 가능

- JPQL 단점 보완


[gradle 설정]

gradle 설정은 gradle 버전마다 상이하다.

1
2
3
4
5
6
7
8
9
10
11
12
13
14
15
16
17
18
19
20
21
22
23
24
25
26
27
28
29
30
31
32
33
34
35
36
37
38
39
40
41
42
43
44
45
46
47
48
49
50
51
52
53
54
55
56
57
58
59
60
61
62
63
64
65
66
67
68
69
70
71
72
73
74
75
76
77
78
79
80
81
82
83
84
85
86
87
88
89
90
91
92
93
94
buildscript {
    ext {
        springBootVersion = '2.1.4.RELEASE'
        querydslPluginVersion = '1.0.10'
    }
    repositories {
        mavenCentral()
        maven { url "https://plugins.gradle.org/m2/" } // plugin 저장소
    }
    dependencies {
        classpath("org.springframework.boot:spring-boot-gradle-plugin:${springBootVersion}")
        classpath "io.spring.gradle:dependency-management-plugin:1.0.7.RELEASE"
        classpath("gradle.plugin.com.ewerk.gradle.plugins:querydsl-plugin:${querydslPluginVersion}")
    }
}
 
 
apply plugin: 'java'
apply plugin: 'org.springframework.boot'
apply plugin: 'io.spring.dependency-management'
apply plugin: "com.ewerk.gradle.plugins.querydsl"
apply plugin: 'eclipse'
 
group = 'com.jpp'
version = '0.0.1'
sourceCompatibility = '1.8'
targetCompatibility = '1.8'
 
configurations {
   compileOnly {
      extendsFrom annotationProcessor
   }
}
 
repositories {
   mavenCentral()
}
 
dependencies {
   compile 'org.springframework.boot:spring-boot-starter-actuator'
   compile 'org.springframework.boot:spring-boot-starter-data-jpa'
   compile 'org.springframework.boot:spring-boot-starter-web'
   compileOnly 'org.projectlombok:lombok'
   runtimeOnly 'com.h2database:h2'
   annotationProcessor 'org.projectlombok:lombok'
   
   compile 'org.springframework.boot:spring-boot-starter-tomcat'
   
   testCompile('org.springframework.boot:spring-boot-starter-test') {
      exclude group: 'org.junit.vintage', module: 'junit-vintage-engine'
   }
   
   compile 'org.apache.tomcat.embed:tomcat-embed-jasper'
   compile 'javax.servlet:jstl'
   
   compile 'org.json:json:20180813'
   compile 'com.google.code.gson:gson:2.8.5'
   
   compile group: 'org.aspectj'name'aspectjweaver', version: '1.9.2'
   compile group: 'org.aspectj'name'aspectjrt', version: '1.9.2'
   
   compile 'com.querydsl:querydsl-jpa' // querydsl
   compile 'com.querydsl:querydsl-apt' // querydsl
}
 
test {
   useJUnitPlatform()
   ignoreFailures = true
}
 
def querydslSrcDir = 'src/main/generated'
 
querydsl {
    library = "com.querydsl:querydsl-apt"
    jpa = true
    querydslSourcesDir = querydslSrcDir
}
 
sourceSets {
    main {
        java {
            srcDirs = ['src/main/java', querydslSrcDir]
        }
    }
}
 
compileQuerydsl{
    options.annotationProcessorPath = configurations.querydsl
}
 
configurations {
    querydsl.extendsFrom compileClasspath
}
 
cs


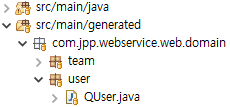
gradle build 후 지정한 경로(src/main/generated)에 Query Class가 생성되었음을 확인 할 수 있다.


[QueryDSL 사용]

1
2
3
4
5
6
7
8
9
@PersistenceContext
EntityManager em;
 
public List<User> selectUserByNm(String nm){
  JPAQueryFactory jqf = new JPAQueryFactory(em);
  
  return jqf.selectFrom(user).where(user.name.eq(nm)).fetch();
}
 
cs


참고 :

Tacademy 김영한 개발자님의 강의

김영한 개발자님의 JPA 저서

https://www.baeldung.com/spring-data-jpa-query

https://www.baeldung.com/querydsl-with-jpa-tutorial


반응형

'back > JPA' 카테고리의 다른 글

[JPA] cascade  (0) 2022.11.10
[JPA] equals , hashcode  (0) 2022.11.08
[JPA] JPA 영속성 컨텍스트  (0) 2020.03.08
[JPA] 연관관계 매핑 : 단방향, 양방향 매핑  (0) 2020.03.01
[JPA] JPA 기초 설정 및 entity 필드 매핑  (0) 2020.02.27

1. 데이터베이스 Isolation Level 이란

트랜잭션에서 일관성 없는 데이터를 허용하는 수준


2. Isolation Level 의 종류

- Read Uncommitted

- Read Commited

- Repeatable Read

- Serializable

Read Uncommitted -> Serializable 로 갈 수록 격리수준이 높다(high)

Serializable -> Read Uncommitted 로 갈 수록 격리수준이 낮다(low)

1) Read Uncommitted
- SELECT 문장 수행시 해당 데이터에 Shared Lock 이 걸리지 않는 Level
- 아직 commit 되지 않은 트랜잭션 A 의 데이터를 B가 SELECT 할 수 있음
발생하는 문제 : dirty read, non-repeatable read, phantom read

2) Read Commited
- Select 문장이 수행되는 동안 데이터에 Shared Lock 이 걸린다
- 아직 commit 되지 않은 트랜잭션 A 의 데이터를 B가 SELECT 할 수 없다
발생하는 문제 : non-repeatable read, phantom read

3) Repeatable Read
- 트랜잭션 A가 시작되기 전에 커밋된 내용까지만 조회할 수 있다.
- 자신의 트랜잭션 보다 낮은 트랜잭션에서 커밋된 것만 읽는다.
(모든 InnoDB의 트랜잭션은 고유한 트랜잭션 시퀀스를 가지고 있으며 Undo 영역에 백업된 모든 레코드는 변경을 발생시킨 트랜잭션의 번호가 포함되어 있다)
발생하는 문제 : phantom read

4) Serializable
- 트랜잭션이 완료될 때까지 다른 트랜잭션이 해당되는 영역에 대한 수정 및 입력을 할 수 없다.
- 완벽한 LOCK 을 건다.


3. 격리 수준에 따라 나타나는 현상

3-1) Dirty Read

1) 트랜잭션 A 에서 값을 넣는다. insert into user (seq, gender, name) values (1, 'M', 'pyo');

2) 트랜잭션 B 에서 값을 읽는다. select * from user where seq = 1;

3) 트랜잭션 A 에서 insert 했던 값을 롤백한다. 

4) 트랜잭션 B 에서 읽어놓은 값은 실제로 DB에 존재하지 않는 데이터가 돼버린다. (dirty 하다)


3-2) Non-repeatable Read

1) 트랜잭션 A 에서 값을 읽는다. select gender, name from user where seq = 1;

    result : M pyo

2) 트랜잭션 B 에서 값을 넣는다. update user set gender = 'W' where seq = 1;

3) 트랜잭션 B 에서 commit 한다.

4) 트랜잭션 A 에서 값을 읽는다. select gender, name from user where seq = 1;

    result : W pyo

    남자였던 pyo 가 여자가 되었다. 위처럼 반복해서 동일한 데이터를 읽을 경우 상이한 결과가 나온다.


3-3) Phantom Read

1) 트랜잭션 A 에서 범위(range) 기준으로 값을 읽는다.

2) 트랜잭션 B 에서 1)에 포함되는 값을 넣는다.

3) 트랜잭션 B 에서 commit 한다.

4) 트랜잭션 A 에서 범위(range) 기준으로 값을 읽는다.

   result : 1)에서 읽히지 않은 값이 결과로 나온다 


Isolation Level Dirty Read NonRepeatable Read Phantom Read
Read Uncommitted Permitted Permitted Permitted
Read Commited - Permitted Permitted
Repeatable Read - - Permitted
Serializable - - -


 Non-repeatable read vs Phantom read

Non-repeatable read 와 Phantom read 의 차이


※ 엔진별 Default Isolation Level

- Mysql InnoDB 엔진 : Repeatable-Read 

- Oracle : Read-Commited


4. isolation level 지정하기

1) sql에서의 isolation level 지정

SET TRANSACTION ISOLATION LEVEL 
   { READ COMMITTED | READ UNCOMMITTED | REPEATABLE READ | SERIALIZABLE }

2) spring transaction 에서의 isolation level 지정

예제 참고


참고 :

영문으로 되어 있는 설명

그림으로 설명이 잘 되어 있는 곳

sql 코드로 설명이 잘 되어 있는 곳

mysql 공식문서


반응형

'DB' 카테고리의 다른 글

[DB] InnoDB vs MyISAM : InnoDB와 MyISAM의 차이점  (0) 2020.08.18

1. Servlet 생명주기

Init > Service(get/post) > Destory

https://minwan1.github.io/2017/10/08/2017-10-08-Spring-Container,Servlet-Container/

https://javannspring.tistory.com/231


2. BeanFactory 와 ApplicationContext 구조

https://whiteship.tistory.com/518

BeanFactory 를 ListenableBeanFactory, HierachialBeanFactory가 구현

ListenableBeanFactory, HierachialBeanFactory를 ApplicationContext가 구현

XmlWebApplicationContext, FileSystemXmlApplicationContext, ClassPathXmlApplicationContext 등이ApplicationContext 구현


3. 객체 생성의 차이

https://otep.tistory.com/19

ApplicationContext 는 Bean을 preload.

BeanFactory getBean 은 lazy 


4. Init/Destroy Method 지정 방법

Init 지정 방법

https://www.baeldung.com/running-setup-logic-on-startup-in-spring

1. @PostConstruct 사용

2. InitializingBean Interface 구현, afterPropertiesSet() 사용

3. ApplicationListener<ContextEvt> 구현

4. @Bean InitMethod 사용

순서 : @PostConstruct > InitializingBean > init-method > ContextStartedEvent 

https://programmer.ink/think/5ddc351b29481.html


Destory 지정 방법

https://www.baeldung.com/spring-shutdown-callbacks

1. @PreDestroy 사용

2. DisposableBean Interface 구현, Destroy() 사용

3. ApplicationListener<ContextEvt> 구현

4. ServletContetListener 구현 (web.xml 등록)

5. @Bean destroyMethod 사용

순서 : ContextClosedEvent > @PreDestroy > DisposableBean > destroy-method 

https://programmer.ink/think/5ddc351b29481.html


※ Init 은 Order @DependOn 등을 사용하여 주입 순서를 지정 할 수 있음

※ Bean Destroy 는 Bean Init 의 역순으로 이루어짐


반응형

2020.03.15 시작


반응형

+ Recent posts