[ 1. EC2 Instance Launch Types ]

1. On Demand Instances : short workload, predictable pricing

2. Reserved: (Minimum 1year)

  - Reserved Instances: long workloads

  - Convertible Reserved Instances: long workloads with flexible instances

  - Scheduled Reserved Instances: eg. every Thursday between 3 and 6 pm

3. Spot Instances: short workloads, for cheap, can lose instances (less reliable)

4. Dedicated Instances : no other customers will share your hardware

5. Dedicated Hosts: book an entire physical server, control instance placement


1. EC2 On Demand

필요시에만 사용, 비쌈

- Pay for what you use (billing per second, after the first minute)

- Has the highest cost but no upfront payment

- No long term commitment

- Recommended for short-term and un-interrupted workloads, where you can't predict how the application will behave.


2. EC2 Reserved Instances

선불제, 비교적 저렴

- Up to 75% discount compared to On-demand

- Pay upfront for what you use with long term commitment

- Reservation period can be 1 or 3 years

- Reserve a specific instance type

- Recommended for steady state useage applications(think database)

* Convertible Reserved Instance

  - can change the EC2 instance type

  - Up to 54% discount

* Scheduled Reserved Instances

  - launch within time window you reserve

  - When you require a fraction of day/week/month


3. EC2 Spot Instances

여유자원을 싸게 사용하는 방식으로 사용자가 최대 입찰 가격을 정해놓고 사용, 가격이 최대가격이상이 되면 중지

- Can get a discount of up to 90% compared to On-demand

- Instances that you can "lose" at any point of time if your max prices is less then the current spot price

- The Most cost-efficient instances in AWS

- Useful for workloads that are resilient(회복력있는/탄력적인) to failure

  eg. Batch jobs, Data analysis, Image processing

- Not great for critical jobs or databases

- Great combo : Reserved Instances for baseline + On-Demand & Spot for peeks


- Define max spot price and get the instance while current spot price < max

- The hourly spot price varies based on offer and capacity

- If the current spot price > your max price, you can choose to stop or terminate your instance with a 2 minutes grace period

[ # Other strategy : Spot Block ]

  "block" spot instance during a specified time frame (1 to 6 hours) without interruptions

  * In rare situations, the instance may be reclaimed


[ # How to terminate Spot Instances ]


Spot request 설정시 지정한 request type 에 따라, 설정한 max price 에 도달했을 때의 인스턴스 동작이 달라짐

 1) one-time : 설정한 spot request 가 인스턴스 런칭과 함께 사라짐. max price 도달시 인스턴스 stop or terminate.

 2) persistent : 설정한 spot request 가 남아, 인스턴스가 terminated 돼도 인스턴스를 다시 런칭시킴

* persistent request type 인 경우, spot request 를 먼저 cancel 한 후, spot instance를 terminate 시켜야 함

* You can only cancel Spot Instance requests that are open, active, or disabled.

  (open/active/disabled 상태일 때만 spot request 제거 가능)


4. EC2 Dedicated Hosts

사용자 전용의 물리적 서버, 딮한 설정 가능

- Physical dedicated EC2 server for your use

- Full control of EC2 Instance placement

- Visibility into the underlying sockets/physical cores of the hardware

- Allocated for your account for a 3 year period reservation

- More expensive

- Useful for software that have complicated licensing model

  Or for companies that have strong regulatory or compliance needs


5. EC2 Dedicated Instances

계정에 귀속된 인스턴스

- Instances running on hardware that's dedicated to you

- May share hardware with other instances in same account

- No control over instance placement (can move hardware after Stop/Start)


[ Spot Fleets ]

- Spot Fleets = set of Spot Instances + (Optional) On-Demand Instances

- The Spot Fleet will try to meet the target capacity with price constraints

  1) Define possible launch pools: instance type (m5.large), OS, AZ

  2) Can have multiple launch pools, so that the fleet can choose

  3) Spot Fleet stops launching instances when reaching capacity or max cost

- Strategies to allocate Spot Instances:

  1) lowestPrice : from the pool with the lowest price (cost optimization, short workload)

  2) diversified : distributed across all pools (great for availability, long workloads)

  3) capacityOptimized : pool with the optimal capacity for the number of instances

* Spot Fleets allow us to automatically request Spot Instances with the lowest price


[ 2. EC2 Instance Types ]

R : appliations that needs a lot of RAM - in-memory caches

C : applications that needs goods CPU - compute/databases

M : applications that are balanced (think "medium") - general/web app

I : applications that need good local I/O (instance storage) - databases

G : applications that need a GPU - video rendering/machine learning

T2/T3 : burstable instances (up to a capacity)

  트래픽이 폭발하는 경우 CPU가 이에 맞게 뛰어난 퍼포먼스를 보여줌 이때 credit 을 소모하며 credit 을 다 사용하는 경우 CPU 성능은 다시 떨어짐. 이후 credit 이 다시 축척됨.

  - AWS has the concept of burstable instances (T2/T3 machines)

  - Burst means that overall, the instance has OK CPU performance

  - When the machine needs to process something unexpected, it can burst, and CPU can be very good.

  - If the machine bursts, it utilized "burst credits"

  - If all the credits are gone, the CPU becomes BAD

  - If the machine stops bursting, credits are accumulated over time

  - Burstable instances can be amazing to handle unexpected traffix and getting the insurance that it will be handled correctly

  If your instance consistently runs low on credit, you need to move to a different kind of non-burstable instance

TC/T3 - unlimited : umlimited burst

  credit 과 상관없이 CPU 가 항상 burst 에 대응함. 대신 추가적인 비용을 지불.

  - unlimited burst credit balance

  - You pay extra money if you go over your credit balance, but you don't lose in performance

  - Overall, it is a new offering, so be careful, costs could go high if you are not monitoring the health of your instances


반응형

[ 1. What is EC2? ]

EC2 인스턴스는 AWS에서 제공하는 대여형 가상머신

NAS 와 같은 역할을 하는 EBS, 로드밸런싱을 수행하는 ELB, 서버 트래픽에 따라 인스턴스 수를 증가/증감 시키는 ASG 등이 함께 사용된다

- EC2 is one of most popular of AWS offering

- It mainly consists in capability of :

  1) renting virtual machines(ec2)

  2) storing data on virtual drives(EBS)

  3) distributing load across machines(ELB)

  4) Scaling the services using an auto-scaling group(ASG)


* AMI (amazon machine image) : amazon linux2, redhat, Ubuntu, window ...


[ EC2 생성 후 접속 방법 (WINDOW10) ]

> ssh -i pem파일경로 EC2-user@EC2의공인IP

Permission denied(권한문제) 에러발생시 해결 방법(window 에서의 chmod 방법) :

techsoda.net/windows10-pem-file-permission-settings/


[ 2. Security Groups ]

EC2의 inbound/outbound 방화벽 정책으로 SG 를 한개 설정하여 여러개의 EC2 인스턴스에 동일하게 적용시킬 수 있다. (region 제약)

- Security Groups are the fundamental of network security in AWS

- They control how traffic is allowed into or out of our EC2 Machines

- acting as a "firewall" on EC2 instances

- They regulate :

  1) Access to Ports

  2) Authorised IP ranges (CIDR) - ipv4 and ipv6

  3) Control of inbound/outbound network

- can be attached to multiple EC2 instances

- locked down to a region /VPC combination

* if your application is not accessible (time out), then it's a security group issue (방화벽 문제)

* if your application gives a "connection refused" error, then it's an application error or it's not launched

- All inbound traffic is blocked by default

- All outbound traffic is authorised by default


[ # EC2 에 Apache 설치 ]

1) EC2 에 접속

2) > sudo su

    root 로 switch user

3) > yum update -y

force update machine

4) > yum install -y httpd.x86_64

아파치 설치

5) > systemctl start httpd.service

서비스 시작

6) > enable httpd.service

enabled across reboots

7) curl localhost:80

테스트

8) ec2publicip:80

외부에서 접속해보기 -> connection time out 발생

9) Security group 의 inbound 설정에 http 80 포트 추가

10) 재시도 성공 확인


security groups can communicate straight through to other instances


[ 3. Elastic IPs ]

고정된 공인 아이피, Elastic IP 설정시 EC2 인스턴스를 재기동해도 공인아이피가 바뀌는 현상이 나타나지 않는다

Elastic IP를 사용하기 보단, DNS (Route 53) 을 사용 하는게 구조적으로 낫다

- Elastic IP is a public IPv4 IP you own as long as you don't delete it

* if restart EC2 instance, it can change its public IP

- if you need to have a fixed public IP for your instance, you need an Elastic IP

- with an Elastic IP address, you can mask the failure of an instance or software by rapidly remapping the address to another instance in your account.

- you can only have 5 Elastic IP in your account (can increase if you ask AWS)

* try to avoid using Elastic IP :

  1) They often reflect poor architectural decisions

  2) Instead, use a random public IP and register a DNS name to it


[ 3. EC2 User Data ]

인스턴스 런칭시 실행되는 초기 스크립트로써 업데이트수행/프로그램설치 등을 EC2 런칭과 동시에 수행시키고자 할 때 사용한다 (AMI 를 사용하여 대체할 수 있다)

- It is possible to bootstrap our instances using an EC2 User data script 

- bootstrapping means launching commands when a machine starts

- That script is only run once at the instance first start (인스턴스 런칭과 동시에 스크립트 실행)

- EC2 user data is used to automate boot tasks such as:

  1) Installing updates

  2) Downloading common files from the internet 

* The EC2 User Data Script runs with the root user

* where to put/change user data

  생성시 : configure instance details step 의 advanced details 에서 설정

  생성후 : instance 우클릭 > instance settings > change user data


[ 4. EC2 Instance Launch Types ]

EC2 인스턴스는 아래와 같이 5가지 런치타입이 존재한다.

애플리케이션의 목적에 따라 런치타입을 바꾸어 비용절감을 할 수 있다.

1. On Demand Instances : short workload, predictable pricing

2. Reserved : (Minimum 1year)

  - Reserved Instances: long workloads

  - Convertible Reserved Instances: long workloads with flexible instances

  - Scheduled Reserved Instances: eg. every Thursday between 3 and 6 pm

3. Spot Instances : short workloads, for cheap, can lose instances (less reliable)

4. Dedicated Instances : no other customers will share your hardware

5. Dedicated Hosts : book an entire physical server, control instance placement


1. EC2 On Demand

필요시에만 사용, 비쌈

- Pay for what you use (billing per second, after the first minute)

- Has the highest cost but no upfront payment

- No long term commitment

- Recommended for short-term and un-interrupted workloads, where you can't predict how the application will behave.


2. EC2 Reserved Instances

일정 기간에 대한 선불제, 비교적 저렴

- Up to 75% discount compared to On-demand

- Pay upfront for what you use with long term commitment

- Reservation period can be 1 or 3 years

- Reserve a specific instance type

- Recommended for steady state useage applications(think database)

* Convertible Reserved Instance

  - can change the EC2 instance type

  - Up to 54% discount

* Scheduled Reserved Instances

  - launch within time window you reserve

  - When you require a fraction of day/week/month


3. EC2 Spot Instances

여유자원을 싸게 사용하는 방식으로 사용자가 최대 입찰 가격을 정해놓고 사용, 가격이 최대가격이상이 되면 중지

- Can get a discount of up to 90% compared to On-demand

- Instances that you can "lose" at any point of time if your max prices is less then the current spot price

- The Most cost-efficient instances in AWS

- Useful for workloads that are resilient(회복력있는/탄력적인) to failure

  eg. Batch jobs, Data analysis, Image processing

- Not great for critical jobs or databases

- Great combo : Reserved Instances for baseline + On-Demand & Spot for peeks


4. EC2 Dedicated Hosts

사용자 전용의 물리적 서버, 딮한 설정 가능

- Physical dedicated EC2 server for your use

- Full control of EC2 Instance placement

- Visibility into the underlying sockets/physical cores of the hardware

- Allocated for your account for a 3 year period reservation

- More expensive

- Useful for software that have complicated licensing model

  Or for companies that have strong regulatory or compliance needs


5. EC2 Dedicated Instances

계정에 귀속된 인스턴스

- Instances running on hardware that's dedicated to you

- May share hardware with other instances in same account

- No control over instance placement (can move hardware after Stop/Start)


반응형

1. 이클립스를 종료

2. C:\Users\Administrator(본인계정)\AppData\Roaming\Subversion\auth  파일 삭제 

3. $이클립스설치경로\configuration\org.eclipse.core.runtime\keyring  파일 삭제 

4. 이클립스를 재실행 후 신규계정으로 다시 로그인


출처: https://madnix.tistory.com/entry/Eclipse-Subversion에서-SVN-로그인-정보-초기화하는-방법-Window

반응형

[ 1. AZ (Availability Zones) ]

AWS 의 물리적 자원은 지역적 제약조건이 있다

region 은 지역, Availability Zones 은 지역 밑에 물리적으로 분리되어있는 더 작은 지역의 개념.

AZ 밑의 각각의 데이터센터는 서로 떨어져 있으므로 재난으로부터 동시에 영향을 받지 않는다

EC2 인스턴스는 region 기반, IAM 은 global (region 제약이 없음)

each region has many availability zones ( min 2, max 6)

eg) ap-southeast-2 has following AZs.

ap-southeast-2a

ap-southeast-2b

ap-southeast-2c


1) Each AZ is one or more discrete data centers with redundant power, networking and connectivity

2) They're separate from each other, so that they're isolated from disasters

3) They're connected with high bandwith, ultra-low latency networking


* EC2 based on region

* IAM is global


* Some service is not offered in some regions

(can check at AWS > Regional Table)


[ 2. IAM (Identity and Access Management) ]

AWS 보안 관련 설정으로 Users/Groups/Roles/Policies 등의 설정이 있다

IAM 설정은 Global

Root 계정(AWS계정)의 직접 사용을 지양하고 IAM 으로 Admin 계정/그룹을 생성하여 Admin policies 를 부여, Admin 계정을 대신 사용한다

Your whole AWS security is there:

- Users : physical person

- Groups : contains users

- Roles : internal usage within AWS resources (for machine)

- Policies : AdministratorAccess, ... 등


Root account should never be used (and shared)

Users must be created with proper permissions

IAM is at the center of AWS

Policies are written in JSON


IAM has a global view(can be across all the regions)

Permissions are governed by Policies(JSON)

MFA(Multi Factor Authentication) can be setup (do not use root account)

IAM has predefined "managed policies"

It is best to give users the minimal amount of permissions thy need to perform their job (least privilege principles)


# IAM Federation (for big enterprise)

big enterprises usually integrate their own repository of users with IAM

this way, one can login into AWS using their company credentials

Identity Federation uses the SAML standard (Active Directory)


*

One IAM User per physical person

One IAM Role per application

IAM credentials should never be shared

never write IAM credentials in code. ever.

and even less, never commit your IAM credentials.

never use the root account except for initial setup.

never use ROOT IAM credentials


[ IAM 최초 Admin 설정 ]

1. activate MFA (multi factor authentication)

continue to security credentials 버튼 클릭

virtual MFA device 클릭

google OTP app download 

OTP app으로 QR 코드 인식 후 auth code 1, 2 입력


2. User 생성 (Admin)

access type programatic access 체크

AWS management console access 체크

Console password : autogenerated password

require password reset : user must create a new password at next login 체크

Attach existing policies > AdministratorAccess 체크

Create user without a permissions boundary 체크

* user 생성 완료 페이지에서 유저 정보가 있는 .csv 파일 다운로드


3. Group 생성 (Admin)

AdministratorAccess policy 체크


4. Group 에 2에서 생성한 Admin User 추가


5. User의 Admin policy 재설정

User 설정에서 User 에 직접 부여된(Attached directly) Admin 권한 제거 


6. IAM password policy 설정

enable password expiration 등등


7. IAM users sign-in link 커스터마이징

IAM users sign-in link 우측의 customize 버튼 클릭 후 link alias 입력


8. link 에 접속후 생성한 Admin User 아이디로 로그인 및 패스워드 변경(최초 로그인은 2에서 다운로드 받은 .csv 파일에 적혀있음)

반응형

1. 

stdin 0

stdout 1

stderr 2

linuxhint.com/bash_stdin_stderr_stdout/


2.

> 파일이 없을 경우 생성 후 쓰기

>> 파일이 없을 경우 생성 후 append 하기


3.

2>&1 

stderr 를 stdout 으로 같이 찍기

stackoverflow.com/questions/818255/in-the-shell-what-does-21-mean


*

wget -S http://testapi.com 2>&1 | grep "HTTP/" | awk '{print $2}'

jason-heo.github.io/sys/admin/2016/09/11/curl-http-code.html


/dev/null

linuxhint.com/what_is_dev_null/


반응형

[SVN branch와 trunk merge 하는 방법]

1. branch 프로젝트 우클릭


2. TEAM > merge 클릭


3. Merge two different trees 선택


4. from 에 trunk repository 정보, to에 branch repository 정보 입력

* from 이 trunk, to 가 branch 라는 점을 유의

* trunk / branch 모두 commit이 되어있어야 한다.


5. Head revision을 기준으로 merge 진행


반응형

* 현재시각 2021/02/08 17시일때

select * from where tdate > sysdate-1;
: 2/7 17시 이후 데이터

select * from where trunc(tdate) > trunc(sysdate)-1;
: 2/8 0시 이후 데이터

select * from where tdate > trunc(sysdate)-1;
: 2/7 0시 이후 데이터

반응형

'DB > ORACLE' 카테고리의 다른 글

[ORACLE] CLOB BLOB  (0) 2021.04.14
[ORACLE] 실행중인 쿼리 조회  (0) 2021.03.25
ORACLE 로컬 bit 확인  (0) 2021.03.16
LEAD, LAG  (0) 2021.02.03
프로시저 호출 방법 : 파라미터가 있는 경우, mybatis에서의 호출  (0) 2020.10.26

LEAD

다음행읽기


LAG

이전행읽기


gent.tistory.com/339


반응형

'DB > ORACLE' 카테고리의 다른 글

[ORACLE] CLOB BLOB  (0) 2021.04.14
[ORACLE] 실행중인 쿼리 조회  (0) 2021.03.25
ORACLE 로컬 bit 확인  (0) 2021.03.16
[oracle] sysdate  (0) 2021.02.08
프로시저 호출 방법 : 파라미터가 있는 경우, mybatis에서의 호출  (0) 2020.10.26

1. Address Mapping

- IP address : universally unique

- Ethernet address(MAC address) : physical address / local LAN 에서 사용


# Address resolution 방법 2가지

- static : IP와 MAC 주소를 정적으로 매핑시켜놓음, 랜카드를 바꿀 경우 해당 랜카드에 맞춰 이더넷 어드레스가 바뀌므로 매핑되어있는 정보가 무의미해짐. 실질적으로 사용하기 힘듬

- dynamic : ARP , RARP 등이 있음.


# ARP (Address Resolution Protocol)

- IP 에 대응하는 MAC주소를 알아내기 위해.

- LAN 내에 broadcast 하고, broadcast를 받은 시스템 중 자신의 IP에 해당하는 시스템만 MAC주소를 응답.

- 20~30분간 캐시메모리에 저장


* ARP packet format

ARP packet format 

- 자신의 IP주소

- 자신의 Ethernet 주소

- 상대방의 IP주소

- 상대방의 Ethernet 주소 

를 넣어 전송, 회신시 상대방 Ethernet 주소를 돌려받음.


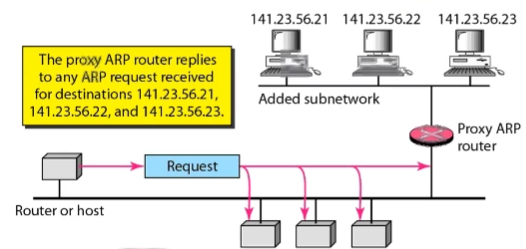
* proxy ARP

141.23.56.21 의 MAC을 알아내고자 ARP 요청을 했을 때, proxy ARP router 가 자신의 MAC 으로 대신 응답. 보안을 위해 사용.


* ARP Announcements

컴퓨터 OS가 부팅될 때 ARP broadcast 를 하여, LAN 내의 컴퓨터들의 cache 를 갱신시키게 함(자신의 IP/ethernet address갱신할 수 있게). 이때 동일한 IP를 사용중인 LAN 내의 컴퓨터가 있다면 IP충돌 노티가 발생.


# RARP (Reverse Address Resolution Protocol)

- MAC 에 대응하는 IP주소를 알아내기 위해 (ARP와 반대)

- MAC 주소를 담아 broadcast하며, 서버가 IP주소를 회신해 줌.


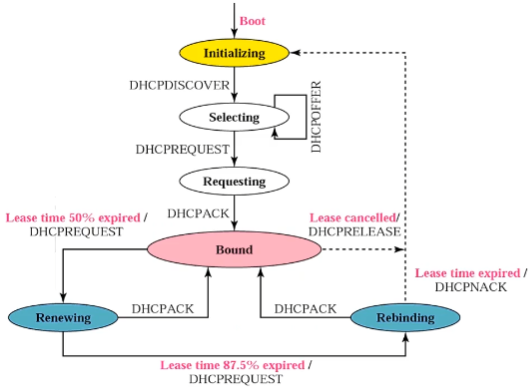
# DHCP (Dynamic Host Configuration Protocol)

- 미사용 중인 IP를 자동으로 할당

- 고정 IP 할당도 가능

- expired time 을 주어 일정시간동안만 유효한 IP 주소 제공

DHCP 동작 순서도

1) 컴퓨터가 LAN내에 broadcasting

2) 서버가 DHCP OFFER

3) 남아있는 IP 유효시간의 50% 도달시 서버에 DHCP request 를 다시보내 renewing(갱신)

4) 남아있는시간의 87.5% 도달시 1) 과정 반복


# ICMP(Internet control message protocol)

- IP protocol 의 경우 error control 이 없음. 이를 보완하기 위해 나온 프로토콜

- IP packet 사용

- IP header의 protocol field 가 1 인 경우 ICMP 사용

- Error reporting message(에러 보고) :

Destination unreachable, Source quench, Time exceeded, Parameter problems, Redirection

- Query messages(서버가 살아있는지 질의) :

Echo request&reply, Time-stamp request and reply, address-mask request and reply, Router solicitation and advertisement

- ICMP 를 사용의 예: ping(Echo request&reply), traceroute


* traceroute 동작 방식

host A 에서 host B 까지의 라우팅 알아내고자 할 때, TTL(Time to live(거쳐갈 수 있는 라우팅 갯수)) 을 사용한다.

TTL 1 로 보내어 첫번째 라우터 a에 도달시 TTL 0이 되어 라우터가 메시지를 버리며 본인의 IP를 ICMP 로 회신함. 

host A 는 a 의 IP를 찍음.

다시 TTL 2 로 보내어 a 다음의 라우터 b까지 도달하게 하며 b는 본인의 IP를 ICMP로 회신함.

host A 는 b 의 IP를 찍음. 이를 반복하여 host B까지의 라우팅 경로를 찍게 됨.


※ KOCW 성균관대학교 안성진 교수님의 컴퓨터네트워크 강의 참고


반응형

[ Internet protocol ]

frame Datalink layer : 연결만 관여

packet Network layer : 라우팅, 에러 관리


[ # Datagram protocol ]

- connectionless service

- 각각의 패킷이 독립적임

- 패킷 송신시 경로가 그때그때마다 네트워크 상황에 따라 달라짐


IP packet 은 네트워크에서 순서에 무관하게 수신됨

* TCP/IP (TCP over IP): ip packet 전송은 순서를 보장하지 않지만 TCP가 위에서 순서를 맞춰줌


[ # IP (IPv4) ]

- unreliable, connectionless databgram protocol

- best-effort delivery service (최대한 노력하는 서비스(100%보장 없단의미))

- no error control/flow control

- error detection

- reliability 가 중요하다면 TCP와 함께 써야함

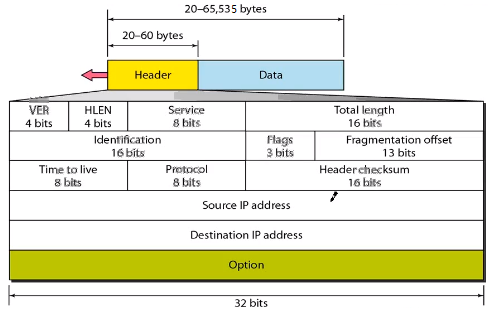
- 20~60bytes 사이 가변길이 header를 갖는다(IPv6는 40bytes 로 고정)

- 각행은 4bytes


Datagram(packet)

[ header 규격 설명 ]

# 1. VER : IP version (현재는 ver.4 사용)

# 2. HLEN : header length, 행 갯수를 의미

* header length 가 5일 경우 header 의 크기는 5*4bytes = 20bytes


# 3. Service : TOS(type of service), DS(Differentiated service) 와 같이 서비스 종류를 구분하는 용도

* TOS : 4비트를 DTRC로 나누어, 원하는 서비스 형태를 표현 (eg: FTP 0100(T가 제일 중요), DNS 1000(D가 제일 중요))


# 4. Total length : IP datagram 길이, data 크기를 파악하기 위함


[ Fragmentation : 단편화 ] 

네트워크마다 MTU가 다르므로 datagram 을 단편화 해야한다.

아래 #5~#7 의 Identification, Flags, fragmentation offset 은 단편화 한 IP packet 의 순서를 구분하여 도착지점의 reassembly를 가능케 한다.

* MTU (Maximum transfer unit) : 송신가능한 최대 크기

* reassembly 는 최종 도착점에서만 한다. (MTU에 맞게 단편화한 IP packet을 중간 경유지 네트워크에서 다시 합치지 않는다)


# 5. Identification : fragmentation 이후 reassemble 을 할 때 ip packet 을 구분하는 용도

# 6. Flags : fragmentation 후 마지막 패킷을 구분하기 위한 용도로 사용

Flags : 1번째 비트는 미사용, 2번째 비트는 fragmentation을 원치않을때 사용, 3번째 비트가 0인경우 마지막 패킷임을 의미

# 7. fragmentation offset : 패킷 순서표시

Identification, flag, flagmentation offset의 예

# 8. Time to live (TTL) : 라우터를 거칠 때 마다 -1, 0이 될 경우 라우터에서 discard

# 9. Protocol : ip packet을 처리 후 상위계층 어디로 보내야 하는지 구분자 역할. TCP(6)/UDP(17)/ICMP(1) 등

# 10. Headerchecksum : 헤더 에러 체크 용도

# 11. Options : 최대 40bytes.

1) no operation option : header 4bytes 크기를 맞추기 위함

2) end of option : header 4bytes 크기를 맞추기 위함

3) record route option : internet router 리스트 record 목적

4) strict source route option : 송신자가 거쳐갈 route를 지정할 경우 사용


# IPv6가 IPv4에 비해 갖는 장점

1. address 주소가 훨씬 많음. 128bits 크기

2. 고정 header format 및 크기(40bytes)를 가지므로 처리 용이

3. 보안


# Transition from IPv4 and IPv6 : IPv4 에서 IPv6 으로의 전환

1. Dual stack : IPv4, IPv6을 모두 사용, DNS 의 응답으로 IPv4/IPv6 구분

2. Tunneling : IPv6 --> IPv4 --> IPv6 와 같이 중간 라우터구간에서 IPv4 사용하는 경우 사용.

3. Header translation : IPv6 헤더를 IPv4 헤더로 변환, 반대의 상황도 마찬가지.


※ KOCW 성균관대학교 안성진 교수님의 컴퓨터네트워크 강의 참고

반응형

+ Recent posts