어댑터 패턴은 실생활에서 사용하는 어댑터와 동일한 역할을 수행한다.

한 클래스의 인터페이스를 클라이언트에서 사용하고자 하는 다른 인터페이스로 변환한다.


어댑터 패턴 사용시 라이브러리를 직접 사용하는 것이 아닌, 

라이브러리를 캡슐화한 어댑터를 사용하게 되므로, 소스간 결합도가 약해지는 장점이 있다.

wrapper 와 slf4j(log4j 의 어댑터) 는 어댑터라 볼 수 있다.


[Adapter Pattern의 Class 다이어그램(참고)]

Client 는 Adapter 구상 클래스를 Target Interface를 통해 사용한다.

Adapter 클래스는 Target Interface를 구현한다.

Adapter 클래스는 Adaptee(새롭게 사용할 구상 클래스) 를 구상 클래스로 사용하며,

Adapter의 Request()는 Adaptee의 SpecificRequest()를 호출한다. (Adaptee를 캡슐화)

Client 는 Adapter 의 Request()를 사용하는 줄 알지만 실제론 Adaptee 의 SpecificRequest()를 사용하게 된다.


실제 Adaptor pattern 의 사용 예를 살펴보자.


1-1. Adapter 패턴을 사용하지 않은 설계

[OldLibraryIF]

1
2
3
public interface OldLibraryIF {
    public void sendPush(String input);
}
cs


[OldLibrary]

OldLibrary 인터페이스를 구현하는 클래스

1
2
3
4
5
6
7
public class OldLibrary implements OldLibraryIF {
    
    public void sendPush(String input) {
        System.out.println("send " + input + " using OldLibrary");
    }
    
}
cs


[Client]

OldLibrary를 사용하는 클라이언트

1
2
3
4
5
6
public class Client {
    public static void main(String[] args) {
       OldLibraryIF oldLib = new OldLibrary();
       oldLib.sendPush("message");
    }
}
cs


[결과]

send message using OldLibrary

위와 같이 모든 구현이 끝나있는 상태에서 기존의 라이브러리였던 OldLibrary 를 제거하고,

아래와 같은 새로운 라이브러리(NewLibrary)를 사용해야 하는 상황이 생긴다면 어떻게 해야할까?

교체대상인 OldLibrary를 사용하는 클라이언트를 일일히 찾아 수정해주어야 한다.


1-2. Adapter 패턴을 사용하지 않은 설계에서 OldLibrary를 NewLibrary로 교체

[NewLibraryIF]

1
2
3
4
public interface NewLibraryIF {
    public void sendMsg(String input);
}
 
cs


[NewLibrary]

NewLibrary 인터페이스를 구현하는 클래스

1
2
3
4
5
6
7
public class NewLibrary implements NewLibraryIF {
    
    public void sendMsg(String input) {
        System.out.println("send " + input + " using NewLibrary");
    }
    
}
cs


[Client]

OldLibrary 대신 NewLibrary를 사용하도록 기존의 Client 를 수정.

1
2
3
4
5
6
7
public class Client {
    public static void main(String[] args) {
        NewLibraryIF newLib = new NewLibrary();
        newLib.sendMsg("message");
    }
}
 
cs


[결과]

send message using NewLibrary

라이브러리 교체는 쉽게 끝이난 듯 보인다.

하지만 OldLibrary를 사용하는 곳이 수십, 수백곳이라면?!

애초에 어댑터 패턴을 사용했더라면 어땟을까?


2-1. Adapter 패턴을 사용한 설계

[Adapter]

OldLibrary를 캡슐화한 Adapter 클래스

1
2
3
4
5
6
7
8
9
10
public class Adapter implements OldLibraryIF{
    
    OldLibraryIF oldLibrary = new OldLibrary();
 
    @Override
    public void sendPush(String input) {
        oldLibrary.sendPush(input);
    }
    
}
cs


[Client]

1
2
3
4
5
6
public class Client {
    public static void main(String[] args) {
        OldLibraryIF adapter = new Adapter();
        adapter.sendPush("message");
    }
}
cs


[결과]

send message using OldLibrary

Client 에서 OldLibrary를 생성자로 직접 생성하여 사용하는 대신, Adapter 클래스를 사용했다.

이전과 마찬가지로 OldLibrary를 NewLibrary로 교체해보자.


2-2. Adapter 패턴을 사용한 설계에서 OldLibrary를 NewLibrary로 교체

[Adapter]

OldLibrary를 멤버변수로 사용하는 대신 NewLibrary를 멤버변수로 사용

1
2
3
4
5
6
7
8
9
10
11
public class Adapter implements OldLibraryIF{
    
    NewLibraryIF newLibrary = new NewLibrary();
 
    @Override
    public void sendPush(String input) {
        newLibrary.sendMsg(input);
    }
    
}
 
cs


[Client]

기존의 Client 코드와 동일한 코드를 사용해도 된다.

Adapter 클래스 코드만 수정했을 뿐, Client 코드는 바꾼게 없다.

1
2
3
4
5
6
7
public class Client {
    public static void main(String[] args) {
        OldLibraryIF adapter = new Adapter();
        adapter.sendPush("message");
    }
}
 
cs


[결과]

send message using NewLibrary

이와 같이 Adapter 패턴(캡슐화)을 사용하게 되면 라이브러리의 변화가 발생해도 클라이언트를 수정하지 않아도 된다.

도서 <Clean Code> 에도 외부라이브러리를 캡슐화 하여 사용하는 이점에 대해 언급되어있다.


참고 : Head First Design Patterns

반응형

람다의 메소드 참조

메소드 참조는 매개변수의 정보 및 리턴 타입을 알아내어 람다식에 불필요한 매개 변수를 제거하기 위함


[기본문법]

https://developyo.tistory.com/190


[메소드참조]

1. static 메소드참조

public static int abs(int a){}   //Math class 내의 abs()
Math::abs  //위와 같다

Math.abs(..)와 같은 static 메소드를 Math::abs 로 표현 할 수 있다.

※ Math::abs()와 같이 ()를 붙이지 않는것을 주의.


위와 같은 람다의 static 메소드 참조를 사용하여 인터페이스를 구현할 경우

아래와 같이 static 메소드를 리턴하도록 구현 할 수 있다.

1
2
3
4
5
6
7
8
9
10
11
12
13
14
15
16
17
18
19
20
21
22
23
24
25
26
27
28
29
30
31
32
33
34
package Java.Lamda.methodReferences;
 
public class MethodRef_1_Basic {
 
    public static void main(String[] args){
        
        /** 1.기본 사용법 */
        //String.valueOf() 를 그대로 사용하여 리턴하는 람다
        FuncI funcI = (Object obj) -> String.valueOf(obj);
        System.out.println(funcI.anony("HELLO"));
        
        //위 경우 아래와 같이 메소드 참조가 가능
        FuncI funcI_ref_method = String::valueOf;
        System.out.println(funcI_ref_method.anony(100));
        
        //절대값을 구해주는 Math.abs 를 참조 
        System.out.println("abs ref : "+convert(-1, Math::abs));
    
    }
 
    @FunctionalInterface
    interface FuncI {
        String anony(Object obj);
    }
    
    @FunctionalInterface
    interface MathAbs {
        int anony(int obj);
    }
    
    public static int convert(int number, MathAbs func) {
        return func.anony(number);
    }
}
cs

[실행결과]

HELLO
100
abs ref : 1


2. 생성자 참조

() -> new String()    
String::new           //위와 같다

위와 같이 생성자를 리턴하는 경우 타입::new 와 같이 표현 할 수 있다.

아래는 생성자 참조를 이용한 예제.

[Person.java]

1
2
3
4
5
6
7
8
9
10
11
12
13
14
15
16
17
18
19
20
21
22
23
24
25
26
27
28
29
30
31
32
package Java.Lamda.methodReferences;
 
public class Person {
    
    private String name;
    private String gender;
 
    public Person() {
    }
    public Person(String name) {
        this.name=name;
    }
    public Person(String name, String gender) {
        this.name=name;
        this.gender = gender;
    }
 
    public String getName() {
        return name;
    }
    public void setName(String name) {
        this.name = name;
    }
 
    public String getGender() {
        return gender;
    }
    public void setGender(String gender) {
        this.gender = gender;
    }
}
 
cs

[클라이언트]

1
2
3
4
5
6
7
8
9
10
11
12
13
14
15
16
17
18
19
20
21
22
23
24
25
26
27
28
29
30
package Java.Lamda.methodReferences;
 
import java.util.List;
import java.util.function.BiFunction;
import java.util.function.Function;
 
public class MethodRef_2_Constructor {
 
    public static void main(String[] args){
 
        Func<String, Person> func1 = Person::new;
        Person person = func1.create("pyo");
        System.out.println(person.getName());
        
        Func2<StringString, Person> func2 = Person::new;
        Person person2 = func2.create("pyo""male");
        System.out.println(person2.getName() + "/" + person2.getGender());
 
    }
    
    @FunctionalInterface
    interface Func<T, R>{
        R create(T t);
    }
    @FunctionalInterface
    interface Func2<T, U, R>{
        R create(T t, U u);
    }
}
 
cs

위의 Func<T, R>, Func2<T, U, R>과 비슷한 역할을 하는

Function<T, R>, BiFunction<T, U, R> functionalInterface가 java.util 패키지로 제공된다.

[실행결과]

pyo
pyo/male


3. 인스턴스 참조

()->a.toString();
a::toString        //위와 같다

위와 같이 인스턴스의 메소드를 리턴하는 경우 인스턴스::메소드 와 같이 표현 할 수 있다.

아래는 인스턴스 참조를 사용한 예.

1
2
3
4
5
6
7
8
9
10
11
12
13
14
15
16
17
18
19
20
21
22
package Java.Lamda.methodReferences;
 
import java.util.ArrayList;
import java.util.Arrays;
import java.util.Comparator;
import java.util.List;
 
public class MethodRef_4_Instance {
 
    public static void main(String[] args){
        Person person = new Person("pyo");
        Func func = person::getName;
        System.out.println(func.anony());
        
    }
    
    @FunctionalInterface
    interface Func {
        String anony();
    }
}
 
cs


참고:

https://futurecreator.github.io/2018/08/02/java-lambda-method-references/

https://imcts.github.io/java-method-reference/


반응형

'back > java' 카테고리의 다른 글

HttpUrlConnection 모듈 (리펙토링) : 빌더패턴과 프록시패턴 사용  (0) 2020.02.21
[Java] java reflection  (0) 2020.02.20
[Java] lambda 람다 1 (기본문법)  (0) 2020.01.15
[Java] Generic 제네릭  (0) 2019.12.28
[Java] Compile  (0) 2019.12.22

jdk 1.8 이상부터 지원.

함수형 프로그래밍을 가능케 함.

1회용 익명 클래스가 필요할 때 람다를 사용하여 코드를 줄일 수 있음.


[기본 문법 1 : 인수가 없는 경우]

접근제한자, 리턴타입 생략 가능

public void method(){
}

() -> {
}

* @FunctionalInterface : 추상메소드가 한개만 존재하는 인터페이스

* lambda는 Functional Interface 에만 사용이 가능

1
2
3
4
5
6
7
8
9
10
11
12
13
14
15
16
17
18
19
20
21
22
23
24
25
26
27
28
29
30
package Java.Lamda.basic;
 
public class Main1 {
        
    public static void main(String[] args) {
 
        //기존방법대로 익명클래스를 사용한 구현
        Interface i = new Interface() {
            @Override
            public void sayHello() {
                System.out.println("HELLO! in anonymous class");
            }
        };
        i.sayHello();
        
        //lambda를 사용한 익명클래스 구현        
        //lambda 는 Functional Interface 에만 사용이 가능
        Interface lamda = () -> {
            System.out.println("HELLO! in anonymous method(lambda)");
        };
        lamda.sayHello();
    }
    
    //@FunctionalInterface 는 abstract method 가 오직 1개여야 한다.
    @FunctionalInterface
    interface Interface {
        void sayHello();
    }
}
 
cs

[결과]

HELLO! in anonymous class 
HELLO! in anonymous method(lambda)


[기본 문법 2 : 인수가 존재하는 경우]

인수 타입 생략이 가능.

return 생략 가능(함수 내 처리가 return 문이 전부인 경우)

public void method(int x, int y){
   return x+y;
}

(x, y) -> x+y;
1
2
3
4
5
6
7
8
9
10
11
12
13
14
15
16
17
18
19
20
21
22
23
24
25
26
27
28
29
30
31
package Java.Lamda.basic;
 
public class Main3 {
    
    public static void main(String[] args) {
        
        Calculation add = (x, y) -> {
            return x+y;
        };
        System.out.println(calculate(add23));
        
        
        Calculation multiply = (x, y) -> x*y;
        System.out.println(calculate(multiply, 23));
    }
    
    static Integer calculate(Calculation operation, Integer x, Integer y) {
        return operation.apply(x, y);
    }
    
    @FunctionalInterface
    interface Calculation {
        Integer apply(Integer x, Integer y);
    }
    
    class Calculator {
        Integer add(Calculation cal, Integer x, Integer y) {
            return cal.apply(x, y);
        }
    }
}


cs

[결과]

5
6


[기본 문법 3 : static 메소드, default 메소드]

jdk 1.8 부터 interface 에서 static 메소드, default 메소드 사용이 가능.

static 메소드 : 오버라이딩 불가
default 메소드 : 오버라이딩 가능

인터페이스에 메소드라니?!

추상메소드만 가질 수 있는게 아니라니?!

인터페이스가 메소드(default 메소드)를 가질 수 있게 되면서, 추상클래스와 인터페이스가 매우 비슷해졌다.

(인터페이스를 만들 때, 공통 관심사는 default 메소드로, 나머지 메소드를 abstract 메소드로 선언하면 기존의 추상클래스와 매우 비슷하다)

자바에서도 결국 다중상속이 가능하게 된 셈이다.

그렇다면 추상클래스와 인터페이스의 차이점은 이제 더이상 없는건가?

아직 아래와 같은 차이점이 존재한다.

추상클래스 : 다중상속이 불가, 인스턴스 변수를 가질 수 있다
인터페이스 : 다중구현이 가능, 인스턴스 변수를 가질 수 없다

Calculation : interface

ExtendsCalculation : Calculation interface 상속받은 interface

1
2
3
4
5
6
7
8
9
10
11
12
13
14
15
16
17
18
19
20
21
22
23
24
25
26
27
28
29
30
31
32
33
34
35
36
37
38
39
40
41
42
43
44
45
46
47
48
49
50
51
52
53
54
package Java.Lamda.basic;
 
public class Main4 {
 
    public static void main(String[] args) {
 
        Calculation add = (x, y) -> {
            return x+y;
        };
        add.print(23);
        Calculation.print2(23);
        System.out.println(calculate(add23));
        
        
        ExtendsCalculation multiply = (x, y) -> x*y; 
        multiply.print(23);
        System.out.println(calculate(multiply, 23));
        
    }
    
    static Integer calculate(Calculation operation, Integer x, Integer y) {
        return operation.apply(x, y);
    }
    
    @FunctionalInterface
    interface Calculation {
        Integer apply(Integer x, Integer y);
        
        default void print(Integer x, Integer y) {
            System.out.println("x : " + x);
            System.out.println("y : " + y);
        }
        
        static void print2(Integer x, Integer y) {
            System.out.println("x : " + x + ", y : " + y);
        }
    }
    
    class Calculator {
        Integer add(Calculation cal, Integer x, Integer y) {
            return cal.apply(x, y);
        }
    }
    
    @FunctionalInterface
    interface ExtendsCalculation extends Calculation{
        @Override
        default void print(Integer x, Integer y){
            System.out.println("x,y : " + x +","+ y);
        }
    }
    
}
 
cs

[결과]

x : 2
y : 3
x : 2, y : 3
5
x,y : 2,3
6

※ stackoverflow 및 각종 개발자 커뮤니티 QnA 에 Comparator Interface 구현시 람다를 어떻게 사용할 수 있냐는 질문이 꽤 많이 보인다.

1.8 에서의 Comparator 인터페이스를 들여다 보면, default 메소드 및 static 메소드 다수 존재하나 추상메소드는 오직 compare()메소드, 단 한 개 존재한다.


[메소드 참조]

https://developyo.tistory.com/193?category=688588


참고:

https://futurecreator.github.io/2018/07/20/java-lambda-type-inference-functional-interface/


반응형

'back > java' 카테고리의 다른 글

[Java] java reflection  (0) 2020.02.20
[Java] lambda 람다 2 (메소드참조)  (0) 2020.01.17
[Java] Generic 제네릭  (0) 2019.12.28
[Java] Compile  (0) 2019.12.22
[Java] Collection Framework  (0) 2019.12.21

[ redirect 시 attribute 전달하는방법 ]

redirectAttributes.addFlashAttribute 사용

1
2
3
4
5
6
7
8
9
10
11
12
13
14
15
@RequestMapping(value="/save.do")
public String save(HttpServletRequest request, RedirectAttributes redirectAttributes, paramVO vo) throws Exception { 
    ...        
    redirectAttributes.addFlashAttribute("param", param);
    return "redirect:/result.do";
}
 
 
@RequestMapping(value="/result.do")
public ModelAndView result(HttpServletRequest request, @ModelAttribute("paramVO") paramVO vo) throws Exception {
    ModelAndView mav = new ModelAndView("bmp/Result");
    ...
    logger.info(vo.getName());
    return mav;
}
cs


https://stackoverflow.com/questions/19266427/what-are-ways-for-pass-parameters-from-controller-after-redirect-in-spring-mvc


※ addFlashAttribute 와 addAttribute 차이

addAttribute 는 단수개의 파라미터들 (내부적으로 redirect url 뒤에 붙여서(get과 같이) 나가는 방식)

addFlashAttribute 복수개의 파라미터(map , vo 등)

https://bactoria.tistory.com/entry/%EC%8A%A4%ED%94%84%EB%A7%81-addAttribute-addFlashAttribute-%EC%B0%A8%EC%9D%B4%EC%A0%90-RedirectAttributes-rttr-%EB%A6%AC%EB%8B%A4%EC%9D%B4%EB%A0%89%ED%8A%B8


[ redirect, forward 차이 ]

redirect

request, response 를 새로 생성, 새로운 호출 (뒤로가기 가능(A에서 B로 리다이렉트시 B에서 뒤로가기로 A 이동 가능))

ex) 고객센터에 전화를 걸었더니 다른 번호로 연결시켜주어 새로운 곳에 문의사항을 다시 전달해야 하는 상황


forward

request, response 를 공유, 기존 호출에 이어서 진행 (뒤로가기 불가(A에서 B로 포워딩시 B에서 뒤로가기로 A를 부른 C로 이동(전전 화면)))

ex) 고객센터에 전화를 걸었더니 담당자가 잘 모르겠다며 옆의 직원에게 상황을 전달하며 수화기를 넘긴 상황

https://doublesprogramming.tistory.com/63

반응형

스프링프레임워크에서 JUnit 을 이용한 API 테스트 : Spring Framework + JUnit + JNDI

junit 없이 매번 was 재기동 및 postman 호출로 api 결과들을 확인하는 방식으로 테스트를 하다 

junit 을 한 번 사용해 볼까 하여 기존 프로젝트에 설정을 잡고 사용해보았다.


혹여 본 포스팅 내용을 참고 하신다면, 프로젝트마다 context 및 프로젝트내에서 사용중인 lib version 등의 설정이 다르므로 제가 작성한 글은 그냥 참고만 하시길 바랍니다. 

실제 프로젝트에서 사용중인 코드 내에서 일부를 발췌하였으므로 github 등에 소스 공유는 힘듭니다.

언제가 될진 모르겠지만 별도의 프로젝트를 만들어 추후 github에 올려놓고 repository 링크를 공유하겠습니다..

출하면 안될 것 같은 패키지 경로, 실제 소스, 결과 등의 코드는 생략하였습니다.


[pom.xml]

필요한 의존성 추가

1
2
3
4
5
6
7
8
9
10
11
12
13
14
15
16
17
18
<dependency>
    <groupId>junit</groupId>
    <artifactId>junit</artifactId>
    <version>4.7</version>
    <scope>test</scope>
</dependency>
<dependency>
    <groupId>org.mockito</groupId>
    <artifactId>mockito-all</artifactId>
    <version>1.9.5</version>
    <scope>test</scope>
</dependency>
<dependency>
    <groupId>org.springframework</groupId>
    <artifactId>spring-test</artifactId>
    <version>3.2.2.RELEASE</version>
    <scope>test</scope>
</dependency>
cs


[ApiControllerTest.java]

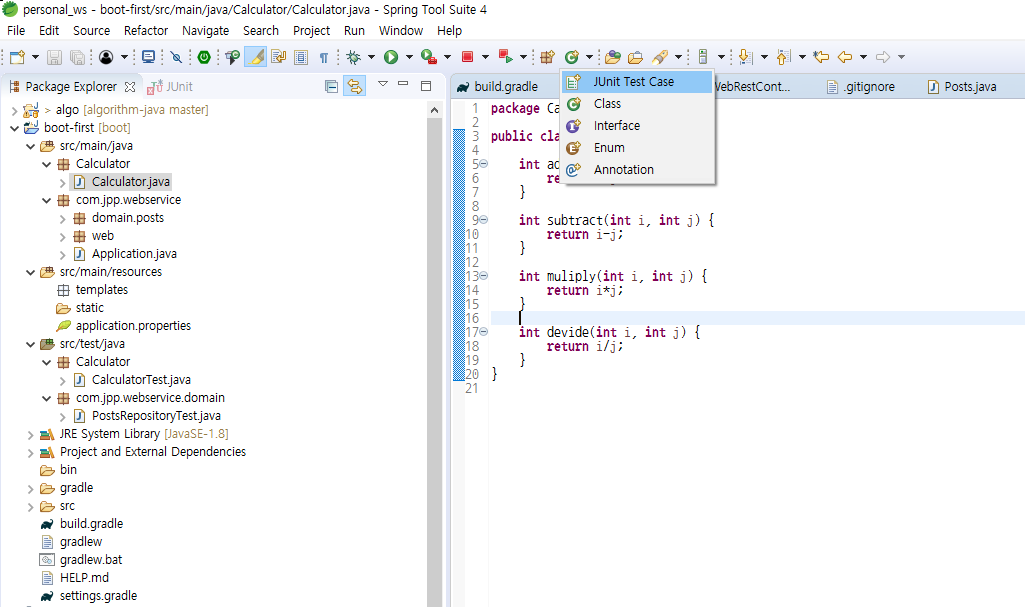
src/test/java 밑에 패키지 생성 후 아래와 같이 작성한다.

※ 테스트 케이스 생성 방법

테스트를 하고자 하는 클래스 선택 -> new -> JUnit Test Case

실제 소스 경로와 동일한 경로의 테스트 소스 경로가 만들어진다.

1
2
3
4
5
6
7
8
9
10
11
12
13
14
15
16
17
18
19
20
21
22
23
24
25
26
27
28
29
30
31
32
33
34
35
36
37
38
39
40
41
42
43
44
45
46
47
48
49
50
51
52
53
54
55
56
57
58
59
60
61
62
63
64
65
66
67
68
69
70
71
72
73
74
75
76
77
78
79
80
81
82
83
84
package ~;
import static org.springframework.test.web.servlet.request.MockMvcRequestBuilders.post;
import static org.springframework.test.web.servlet.result.MockMvcResultHandlers.print;
import java.nio.charset.Charset;
import java.util.Map;
import org.json.JSONObject;
import org.junit.Before;
import org.junit.Ignore;
import org.junit.Test;
import org.junit.runner.RunWith;
import org.mockito.InjectMocks;
import org.mockito.MockitoAnnotations;
import org.slf4j.Logger;
import org.slf4j.LoggerFactory;
import org.springframework.beans.factory.annotation.Autowired;
import org.springframework.http.MediaType;
import org.springframework.test.context.ActiveProfiles;
import org.springframework.test.context.ContextConfiguration;
import org.springframework.test.context.junit4.SpringJUnit4ClassRunner;
import org.springframework.test.context.transaction.TransactionConfiguration;
import org.springframework.test.context.web.WebAppConfiguration;
import org.springframework.test.web.servlet.MockMvc;
import org.springframework.test.web.servlet.MvcResult;
import org.springframework.test.web.servlet.result.MockMvcResultMatchers;
import org.springframework.test.web.servlet.setup.MockMvcBuilders;
import org.springframework.transaction.annotation.Transactional;
import org.springframework.web.context.WebApplicationContext;
import ~.BaseController;
import ~.IdolApiController;
import ~.IdolApiService;
@RunWith(SpringJUnit4ClassRunner.class)
@ContextConfiguration(locations = {
                  "classpath:bmp/spring/context-*.xml" 
                , "classpath:bmp/sqlmap/mybatis-config.xml" 
                , "classpath:bmp/servlet/servlet-*.xml"
              
                })
@ActiveProfiles("dev")
@TransactionConfiguration(transactionManager="txManager", defaultRollback = false)
@Transactional
@WebAppConfiguration
public class ApiControllerTest3 {
    protected static final Logger logger = LoggerFactory.getLogger(ApiControllerTest3.class);
    
    @Autowired
    private WebApplicationContext context;
    
    private MockMvc mvc;
    
    private MediaType contentType = new MediaType(MediaType.APPLICATION_JSON.getType(),
            MediaType.APPLICATION_JSON.getSubtype(), Charset.forName("utf8"));
    
    @Before
    public void setUp() throws Exception {
        mvc = MockMvcBuilders.webAppContextSetup(this.context).build();
    }
    
    
    @Test
    public void testIdolApiController() throws Exception {
        
        JSONObject jobj = new JSONObject();
        jobj.put("id""test");
        jobj.put("clientIp""172.0.0.1");
        jobj.put("content""testcontent.mpg");
        String p = jobj.toString();
        
        MvcResult rs = null;
        
        rs = mvc.perform(post("/getdata")
                                       //.content("{\"said\":\"test\", \"clientIp\":\"172.0.0.1\", \"content\":\"testcontent.mpg\"}")
                                         .content(jobj.toString())
                                         .contentType(contentType)
                        )
        .andDo(print())
        .andExpect(MockMvcResultMatchers.status().isOk())
        .andReturn();
        
        logger.debug("---------------------------");
        logger.debug("result : {}", rs.getModelAndView().getModel());
        
    }
}
 
cs

31 L : junit test 를 위해 클래스에 붙여주는 annotation

32 L : 참조할 bean 들의 설정이 잡혀있는 context 경로 (classpath/file 및 절대/상대 경로 주의)

38 L : 활성시킬 profile 지정 (profile과 관련된 내용은 여기를 참고)

39 L : 트랜잭션 설정

40 L : 트랜잭션 적용

41 L : web controller 테스트를 위한 annotation

53 L : @Before를 메소드에 달아줄 경우 @Test 실행 전에 실행된다.

55 L : MockMvc 빌드를 위한 코드 ( 정확히 모르니 추후 Mock 관련 공부를 하며 보충 )

70~77 L : 

post(url) : post 방식 호출

content(String) : body 로 전송

contentType(contentType) : 호출시 content Type 지정

andDo(print()) : 결과 출력

andReturn() : 결과값 리턴(MvcResult rs 변수에 담기)


※ context 가 아닌 특정 controller 만 주입 받아 처리하고 싶은 경우 아래와 같이..

참고 : https://thswave.github.io/java/2015/03/02/spring-mvc-test.html

@Mock
VodApiService vodApiService;
@InjectMocks
VodApiController vodApiController;
private MockMvc mvc;

@Before
public void setUp() throws Exception {
      MockitoAnnotations.initMocks(this);
      mvc = MockMvcBuilders.standaloneSetup(vodApiController).build();
}

[junit 실행 결과]

1
2
3
4
5
6
7
8
9
10
11
12
13
14
15
16
17
18
19
20
21
22
23
24
25
26
27
28
29
30
31
32
33
34
35
36
MockHttpServletRequest:
         HTTP Method = POST
        Request URI = /getData
          Parameters = {}
             Headers = {Content-Type=[application/json;charset=UTF-8]}
 
             Handler:
               Type = ~
             Method = ~
 
  Resolved Exception:
                Type = null
 
        ModelAndView:
           View name = jsonView
                View = null
           Attribute = result_msg
               value = 
           Attribute = data
              value = {~}
           Attribute = result_cd
               value = 1
 
            FlashMap:
 
MockHttpServletResponse:
              Status = 200
       Error message = null
             Headers = {Content-Type=[application/json;charset=UTF-8], Pragma=[no-cache], Cache-Control=[no-cache, no-store, max-age=0], Expires=[1]}
        Content type = application/json
               Body = {~}
       Forwarded URL = null
      Redirected URL = null
             Cookies = []
DEBUG: ~ - ---------------------------
DEBUG: ~ - result : {~}
cs


여기서 log가 debug 레벨로 잘 출력 됐음을 확인 할 수 있는데, 이는 log4j 설정이 잡혀 있는 파일 (본 프로젝트에선 log4j2.xml)을 src/test/resources 밑에 복사 붙여넣기 한 후, log 레벨을 debug 로 내렸기 때문이다.

src/main/resources 내의 log4j 설정 파일을 읽기 전에 src/test/resources 내의 log4j 설정 파일을 우선적으로 읽는다. 관련 내용은 여기를 참고.

log4j 설정 관련 글은 여기를 참고.


JNDI 를 사용하고 있는 경우, jUnit test

보통은 위와 같이 테스트 할 수 있지만,

JNDI 를 사용하여 DB 설정이 잡혀 있는 경우, 별도의 처리가 필요하다.

JNDI 설정의 경우 was 에 DB 설정 정보가 존재하며 was 구동시 이를 읽어 들이는 방식인데(정확히 모름+공부필요),

was가 아닌 JUnit 구동시 DB설정정보를 읽어들이지 못해 이와 관련된 Bean을 주입 받을 때 에러가 발생하기 때문이다.

이를 해결하는 방법은 아래와 같이 두가지 정도가 있는 듯 하다.


[방법 1 : 테스트용 context 별도 설정]

1) JNDI 설정이 잡혀있는 context-datasource.xml 을 복사하여 src/test/resources 경로 밑에 붙여넣은 후 파일명을 test-datasource.xml 로 바꿔준다.

[example]

아래와 같은 JNDI 설정을

1
2
3
<bean id="dataSource" class="org.springframework.jndi.JndiObjectFactoryBean">
  <property name="jndiName" value="java:/jdbc/testJNDI" />
</bean>
cs

아래와 같이 바꿔준다. (was에 있을 DB접속정보(jndi 설정)를 context에 직접 작성)

1
2
3
4
5
6
7
<bean id="dataSource" class="org.springframework.jdbc.datasource.DriverManagerDataSource" >
    <property name="driverClassName" value="com.mysql.jdbc.Driver"/> 
    <property name="url" value="jdbc:mysql://~:3306/~?useSSL=false&amp;serverTimezone=UTC"/> 
    <property name="username" value="~"/> 
    <property name="password" value="~"/>
</bean>
 
cs

2) 위에서 작성한 JUnit테스트 소스인 ApiControllerTest.java 를 아래와 같이 수정한다.

@ContextConfiguration 부분에 선언된 context 에 1~2) 번에서 작성한 context (jndi 설정을 걷어낸 DB설정(test-datasource.xml))를 추가한다.

1
2
3
4
5
6
@ContextConfiguration(locations = {
                  "classpath:bmp/spring/context-*.xml"
              , "classpath:test-*.xml"
                , "classpath:bmp/sqlmap/mybatis-config.xml" 
                , "classpath:bmp/servlet/servlet-*.xml"
                })
cs


위에서 언급한 log4j 설정과 마찬가지로, src/test/resources 가 src/main/resources 보다 선행돼서 읽히기 때문에 src/main/resources 밑의 context 에 선언된 Bean 과 동일한 이름의 Bean이 src/test/resources 밑의 context 에 선언돼 있어도 상관이 없는 듯 하다.


[방법 2 : JNDI 바인딩]

1) SpringJUnit4ClassRunner 를 상속받는 ExtSpringJUnit4ClassRunner 작성.

1
2
3
4
5
6
7
8
9
10
11
12
13
14
15
16
17
18
19
20
21
22
23
24
25
26
27
28
29
30
31
32
33
34
35
36
package ~;
 
import org.junit.runners.model.InitializationError;
import org.springframework.jdbc.datasource.DriverManagerDataSource;
import org.springframework.jndi.JndiTemplate;
import org.springframework.mock.jndi.SimpleNamingContextBuilder;
import org.springframework.test.context.junit4.SpringJUnit4ClassRunner;
 
public class ExtSpringJUnit4ClassRunner extends SpringJUnit4ClassRunner {
 
    public ExtSpringJUnit4ClassRunner(Class<?> clazz) throws InitializationError {
        super(clazz);
        // TODO Auto-generated constructor stub
        try {
            bindJndi();
        } catch (Exception e) {
            
        }
    }
    
    private void bindJndi() throws Exception {
        SimpleNamingContextBuilder builder = new SimpleNamingContextBuilder();
        builder.activate();
        
        JndiTemplate jt = new JndiTemplate();
        
        DriverManagerDataSource ds = new DriverManagerDataSource();
        ds.setDriverClassName("com.mysql.jdbc.Driver");
        ds.setUrl("jdbc:mysql://~:3306/~?useSSL=false&amp;serverTimezone=UTC");
        ds.setUsername("~");
        ds.setPassword("~");
        
        jt.bind("java:/jdbc/testJNDI", ds);
    }
}
 
cs

위와 같이 Jndi 바인딩을 java 소스로 처리.

관련 부분은 여기를 참고했음.

(이런식으로 JNDI 설정을 잡아줄 수 있는 걸 보면 다른 부분 설정도 이와 비슷하게 처리가 가능할 듯)


2) 위에서 작성한 JUnit테스트 소스인 ApiControllerTest.java 를 아래와 같이 수정한다.

1
@RunWith(ExtSpringJUnit4ClassRunner.class)
cs

SpringJUnit4ClassRunner 대신 위에서 작성한 ExtSpringJUnit4ClassRunner를 사용한다.

나머지 부분은 동일하다.

(jndi 설정을 java소스(ExtSpringJUnit4ClassRunner.java)에서 잡아주었으므로 방법 1과 같이 별도의 context 를 @ContextConfiguration에 추가해줄 필요가 없다)


JUnit 사용시 Maven Build 주의사항

JUnit을 사용하여 테스트를 하고 있고 Maven Build 로 war 파일을 생성하고 있다면 주의해야 할 점.

테스트 코드 결과가 실패인 경우, Maven Build 의 결과가 Failure (실패)로 떨어진다.

이땐 아래와 같이 해결한다.


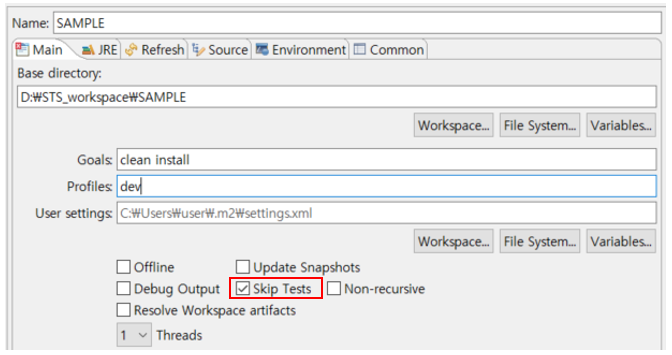
[방법 1 : UI 에서 build option 지정]

프로젝트 우클릭 > Run Configurations.. > 좌측 리스트에서 Maven Build 중 해당 프로젝트 선택 > skip Tests 옵션 체크


[방법 2 : pom.xml 에 build option 수정]

1
2
3
4
5
6
7
8
9
 <plugin>
    <groupId>org.apache.maven.plugins</groupId>
    <artifactId>maven-surefire-plugin</artifactId>
    <version>2.18.1</version>
    <configuration>
        <useSystemClassLoader>false</useSystemClassLoader>
        <skipTests>true</skipTests>
    </configuration>
</plugin>
cs

위에서 7번라인과 같이 skipTests 옵션 true 지정.

해당 내용은 여기를 참고했음.


전체적인 JUnit에 대한 설명 및 설정등은 여기를 참고했음.

(이것저것 공부하고 관련 레퍼런스 찾아보고 블로그/깃헙 돌아다니다 보면 이상하리만큼 자주 도달하게 되는 곳이 있는데 그중 하나인 곳.. 항상 감사드립니다..)


본 포스팅은 다른 포스팅들과 마찬가지로 수시로 수정 및 업데이트 하겠습니다.


참고 :

https://effectivesquid.tistory.com/entry/Spring-test-%EC%99%80-Junit4%EB%A5%BC-%EC%9D%B4%EC%9A%A9%ED%95%9C-%ED%85%8C%EC%8A%A4%ED%8A%B8

반응형

www.ibatis.com 폐쇄로 dtd 경로 로 지정 불가. 

www.ibatis.com 을 ibatis.apache.org/dtd 로 수정해줘야함.


[잘못된(폐쇄된) dtd 경로]

<!DOCTYPE sqlMapConfig PUBLIC "-//iBATIS.com//DTD SQL Map Config 2.0//EN" "http://www.ibatis.com/dtd/sql-map-config-2.dtd">

[정상 dtd 경로]

<!DOCTYPE sqlMapConfig PUBLIC "-//iBATIS.com//DTD SQL Map Config 2.0//EN" "http://ibatis.apache.org/dtd/sql-map-config-2.dtd">


참고 :

https://storing.tistory.com/105


반응형

[Generic (제네릭)]

클래스 내부에서 사용할 데이터 타입을 인스턴스 생성시 확정하는 것을 제네릭이라 한다.

제네릭은 다양한 타입의 객체를 다루는 메소드 및 컬렉션 클래스를 컴파일 시, 타입 체크를 해주는 기능을 한다.

객체 타입을 컴파일 시에 체크하기 때문에 객체의 타입 안정성을 높이고 형변환의 번거로움을 줄인다.


※ ArrayList 같은 컬렉션 클래스는 다양한 종류의 객체를 담을 수 있지만, 보통 아래와 같이 한 종류의 객체를 담는 경우가 더 많다. 또한 꺼낼 때 마다 타입체크를 하고 형변환 하는 것은 아무래도 불편할 수 밖에 없는데, 제네릭이 이와 같은 불편함 들을 해소해준다.

List<Person> list = new ArrayList<>();
list.add(new Person("영심이"));
list.add(new Person("홍길동"));
list.get(0);


1. 제네릭 타입

타입을 파라미터(<T>)로 가지는 클래스 혹은 인터페이스

타입 파라미터(<T>) 를 클래스 혹은 인터페이스 명 뒤에 두어 선언

public class Sample<T>{}
public interface Sample<T>{}

[Print.class (제네릭 타입)]

1
2
3
4
5
6
7
8
9
10
11
12
13
14
15
package Java.Generic;
 
public class Print<T> {
    
    private T text;
    
    public void setText(T text) {
        this.text = text;
    }
    
    public void printText() {
        System.out.println(text);
    }
}
 
cs


[Main.class]

p.text 는 String,

b.text 는 Integer(int) 데이터 타입을 갖게된다.

: 제네릭을 사용하여 클래스를 정의할 때 데이터 타입을 정하지 않고, 인스턴스를 생성할 때 타입을 저장


※ jdk 1.7 버전 이상은 실제 타입 생략 가능

Print<Integer> p = new Print<>();  // Print<Integer> p = new Print<Integer>(); 와 같음

※ Raw Type : 타입 매개변수가 없는 제네릭 클래스

generic은 jdk 1.5 버전에 지원됐으며, 1.5 버전 이전의 소스와 문제가 생기는걸 방지하기 위해 Raw Type 을 허용

아래와 같이 데이터타입을 주지 않고 선언 할 경우 데이터 타입(타입 매개변수)은 Object로 간주한다.

List list = new ArrayList<>();   //List<Object> list = new ArrayList<>(); 와 같음

[제네릭의 장점]

1. 타입안정성 제공 :

명시한 타입의 데이터가 아닌 다른 형태의 데이터 타입으로의 형변환을 방지 (위 Main.class 의 8번, 14번 참고)

2. 타입체크와 형변환 생략 가능 :

다룰 객체의 데이터 타입을 미리 명시


[다중 타입매개변수]

타입매개변수가 N개인 경우, 아래와 같이 사용 가능

1
2
3
4
5
6
7
8
9
10
11
12
13
14
15
16
17
18
19
20
21
package Java.Generic;
 
public class Pair<K, V> {
 
    private K key;
    private V value;
    
    public Pair(K key, V value){
        this.key = key;
        this.value = value;
    }
    
    public K getKey() {
        return key;
    }
    
    public V getValue() {
        return value;
    }    
}
 
cs

Client(호출부)

Pair<String, Integer> pair1 = new Pair<>("key1", 1);
System.out.println(pair1.getKey());    //key1
System.out.println(pair1.getValue());  //1

Pair<Integer, Integer> pair2 = new Pair<>(1, 2);
System.out.println(pair2.getKey());     //1
System.out.println(pair2.getValue());   //2

[제네릭과 다형성]

public class Print{}
public class ChilePrint extends Print{}

위처럼 Print 클래스, 이를 상속하는 ChildPrint 클래스가 있을 때

아래와 같이 사용 가능.

1
2
3
4
5
6
7
8
9
10
public class Client {
    public static void main(String[] args) {
        List<Print> list = new ArrayList<>();
        list.add(new Print());
        list.add(new ChildPrint());
        
        Print p = list.get(0);
        ChildPrint cp = (ChildPrint)list.get(0);    
    }
}
cs

Print 를 상속하는 ChildPrint 는 Print 타입파라미터를 갖는 list 인스턴스에 add 할 수 있다.


2. 제네릭 메소드

리턴 타입 및 매개변수 타입을 타입 매개변수로 갖는 메소드

일반 클래스의 메소드에서도 타입 매개변수를 사용하여 제네릭 메소드 정의 가능

리턴타입 앞에 타입 매개변수(<>)를 추가한 후, 리턴타입과 매개타입을 타입 매개변수로 사용가능


[Cart.class]

1
2
3
4
5
6
7
8
9
10
11
12
13
14
15
16
17
18
19
20
21
22
23
package Java.Generic;
 
import java.util.ArrayList;
import java.util.List;
 
public class Cart<T> {
    
    private List<T> items;
    
    public Cart() {
        if(items == null)items = new ArrayList<>();
    }
    
    public void setItem(T item) {
        this.items.add(item);
    }
    
    public List<T> getItems() {
        return items;
    }
    
}
 
cs

[Calculator.class (제네릭 메소드)]

1
2
3
4
5
6
7
8
9
10
11
12
package Java.Generic;
 
public class Calculator {
    public static <T> int add(Cart<T> cart1, Cart<T> cart2) {
        int result = 0;
        
        result = cart1.getItems().size() + cart2.getItems().size();
        
        return result;
    }
}
 
cs

[Client.class (호출부)]

1
2
3
4
5
6
7
8
9
10
11
12
13
14
15
16
17
package Java.Generic;
 
public class Client {
    public static void main(String[] args) {
        
        Cart<String> cart1 = new Cart<>();
        cart1.setItem("초콜렛");
        cart1.setItem("슬리퍼");
        
        Cart<String> cart2 = new Cart<>();
        cart2.setItem("생수");
        
        int totalSize = Calculator.add(cart1, cart2);
        System.out.println(totalSize);  // 3
        
    }
}
cs


3. 타입 파라미터의 제한

상속 및 구현 관계를 이용하여 타입 제한

※ 상위 타입이 interface인 경우에도 extends 키워드 사용.

public <T extends 상위타입> 리턴타입 메소드(매개변수, ...) {...}

[Product.class]

최상위 클래스

1
2
3
4
5
6
7
8
9
10
11
12
13
14
15
package Java.Generic;
 
public class Product {
    
    private String product;
    
    public void setProduct(String product) {
        this.product = product;
    }
    
    public String getProduct() {
        return this.product;
    }
}
 
cs

[Food.class]

Product를 상속받는 하위 클래스

1
2
3
4
package Java.Generic;
 
public class Food extends Product{}
 
cs

[Fruit.class]

Food 를 상속받는 하위 클래스

1
2
3
4
package Java.Generic;
 
public class Fruit extends Food{}
 
cs

[Cart.class]

1
2
3
4
5
6
7
8
9
10
11
12
13
14
15
16
17
18
19
20
21
22
23
package Java.Generic;
 
import java.util.ArrayList;
import java.util.List;
 
public class Cart<T> {
    
    private List<T> items;
    
    public Cart() {
        if(items == null)items = new ArrayList<>();
    }
    
    public void setItem(T item) {
        this.items.add(item);
    }
    
    public List<T> getItems() {
        return items;
    }
    
}
 
cs

[Calculator.class (제네릭 메소드)]

타입 파라미터를 Food 로 제한한다. (Food 혹은 Foor 하위 클래스만 타입 파라미터로 받을 수 있다)

1
2
3
4
5
6
7
8
9
10
11
12
package Java.Generic;
 
public class Calculator {
    public static <extends Food> int add(Cart<T> cart1, Cart<T> cart2) {
        int result = 0;
        
        result = cart1.getItems().size() + cart2.getItems().size();
        
        return result;
    }
}
 
cs

[Client.class (호출부)]

1
2
3
4
5
6
7
8
9
10
11
12
13
14
15
16
17
18
19
package Java.Generic;
 
public class Client {
    public static void main(String[] args) {
        
        Cart<Food> cart1 = new Cart<>();
        Product p = new Food();
        p.setProduct("초콜릿");
        cart1.setItem((Food)p);
        
        Cart<Food> cart2 = new Cart<>();
        Product p2 = new Food();
        p2.setProduct("과자");
       cart2.setItem((Food)p2);
        
        int totalSize = Calculator.add(cart1, cart2);
        System.out.println(totalSize);
    }
}
cs

※ 해당 메소드 호출 시, 타입 파라미터를 섞어서 사용 할 수 없다.

: 16번 라인의 .add(...) 호출 시, 넘겨주는 매개변수 cart1 의 타입 파라미터(6번 라인의 Cart<Food>)에 의해 .add(...) 메소드의 타입파라미터(Calculator.class의 4번 라인의 <T>)가 정해진다.


예를 들어, 아래와 같은 경우

14번 라인에서 빨간줄이 그어진다. 

cart3 의 Fruit 으로 .add(...) 메소드의 타입파라미터가 정해지지만, Food 를 담고있는 cart4 를 매개변수로 넣으려고 하고 있으므로 not applicable for the arguments 에러가 발생한다.

1
2
3
4
5
6
7
8
9
10
11
12
13
14
15
16
package Java.Generic;
 
public class Client {
    public static void main(String[] args) {
        
        Cart<Food> cart1 = new Cart<>();
        Calculator.add(cart1, cart1);
        
        Cart<Fruit> cart2 = new Cart<>();
        Calculator.add(cart2, cart2);
                
        Cart<Fruit> cart3 = new Cart<>();
        Cart<Food> cart4 = new Cart<>();
        Calculator.add(cart3, cart4);    //compile error
    }
}
cs


4. 와일드카드

1. 제네릭 타입<?>: Unbounded Wildcards(제한 없음)

  타입 파라미터로 모든 클래스나 인터페이스 타입이 올 수 있다.

2. 제네릭 타입<? extends 상위 타입>: Upper Bounded Wildcards(상위 클래스 제한)

  타입 파라미터로 상위 타입의 하위 타입만 올 수 있다.

3. 제네릭 타입<? super 하위 타입>: Lower Bounded Wildcards(하위 클래스 제한)

  타입 파라미터로 하위 타입의 상위타입만 올 수 있다.


[example]

public class Product {}
public class Food extends Product {}
public class Fruit extends Food {}

[Calculator.class : 타입 파라미터 제한과 와일드카드 사용의 차이]

add1(...) : 타입 파라미터를 제한

add3(...) : 와일드카드를 사용하여 매개변수의 타입을 제한

1
2
3
4
5
6
7
8
9
10
11
12
13
14
15
16
17
18
19
20
21
22
23
24
25
26
27
28
29
30
31
package Java.Generic;
 
public class Calculator {
    public static <extends Food> int add1(Cart<T> cart1, Cart<T> cart2, Cart<T> cart3) {
        //제네릭 메소드에서의 타입 파라미터의 제한
        //타입파라미터를 Food 로 제한
        //매개변수는 타입파라미터인 T를 갖는 Cart이며, T는 Food 및 Food 의 subclass 로 제한
        int result = 0;
        result = cart1.getItems().size() + cart2.getItems().size() + cart3.getItems().size();
        return result;
    }
    
//    public static <T super Food> int add2(Cart<T> cart1, Cart<T> cart2, Cart<T> cart3) {    
//        //제네릭 메소드에서 타입 파라미터를 제한할 때 위와 같은 super키워드는 불가 
//        //compile error
//        int result = 0;
//        result = cart1.getItems().size() + cart2.getItems().size() + cart3.getItems().size();
//        return result;
//    }
    
    public static int add3(Cart<super Food> cart1, Cart<?> cart2, Cart<extends Food> cart3) {
        //매개변수의 타입을 와일드카드 (?)를 사용하여 제한
        //cart1 맥대변수(Cart)의 타입파라미터 : Food 및 Food 를 subclass 
        //cart2 매개변수(Cart)의 타입파라미터 : 아무 타입이나 담고있는 Cart
        //cart3 매개변수(Cart)의 타입파라미터 : Food 및 Food 의 subclass
        int result = 0;
        result = cart1.getItems().size() + cart2.getItems().size() + cart3.getItems().size();
        return result;
    }
}
 
cs

[Client.class]

1. add1사용

1
2
3
4
5
6
7
8
9
10
11
12
13
14
15
16
17
18
package Java.Generic;
 
public class Client {
    public static void main(String[] args) {
        
        Cart<Food> cart1 = new Cart<>();
        Calculator.add1(cart1, cart1, cart1);    //타입파라미터를 Food 로 지정
        
        Cart<Fruit> cart2 = new Cart<>();
        Calculator.add1(cart2, cart2, cart2);    //타입파라미터를 Fruit 으로 지정
        
        Cart<Fruit> cart3 = new Cart<>();
        Cart<Food> cart4 = new Cart<>();
        Calculator.add1(cart3, cart3, cart4);    //car3 매개변수에 의해 Fruit 으로 타입파라미터가 정해지지만, cart4 Food를 넣으려하기 때문에 Compile Error
        
    }
}
 
cs

2. add3 사용

1
2
3
4
5
6
7
8
9
10
11
12
13
14
15
16
17
18
19
20
21
22
23
24
25
package Java.Generic;
 
public class Client {
    public static void main(String[] args) {
        
        Cart<Product> cart1 = new Cart<>();
        Product p = new Product();
        p.setProduct("바가지");
        cart1.setItem(p);
        
        Cart<String> cart2 = new Cart<>();
        cart2.setItem("연필");
        
        Cart<Fruit> cart3 = new Cart<>();
        Product p2 = new Fruit();
        p2.setProduct("사과");
        Product p3 = new Fruit();
        p3.setProduct("수박");
        cart3.setItem((Fruit)p2);
        cart3.setItem((Fruit)p3);
        
        int totalSize = Calculator.add3(cart1, cart2, cart3);
        System.out.println(totalSize);
    }
}
cs


※ 

E - Element (used extensively by the Java Collections Framework)

K - Key

N - Number

T - Type

V - Value


참고:

https://devbox.tistory.com/entry/Java-%EC%A0%9C%EB%84%A4%EB%A6%AD

https://movefast.tistory.com/74

https://ict-nroo.tistory.com/42


반응형

'back > java' 카테고리의 다른 글

[Java] lambda 람다 2 (메소드참조)  (0) 2020.01.17
[Java] lambda 람다 1 (기본문법)  (0) 2020.01.15
[Java] Compile  (0) 2019.12.22
[Java] Collection Framework  (0) 2019.12.21
Comparator, Comparable + Arrays.sort() 그리고 인터페이스..  (0) 2019.09.02


1. 테스트를 위한 계산기 작성

1
2
3
4
5
6
7
8
9
10
11
12
13
14
15
16
17
18
19
20
21
package Calculator;
 
public class Calculator {
    
    int add(int i, int j) {
        return i+j;
    }
    
    int subtract(int i, int j) {
        return i-j;
    }
    
    int muliply(int i, int j) {
        return i*j;
    }
    
    int devide(int i, int j) {
        return i/j;
    }
}
 
cs


2. junit 테스트 케이스 생성

1) 클래스 생성 버튼 우측의 화살표 버튼을 눌러 JUnit Test Case 선택


2) JUnit Test 를 위한 JUnit 클래스 생성

Test 대상 Class뒤에 Test 를 붙여 이름을 짓는게 관례(Calculator+Test)


3. junit 테스트 케이스 작성

1) 기본적으로 생성된 test() 메소드 제거 후 아래와 같이 코딩

: add() 메소드 테스트

: assertEquals 는 버전에 따라 deprecated 된 메소드가 있으니 잘 보고 사용

1
2
3
4
5
6
7
8
9
10
11
12
13
14
15
16
17
package Calculator;
 
import static org.junit.Assert.*;
 
import org.junit.Test;
 
public class CalculatorTest {
 
    @Test
    public void add() {
        Calculator cal = new Calculator();
        cal.add(12);
        assertEquals(""33);
    }
 
}
 
cs


2) 지역 변수 cal 을 필드로 빼서 사용하기

11번라인의 Calculator cal = new Calculator(); 를 8번 라인으로 빼서 필드로 사용이 가능하나, @Before를 사용하자.

필드 초기화를 전역에서 명시적으로 수행할 경우, 테스트간 독립성이 보장되지 않는다.

반면 @Before 사용시 add(), devide() 와 같은 테스트 메소드 실행시마다 인스턴스를 초기화 하여 

테스트간 독립성이 보장된다.

1
2
3
4
5
6
7
8
9
10
11
12
13
14
15
16
17
18
19
20
21
22
23
24
25
26
27
28
29
30
31
32
33
34
35
36
37
38
39
package Calculator;
 
import static org.junit.Assert.*;
 
import org.junit.After;
import org.junit.Before;
import org.junit.Test;
 
public class CalculatorTest {
 
    private Calculator cal;
    
    @Before
    public void setup() {
        cal = new Calculator();
        System.out.println("setup !!!");
    }
    
    @Test
    public void add() {
        int r = cal.add(23);
        assertEquals("sc"5, r);
        System.out.println("add !!!");
    }
 
    @Test
    public void devide() {
        int r = cal.devide(33);
        assertEquals("success"1, r);
        System.out.println("devide !!!");
    }
 
    @After
    public void teardown() {
        System.out.println("teardown !!!");
    }
    
}
 
cs


[실행 결과]

setup !!!
devide !!!
teardown !!!
setup !!!
add !!!
teardown !!!

위처럼 @Before, @After 는 테스트 메소드 실행시마다 호출됨을 확인 할 수 있다.


참고 : 박재성님의 유투브 강의 https://www.youtube.com/watch?v=tyZMdwT3rIY

반응형

1. Telescoping Pattern (텔레스코핑 패턴)

생성자와 오버로딩을 사용하는 패턴

1
2
3
4
5
6
7
8
9
10
11
12
13
14
15
16
17
18
19
20
21
22
package design_pattern.builder;
public class CoordinateTelescoping {
    //텔레스코핑 생성자 패턴
    //Telescoping constructor
 
    private final int x;
    private final int y;
    private int w;
    private int h;
    
    public CoordinateTelescoping(int x, int y) {
        this(x, y, 00);
    }
    public CoordinateTelescoping(int x, int y, int w, int h) {
        this.x = x;
        this.y = y;
        this.w = w;
        this.h = h;
    }
    
}
 
cs

매개변수 증가시 코드량이 많아지고 무거워지는 문제,

초기화가 필요 없는 값도 무조건적으로 넘겨야 하는 경우가 존재


2. JavaBean Pattern (자바빈 패턴)

getter, setter 사용하는 패턴

(일반적으로 많이 사용되는 Value Object)

1
2
3
4
5
6
7
8
9
10
11
12
13
14
15
16
17
18
19
20
21
22
23
24
25
package design_pattern.builder;
public class CoordinateJavaBean {
    //자바 빈 패턴
    //java bean pattern
    
    private int x=0;
    private int y=0;
    private int w=0;
    private int h=0;
    
    public void setX(int x) {
        this.x = x;
    }
    public void setY(int y) {
        this.y = y;
    }
    public void setW(int w) {
        this.w = w;
    }
    public void setH(int h) {
        this.h = h;
    }
    
}
 
cs

객체가 완전하게 생성되었는지 보장 불가(동결(freezing) 보장 불가)

CoordinateJavaBean b = CoordinateJavaBean();
b.setX(10);

위 경우 x 값만 set한 채 객체를 사용할 수 있으므로 객체가 완전하게 생성되지 않은 상태


3. Builder Pattern (빌더 패턴)

텔레스코핑패턴 + 자바빈 패턴의 형태

초기화가 반드시 필요한 멤버변수는 생성자로,

선택적으로 초기화를 해도 되는 필드는 setter 메소드로 작성

1
2
3
4
5
6
7
8
9
10
11
12
13
14
15
16
17
18
19
20
21
22
23
24
25
26
27
28
29
30
31
32
33
34
35
36
37
38
39
40
41
42
43
44
45
46
package design_pattern.builder;
 
public class CoordinateBuilder {
    //빌더 패턴
    //Builder pattern : 텔레스코핑 패턴 + 자바빈 패턴
 
    private final int x;
    private final int y;
    private final int w;
    private final int h;
    
    public static class Builder {
        private final int x;
        private final int y;
        private int w;
        private int h;
        
        public Builder(int x, int y) {
            this.x = x;
            this.y = y;
        }
        
        public Builder setW(int w) {
            this.w = w;
            return this;
        }
        
        public Builder setH(int h) {
            this.h = h;
            return this;
        }
        
        public CoordinateBuilder build() {
            return new CoordinateBuilder(this);
        }
    }
    
    public CoordinateBuilder(Builder builder) {
        x = builder.x;
        y = builder.y;
        w = builder.w;
        h = builder.h;
    }
    
}
 
cs

[객체 생성]

CoordinateBuilder c = new CoordinateBuilder.Builder(10, 10).setW(5).setH(5).build();

생성자로 필수 맴버변수를 초기화 하는 객체 생성, 선택적으로 초기화가 필요한 멤버변수는 setter 사용,
마지막으로 build 를 호출하여 객체 리턴


참고 :

https://using.tistory.com/71


반응형

일반 프로그램은 하드웨어 위에서 하드웨어를 제어하기 위한 OS 동작,

OS 위에서 프로그램이 실행.

그래서 프로그램을 OS 마다 다르게 제작.

윈도우에서 동작하는 프로그램, 리눅스에서 동작하는 프로그램.

반면 자바는 OS 위에 JVM(java virtual machine) 존재하여 jvm 위에서 프로그램이 실행되기 떄문에 운영체제에 의존적이지 않음.

운영체제 상관없이 자바 프로그램 실행이 가능


일반 프로그램 hardware > OS(operating system) > program

자바 프로그램 hardware > OS(operating system) > jvm > java program


컴파일 과정 :

개발자가 작성한 자바 코드를 컴파일러가 기계어인 자바 바이트 코드(.class)로 변환,

변환된 코드를 인터프리터가 한줄 씩 실행시키며 애플리케이션을 실행.


자바 코드 --컴파일러--> 자바 바이트 코드(class) --인터프리터--> 애플리케이션 실행

https://moomini.tistory.com/13


반응형

+ Recent posts